Purge G/L Journal History
|
|
| Screen ID: | PPURGG-01 |
| Screen Title: | Purge General Ledger History |
| Panel Number: | 4896 |
| Accessed by Tool Number: |
5174 |
You will need to enter Y and press Enter on the entry screen. See Special Conditions note below.
Special Conditions Apply Before Using the G/L Purge
Because the General Ledger files sometimes retain an OBJECT LOCK until the CU*BASE sign-off is performed, we recommend that everyone signs off of CU*BASE before this purge is processed.
Use the iSeries command to COPY the file you are going to purge to provide a backup file in QUERYxx. For example GLHIST can be named GLHIST2. This way you have the option to copy back this file to FILExx without losing any G/L data. Once the purge is completed successfully and verified, the copied file in QUERYxx can be deleted.
On the previous screen, you can answer "Yes" to the question of whether to run the purge between BOD and EOD. Enter a "Y" and press Enter. This will take you to this screen.
Using this Screen
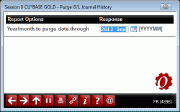
After the GLHIST file is copied, enter your date (YYYYMM) in the "Year/month to purge data through" field on this screen and press Enter to perform the purge. A confirmation screen will appear listing the month through which you are performing the purge. Use Delete (F16) to confirm the purge.
For CU*Answers on-line credit unions, this purge is run this monthly. Twenty-four months of G/L history is retained. Each month, the oldest month is purged.
A report is generated after the purge. In your spool file, this report has a user data of PPURGG and will route with a RDY status to the Printer ID. Rerouting this file to a virtual printer or HOLDxx is recommended. Since each credit union now may have alternative report archival ‘e-doc’ vaults, follow credit union policy to perform your preferred archival procedure.