Configuring Laser Notices (Notice Event Detail Configuration)
|
Screen ID: Screen Title: Panel Number: |
UNPURP-02 Notice Event Detail Configuration 5531 |
-
For complete information about configuring and printing laser member notices, refer to the Member Notices: Configuring and Printing CU-Defined Laser Notices and e-Notices booklet.
-
For directions on specifically configuring Opt In and/or Opt Out notices, refer to Opt In/Opt Out (Reg E) – Managing Your Offering.
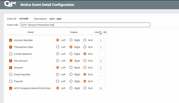
The second screen is used to define an event title and choose which account data should be included as part of the event.
Select the column “Left” or “Right” in front of any item you wish to include for this event. This will determine where text should appear. Then enter a sequential line number (up to 40, depending on the number of fields shown) to indicate the order in which the items should be listed. If you do not wish to include a particular field on the form, simply clear all of the fields for that item.
When done, use Enter to proceed to the third and final screen.
