Defining Custom (Calculated) Fields
|
Screen ID: Screen Title: Panel Number: |
Report Builder (Query) Define Result Fields QRYDEF |
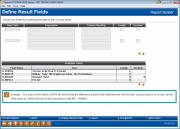
This screen appears when you select the “Create custom fields” option on the Report Builder Main Menu.
This screen is used to create a new field by combining the data in two or more other fields. It could be used for many different purposes, but the most common is to perform mathematical calculations using other fields and/or constant values. (See “Field Descriptions” below the examples for more information about filling in all of the fields on this screen.)
·CU*TIP: To view information about more complex types of expressions describes in IBM Query Help, press F1 while in the Expression field. The screen will “drop to green” and display IBM help in the emulator mode.
Understanding Date Formats
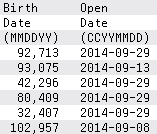
With the File Expansion Project in 2014, CU*Answers began reformatting date fields into an easier to use ISO format. In the example below, BTDATE (from MASTER) is an old date, whereas OPENDAT (from MEMBER1) is in the new format. ISO-formatted dates are always 10 digits in length and are a special date format, identified by the 'L' in the Decimal column. As you can see, ISO formatted dates are already formatted to show a more easy to read date (YYYY-MM-DD) versus the old format that is displayed as a numerical value requiring formatting. Each format has different ways in which it can be used to create custom fields. See the next section to see some examples.

Custom Field Examples
The following examples show some handy ways you can use this screen to manipulate CU*BASE data fields.
Example 1: Reformatting an ISO formatted Date
ISO dates are different from all other dates in the system which follow the rules of formatting any numeric field. ISO dates will always appear as CCYY-MM-DD, but if you want to reformat the date for the purposes of its presentation on a report, options exist.
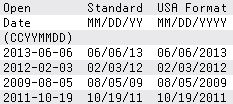
In the following example, two new fields were created from the OPENDAT field. DATE(field_name) creates a standard MM/DD/YY formatted date field. CHAR(field_name,USA) creates a text field in the MM/DD/YYYY format. The result below shows the three fields, all with the same information, but different presentations side-by-side.

Result:
Example 2: Extracting a Portion of an ISO formatted Date
Suppose you wish to pull out the month portion of the 10-digit open date field OPENDAT so that it can be used to select members who opened their account in a certain month.
In the following example, the MONTH expression is used to extract the two digit month that the account was opened. This results in a numeric field. To extract the day or year, use the expressions DAY and YEAR respectively.

Example 3: Extracting a Portion of a non-ISO formatted Date
Suppose you wish to pull out the month portion of the 6-digit birthdate field BTDATE so that it can be used to select members born in a certain month.
In the following example, the DIGITS expression is used to convert the birthdate field into a character string, then the SUBSTR (substring) expression is used to pull out just the first two characters. Remember that this results in a text field, not a numeric field.

HINT: SUBSTR(BTDATETEXT,1,2) means start at the 1st character in the BTDATETEXT field and pull out 2 characters. The expression SUBSTR(BTDATETEXT,5,2) would start at the 5th character and pull out two characters).
Example 4: Combining Month, Day and Year into a Single Date Field
In the following sample, the LASTTRAN field was created to combine the contents of three separate fields containing a year, month and day, into a single field formatted as a complete date. (This is necessary only for a non-ISO formatted date.)
![]()
Assuming a last transaction year of 03, a last transaction month of 05, and a last transaction day of 15, here's how the expression works:
|
03 |
* |
10000 |
= |
030000 |
|
05 |
* |
100 |
= |
500 |
|
15 |
|
|
= |
15 |
|
|
|
|
|
030515 |
(This result can then be formatted with a date separator to appear as 03/05/15. Click for details on setting up this format.)
NOTE: With FEP, in many cases separate month, day, and year fields were combined into new ISO-formatted dates, which no longer necessitates manually combining fields into a single date field. For example, DTOMTH, DTODAY, and DTOYR were combined to create a single OPENDAT field.
Example 5: Performing Calculations on Numeric Fields
A simpler example of a mathematical calculation would be to take the data from a numeric field and add, subtract, multiply or divide by another field or a constant value. For example, we could define a field called CONTGLIB which finds the difference between the disbursement limit and the current balance on a loan, to show the contingent liability amount. Here's how the expression would be written:
![]()
Example 6: Calculating Days Between Two ISO Date Fields
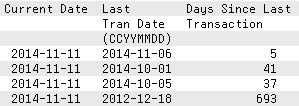
Suppose you wish to calculate the number of days between the current date and the last transaction date. ISO-formatted dates allow you to do that!
In the following example, the DAYS expression can be used with a calculation to determine the number of days between two ISO dates.

Result:
Example 7: Using Concatenate to Combine Text
On occasion you may be asked by a third-party vendor to provide a database file, where some of the data that normally appears in separate fields needs to be combined into a single field. For example, a vendor may require that a member's full name be in a single field, rather than separate first, last, and middle initial fields.
To do this the fields you are combining must be text fields. If you need to combine numeric fields, you must first define custom fields that convert the numbers to text, then define another field that concatenates the custom text fields.
In this example, a member's full name is combined into a single field:
![]()
·
IMPORTANT:
This field will still contain spaces after the last and first name, for
names that are shorter than the full field length of 15 characters (for
last name) and 14 characters (for first name).
For example: “SMITH
JOHN A”
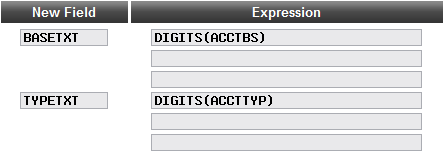
In the following example, the Account Base and Account Type fields are converted to text, then combined into a single field:
![]()
· NOTE: Fields that are converted using the DIGITS feature will have leading zeros (such as 000001234 or 001).
Field Descriptions
|
Field Name |
Description |
|
New Field |
Enter a name for the new custom field. Use no more than ten (10) numeric or alphabetic characters. The name must be different from any other existing field name. |
|
Expression |
Enter an expression to show the mathematical calculation or other computation you wish to be done, such as + (add), - (subtract), * (multiply) or / (divide). This can also be a special expression to join blocks of text together or split the contents of a field into smaller pieces. You may use one or more of the three lines provided for long expressions (text will automatically wrap; do not add extra spaces). CU*TIP: To view information about more complex types of expressions describes in IBM Query Help, press F1 while in the Expression field. The screen will “drop to green” and display IBM help in the emulator mode. |
|
Column Heading |
This field can be used to specify a heading that will appear above this field on the Query report. IMPORTANT: Any column heading defined in the Format Columns screen will take precedence over the heading entered here, so this field can be left blank if you plan to set up column headings separately. |
|
Length |
If you want to define the length of the result field, you may enter a figure here. However, leave the field blank and the system will use the optimum length for the data. |
|
Decimal |
If you want to define the number of decimal digits for the result field, you may enter a figure here. However, leave the field blank and the system will use the appropriate length depending on the type of calculation being performed. |
