Custom Account Field Configuration (2)
| Screen ID: | UCUCFMBC-02 | 
|
| Screen Title: | Custom Account Field Configuration | |
| Panel ID: | 192 | |
| Tool Number: | 1065 | |
| Click here to magnify |
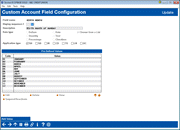
Access this screen by selecting a custom field on the entry custom account field configuration screen and then Edit or View. This is also accessed when creating a new custom account field by selecting Add Value (F6) on the entry screen.
This screen uses Unique Data Management (UDM). Contact the Asterisk Intelligence Team for more details.
The Concept of Custom Data Collection
Discussions about Big Data usually revolve around the possibilities of the insights from observing and analyzing data about your members and their interactions with your credit union. But eventually the conversations always circle back around to, “this analysis could yield even more if I just had a way to gather data about _________ and ________, too.”
This feature allows you to branch out from the traditional name-rank-and-serial-number details in CU*BASE membership files to log social and life-cycle data and assists your credit union with collecting member relationship and your interactions with members via automated channels. Use the custom membership fields and the associated custom account fields to “fill in the gaps” in member accounts and to give your credit union data analysts and thinkers a new opportunity to design the core processing database of the future.
How Collection and Viewing of Custom Account Data Works
Using custom fields your credit union can create and maintain unlimited custom fields that are unique to your credit union. You define the field name as well as the rules that control what data can be entered: dollar amounts, quantity, percentage, text, yes/no checkbox, date, or a defined list (the selections of which you will also define) on this screen. Data is collected and viewed from the screen accessed by clicking the Custom Fields button in the Account Update screens, such as the Closed-End Loan Account Update screen, and viewed in Account Inquiry screens, such as the Loan Account Inquiry screen.
Table (File) to Use to Query Custom Field Data
Use the CMBCFDTA for to Query custom account field data.
Using this Screen
When adding a custom field, you need to first enter:
-
A Field name that will be used to identify it when collecting data
-
A Display sequence which will be used to control the order the collection fields appear on the collection screen
-
A Description to give more help in explaining the reason for the collection of data
-
Then select a data type. This will control the method that the data can be entered. If List is selected, use Enter to reveal the Add Value button which allows you to add values to your list. Once you have added items to your list, you can edit, view, delete, suspend and reactivate them. If you delete a value, a confirmation screen will appear letting you know that you will not only delete the item but also purge all entries. To simply remove the item from the list, and keep the associated records, select to Suspend the entry. The entry will be highlighted to indicate that it is suspended. To collect again, select Reinstate.
Use Enter to save your field.
Data Type Descriptions
|
Data Type |
Input allowed |
|
Text (@) |
40 characters, alpha numeric |
|
Number (#) |
15.0 whole number digits only |
|
List (L) |
Create as many list items as desired, list items 30 characters |
|
Dollars ($) |
11.2, 11 digits include 2 decimal positions NOTE: Dollar amounts are actually stored without a decimal point in the database. CU*BASE GOLD screens that display or allow maintenance of this data automatically format the number with commas and a decimal point. For example, if an amount of $141,750.00 is entered, it will be stored as 14175000 in the CMBCFDTA table. |
|
Date (D) |
MMDDCCYY, calendar selection in GOLD |
|
Checkbox (C) |
Checked or not checked (Y/N) |
