Electronic Checklist (Open and Closed)
| Screen ID: | ECL040-02 | 
|
| Screen Title: | Electronic Checklist | |
| Panel ID: | 4020 | |
| Tool Number: | 552 / 553 | |
| Click here to magnify |
Access this screen by selecting the checklist button from the Open/Close Memberships Dashboard, or when using "Checklist" the Open/Closed Account Dashboard, and Work Checklist from several screens.
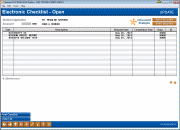
This screen allows you to “check off” items on either a membership or account checklist. This is the access to both the open or closed checklists – select Close List/Open List to toggle between them. Select an task on the list, then use the Maintenance option to work it. Once the item has been worked, a completion date and Emp ID will be added to this screen. Your Member Service team can use these account and membership checklists to work your recently opened or closed memberships and accounts to ensure each member receives the same level of service. Consider having them use the Open/Closed Dashboard) to also audit this service. (Additionally use the New-Closed Account Dashboard for the same reason.)
The membership checklist is actually the checklist for the base or 000 Dividend Application. This is accessed by the dashboards mentioned above or via the Account Update screen for the base (000) account. This membership checklist can be used for tasks outside of Work Flow Controls, such as recording whether the correct forms have been filed or if a laminated membership card has been make for the member.
If you access this screen from Account Update or while opening a sub account, you will work the checklist for the dividend application associated with the sub account. This will allow you to “check off” items on an account checklist while opening or closing this sub account.
Print Checklist prints the task listing of the checklist.
"Close List/Open List" (F9) toggles between the Open Task List (for open memberships/accounts) and the Closed Task List (for closed memberships and accounts.)
SEE ALSO: Creating Checklists for information on configuring this list.
 Integration between CU*BASE and your imaging solution
This screen has a link to your imaging solution to further integrate with CU*BASE. The “Scan e-Document” button is used for scanning a document into your imaging solution. The “View e-Document” button is for retrieving images from your imaging solution.
-
Remember: Only documents warranted by the CU*Spy online vault can be scanned into that vault.
-
Clients with in-house imaging solutions should contact Imaging Solutions for assistance configuring links for use with your vault.