New/Closed/All Memberships Dashboard (Listing)
| Screen ID: | IOCMD-01 | 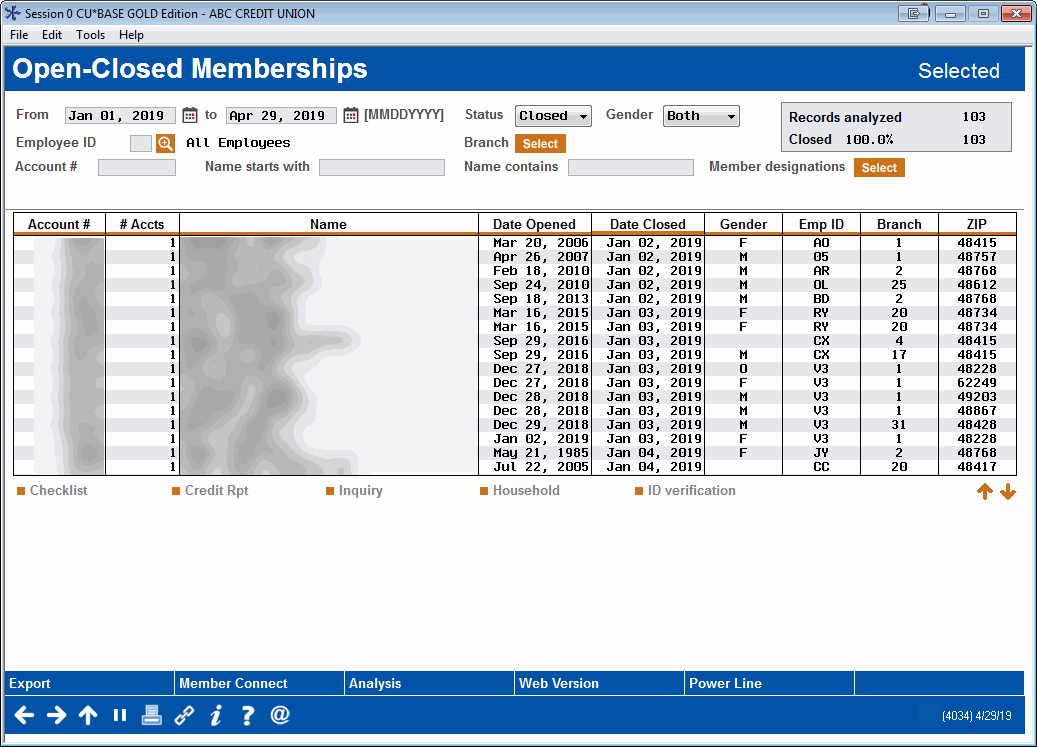
|
| Screen Title: | Open-Closed Memberships | |
| Panel ID: | 4034 | |
| Snap Shot: | "At this time" | |
| Data Source: | MASTER, MSHIST | Click here to magnify |
| Tool Number: | 553 |
Access this screen by selecting Tool #553 New/Closed/All Membership Dashboard.
Helpful Resources
The Open/Close Dashboard will Change the Way You Do Business!
With over 50 ways to analyze your data, the Open/Closed Membership Dashboard will change the way you think about your credit union. This Dashboard is more than just an analysis tool. Use this data to review the policies and strategies at your credit union. Use the built-in PDF Export feature in the analysis to create full-color PDFs of the data and charts to share with your Board.
Use Analysis to move to four screens of analysis on these members. Use the filters to find answers to questions such as:
-
Are marketing campaigns you implemented to increase products and services per member working? Has the age, gender or bill pay adoption of your membership changed? Enter different date ranges to filter the data and view your results.
-
How do your indirect lending members compare to your standard credit union members? Categorize your Indirect Lending members by membership designation. Then use the search criteria to filter by this indicator.
-
Do you have employees who are consistently opening more memberships who might be mentors to others? Data on your high performers is available in the analysis
The Open/Closed Dashboard is also a great Membership Service tool too. Your staff can use the built-in membership checklists to “check off” tasks on a New or Closed checklist, for example, creating a laminated membership card or sending some disclosures of other paperwork. Then have your team use the Dashboard to audit these checklists to ensure all your members receive the same high level of service
How to Use This Screen
On the entry screen use the filters at the top of the screen to filter your membership to view, work with, or analyze member who fit specific criteria. A date range must be entered. Then press Enter to view a listing of the selected memberships that were either opened or closed during the period (depending on the filter option selected)..
|
|
Once you press Enter the number of memberships who fit your criteria will be shown in the “records analyzed” shown in the upper right of the screen. The “closed” figure indicates how many of these selected memberships are currently closed, though not only during the date range selected. |

Then use this screen to work these selected members:
-
Work the members using the Action buttons to the left of the member, such as the Checklist option which allows you to “check off” items on an open or closed membership list.
-
Use Analysis to view four screens of analysis of these members.
-
Use Export and Member Connect to contact these members and send them marketing emails or mailings.
Understand that results seen on this screen are a reflection of current data with every historical membership adjustment or pending situations already having taken place. It is normal to see that this dashboard’s total member count is different from other dashboards, or some query results
Other membership counting tools or your own existing queries may use the EOM files for capturing a membership count at the precise moment of a month closing out. At any month-end, there are still moving elements in place that affect defining whether a membership is open, and what membership open date will be assigned.
For example, if a membership application is being held “pending” until all credit checks, etc have been done you may have a case where the application date is 08/29/2017, but is not completed until 09/03/2017. It will not be in the MASTER file until 09/03/2017, but with an open date of 08/29/2017. This dashboard will read that membership as opened in August, but the August EOM of EMS0817 will not see it.
EOM files are nice as a raw copy of MASTER as of a moment in time, but not for attempting to compare against tools which work off current data.
Refer to the Data Sources listing at the top of this page for a listing of files you would need if you wish to create a customized query report.
Filters
|
Filter |
Description |
|
From…to |
Select a range of dates when the membership was opened or closed. |
|
Status |
Defaults to Opened. Select Opened or Closed to view members who either opened their membership during the date range or closed their membership during the date range selected.
|
|
Gender |
Defaults to Both. Select alternatively Female or Male. |
|
Employee ID |
Defaults to All Employees. Select a single employee ID to view only memberships opened by that employee.
|
|
Branch |
Defaults to All Branches. Use the Select button to reveal a screen allowing you to select one or more branches. |
|
Account # |
Defaults to blank. Enter an account number to view only that account in the listing. |
|
Name starts with |
Defaults to blank. Enter the beginning of a last name to move to that name in the listing. (Member with a corresponding last name will appear at the top of the listing. |
|
Member designations |
Defaults to no membership designations selected. Use the Select button to reveal a screen where you can select the desired Membership Designations. Use the Ctrl key and select the required Designations. Once selected, the count will appear next to the Select button.
|
Action Codes
|
Action Code |
Description |
|
Use this action code to move to the “open” membership checklist. (“Close” membership checklist can be accessed via Close Checklist.) This checklist can be used by your Member Service team to ensure each member receives the same level of service. Use this checklist to “check off” items on the list, such as filling out forms or providing the member with a laminated membership card. You can also use this to audit this service.
|
|
|
Use this action code to view and print a credit report for this member. This helps assure you that a credit report was pulled for the member to be used for cross-selling purposes. |
|
|
Inquiry |
Use this to access the Inquiry screen (for open memberships) or the Closed Inquiry screen (for closed memberships), where you can find details of the member, including email address, as well as research the accounts of the member and whether the member is enrolled in online banking. |
|
Use this to view all the members that are currently enrolled in the household the member belongs to, view other members of that household, and manage details of the household.
|
|
|
Currently not used |
Buttons
|
Buttons |
Description |
||
|
Use “Export report to file” go to the screen where you can choose to create a file that lets you use Member Connect to communicate instantly with these members via email and online banking messages, set up a marketing outreach via mailing labels and selective statement inserts, and track the responses via a telemarketing Tracker. This file will contain account base only. Or choose to export more data to use with Report Builder. |
|||
|
Access the Member Connect Setup screen, the gateway to sending online banking/and or email messages to members, as well as creating mailing labels, statement inserts and telemarketing trackers.
|
|||
|
Enter a four screen analysis on the selected member. First you will select whether to use Current Files or End of Month files. |
|||
|
Web View |
Launching the Web View dashboard will provide additional tools to subscribers to analyze data that can only be found in Analytics Booth, including more screen real estate to view more data at one time, different filters and graphics, and new ways to understand the data. Non-subscribers will be presented with a splash page. |
||
|
Power Line |
Use this button to launch an immediate trend line graph in Analytics Booth to help you better understand your data. Not an Analytics Booth subscriber? Learn more in the CU*Answers Store.
|
