Printing the Collections Delinquency Report
| Screen ID: |
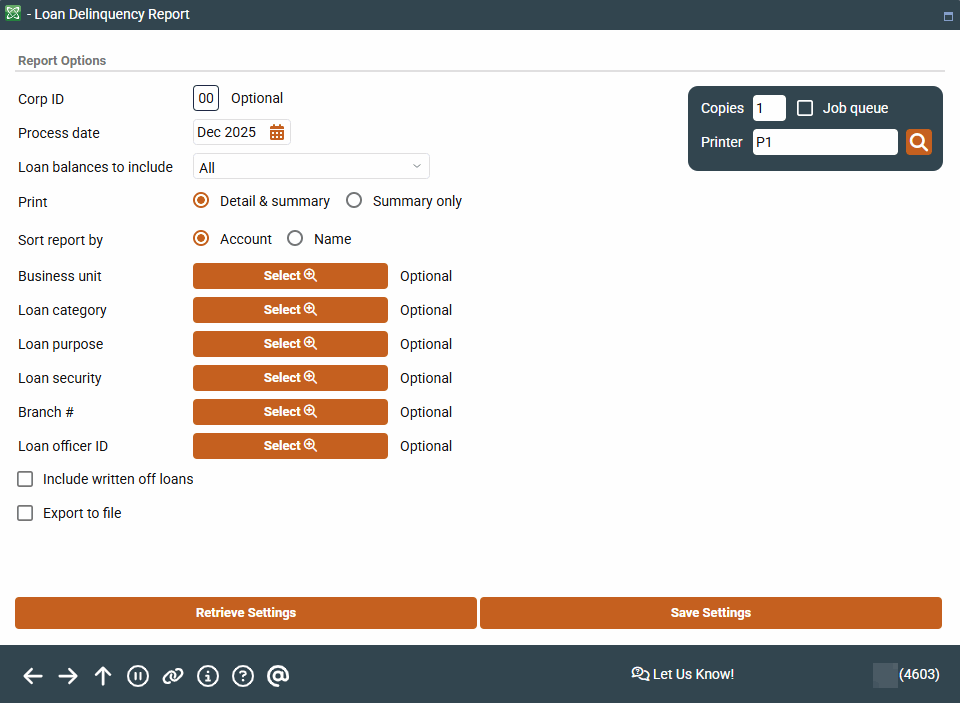
LDELQSC-01 |
|
| Screen Title: |
Loan Delinquency Report |
|
| Panel ID: |
4603 |
|
| Tool Number: | 637 | |
| Report Names: |
LDELQ2D |
|
|
|
Click here to magnify |
This screen is access by selecting Tool #637 Print Collection Delinquency Report.
Helpful Resources
Delinquency and Fine Calculation Methods Used by the core
For information on defining delinquency aging categories, refer to the Configuring Tools for Collections booklet.
Practical uses of this report:
Use this report to view a summary of your delinquent loans by credit union defined levels. See what the break- down of delinquent loans look like today, and then change the levels to interactively review break downs in different date ranges.
This tool let's you review your loans by purpose, security, branch, and loan officer so that you can see the impact any of these items have on your loan portfolio, delinquency, and trending for any adjustments that you need to make.
Two reports can be generated: a Detail report showing detailed information about each individual delinquent loan; and a Summary report showing a total of all delinquent loans broken down by your credit union's configured delinquency aging categories.
Choose any options as desired and use Enter to produce the report(s).
SEE ALSO: Printing the Method B Delinquency Report
How Do I Save/Retrieve My Report Settings?
For more details on setting up this feature, refer to the Automating Reports and Queries booklet.
This report can be used with the “Report Scheduler,” a time-saving automation feature that allows you to select and save the filters you use to run several commonly used reports and then set these reports to be run automatically by our operations staff on the first of the month. Or you can save the settings and run them manually by yourself at any time.
To save your report settings, first select your filters, including printer (can be a physical printer or the HOLDxx or MONTHxx OUTQs). Then select Save Settings . On the next screen name your settings (we recommend adding your name!), and designate whether you wish to run this manually or if you wish for operations to run the report. At a later time, use Retrieve Settings to populate the screen with the settings you have saved. You can also edit your settings using Retrieve Settings. All saved settings can be viewed on the Report Automation: Standard Reports screen.
Field Descriptions
|
Field Name |
Description |
|
Corporate ID |
Enter your credit union's corporation number (usually 01). |
|
Process date |
Enter the month and year for which data should be shown. Normally three previous months are available. To run a report using month-end data prior to the months held online, contact a Client Services Representative. (There is a charge if this service is requested.) |
|
Loan balances to include |
Select to view All loans, or just the credit union portion, or just the investor portion. |
|
Report(s) to be printed |
Choose one of the following to indicate which report should print: DET Print both a detail and a summary report. |
|
Sort report detail by account or name |
Choose A to sort the list by account number, or N to sort by member last name. |
|
Business Unit |
(Optional) To include only accounts with a specific business unit on the report, use the Select button to reveal a pop screen to select one or more business units. SEE ALSO: Filter and selection directions. When you return to the screen the count of the items selected with appear next to the button. |
|
Loan Category |
(Optional) To include only accounts with a specific loan category on the report, use the Select button to reveal a pop screen to select one or more loan categories. SEE ALSO: Filter and selection directions. When you return to the screen, the count of the items selected with appear next to the button. |
|
Loan Purpose |
(Optional) To include only accounts with a specific loan purpose code on the report, use the Select button to reveal a screen to select one or more loan purpose codes. SEE ALSO: Filter and selection directions. When you return to the screen, the count of the items selected with appear next to the button. |
|
Loan Security |
(Optional) To include only accounts with a specific loan security code on the report, use the Select button to reveal a screen to select one or more loan security codes. SEE ALSO: Filter and selection directions. When you return to the screen, the count of the items selected with appear next to the button. |
|
Branch Number |
(Optional) To include only loans assigned to a specific branch (location) number, use the select button to reveal a pop up screen. SEE ALSO: Filter and selection directions. When you return to the screen, the count of the items selected with appear next to the button. |
|
Loan Officer ID |
(Optional) To include only loans authorized by a specific loan officer, use the select button to reveal a pop up screen to select one or more loan officer IDs. SEE ALSO: Filter and selection directions. When you return to the screen, the count of the items selected with appear next to the button. |
|
Include written off loans |
Check this box to include written-off loans in the results. Leave this unchecked if you wish to exclude written-off loans in the results. |
|
Export to file |
Use “Export report to file” go to a screen where you can export more data to use with Report Builder. |
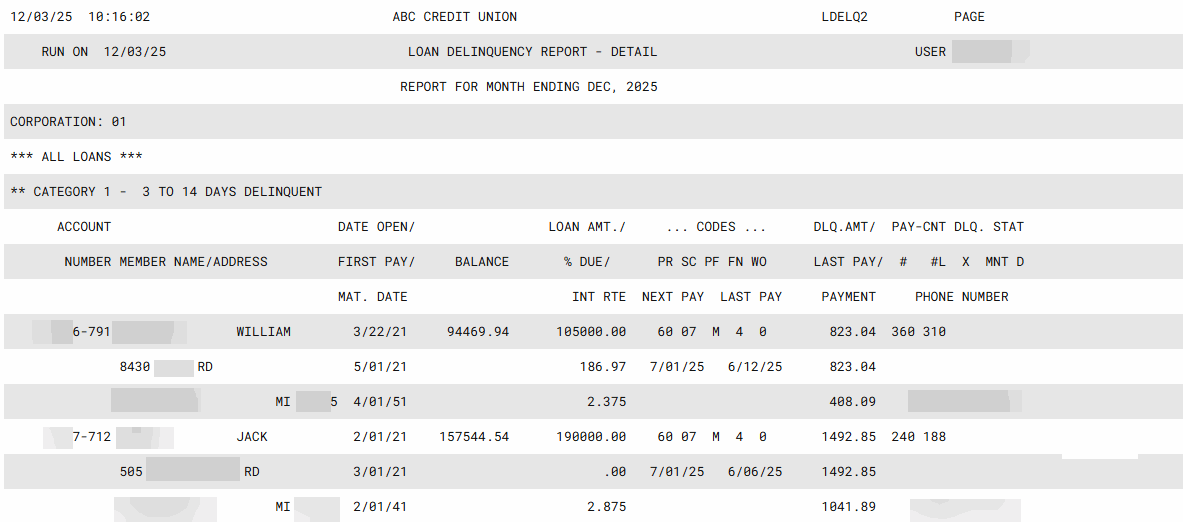
Column Descriptions in Detail Report (shown below)
|
Column |
Description |
|
PR |
Product code |
|
SC |
Security code |
|
PF |
Payment frequency |
|
FNZ |
Fine code |
|
WO |
Write-off code |
|
Pay |
# of payments total |
|
CNT |
# of payments remaining |
|
X |
# of times 30 of more days delinquent |
Report Samples
Summary

Detail (one page from a multiple-page report)
Column descriptions of the detail report are documented in the Column Descriptions section of this topic. This section is found below the Field Descriptions section.