Teller Activity Analysis Report
|
Screen ID: Screen Title: Panel Number: Report Name: |
LTEACTA-01 Teller Activity Analysis 5692 LTEACTAP1, LTEACTAP2 |
|
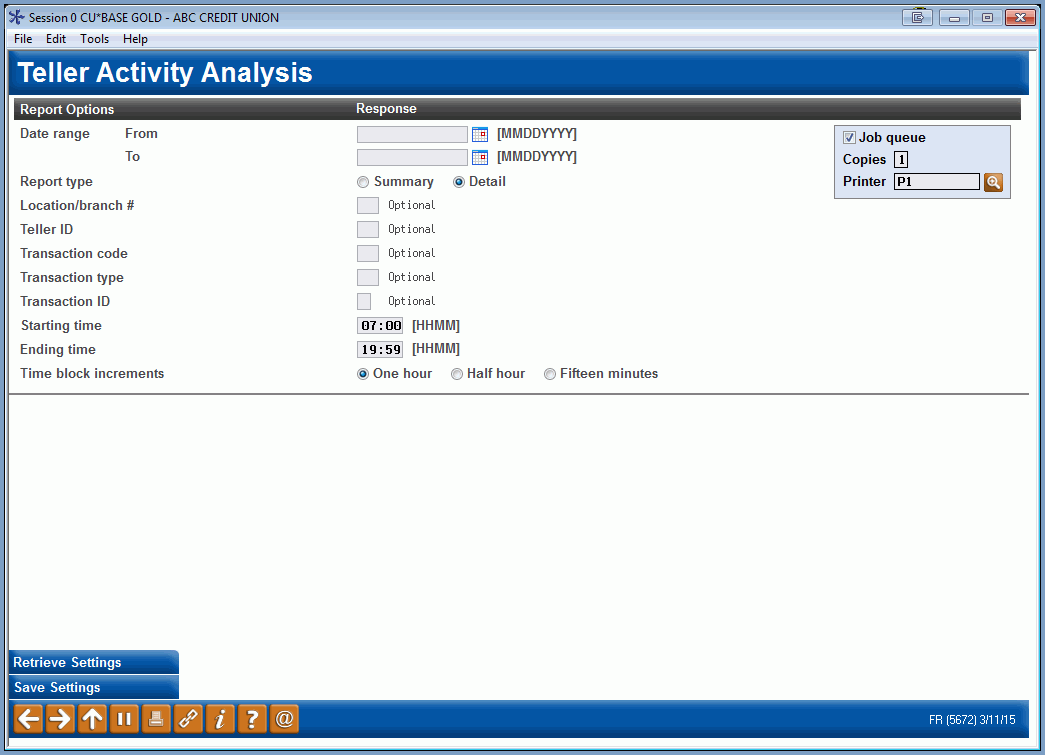
Access this screen by selecting Tool #843 Teller Activity Analysis Report.
-
NOTE: This report pulls data based on Teller Audit Keys. This information is retained for the previous 90 days – therefore, this report can be generated for the previous 90 days only.
This report can be pulled at any time to analyze teller activity for a certain period of time. Like the daily report, this report counts audit key transactions—transactions that hit the teller drawer. This report does NOT show any transactions that do not affect the teller drawer (such as transfers using Proc Code “T” or corporate check/money order withdrawals).
The report is very flexible and can be pulled in a detail or summary format. Use this screen to specify exactly which time blocks should be reported on the analysis, as well as select specific transaction types for detailed analysis.
-
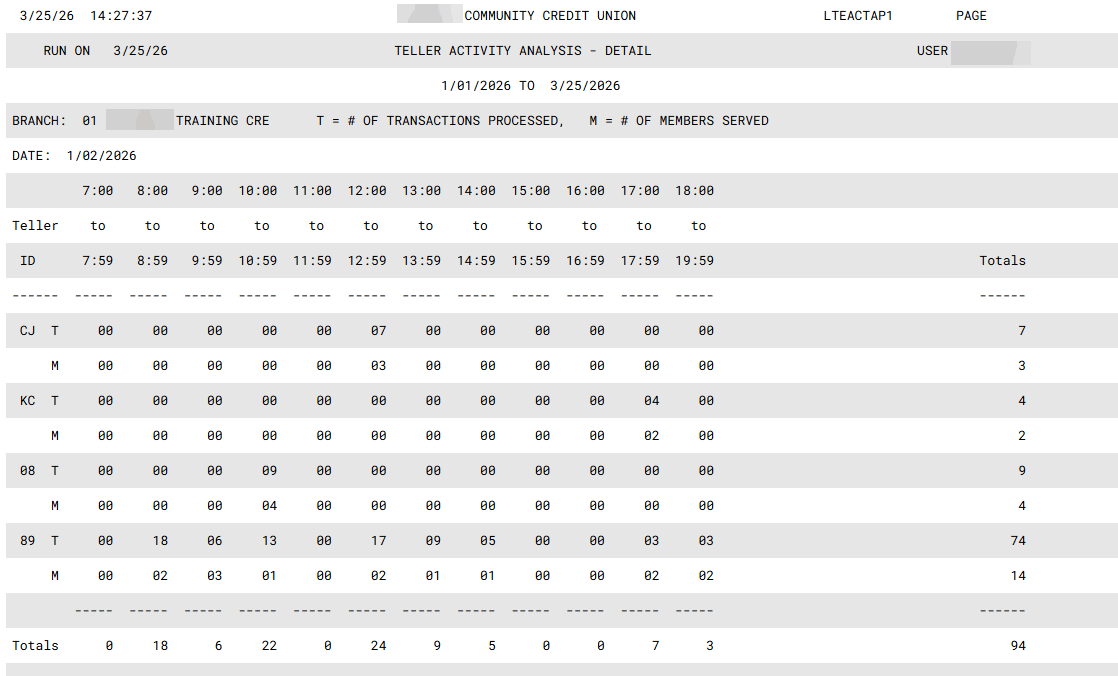
NOTE: On the printed report, the rows marked “T” represent the number of actual transactions processed, and rows marked “M” show the number of actual members represented by those transactions.
How Do I Save/Retrieve My Report Settings?
For more details on setting up this feature, refer to the Automating Reports and Queries booklet.
This report can be used with the “Report Scheduler,” a time-saving automation feature that allows you to select and save the filters you use to run several commonly used reports and then set these reports to be run automatically by our operations staff on the first of the month. Or you can save the settings and run them manually by yourself at any time.
To save your report settings, first select your filters, including printer (can be a physical printer or the HOLDxx or MONTHxx OUTQs). Then select Save Settings. On the next screen name your settings (we recommend adding your name!), and designate whether you wish to run this manually or if you wish for operations to run the report. At a later time, use Retrieve Settings to populate the screen with the settings you have saved. You can also edit your settings using Retrieve Settings. All saved settings can be viewed on the Report Automation: Standard Reports screen.
Field Descriptions
|
Field Name |
Description |
|
Date Range |
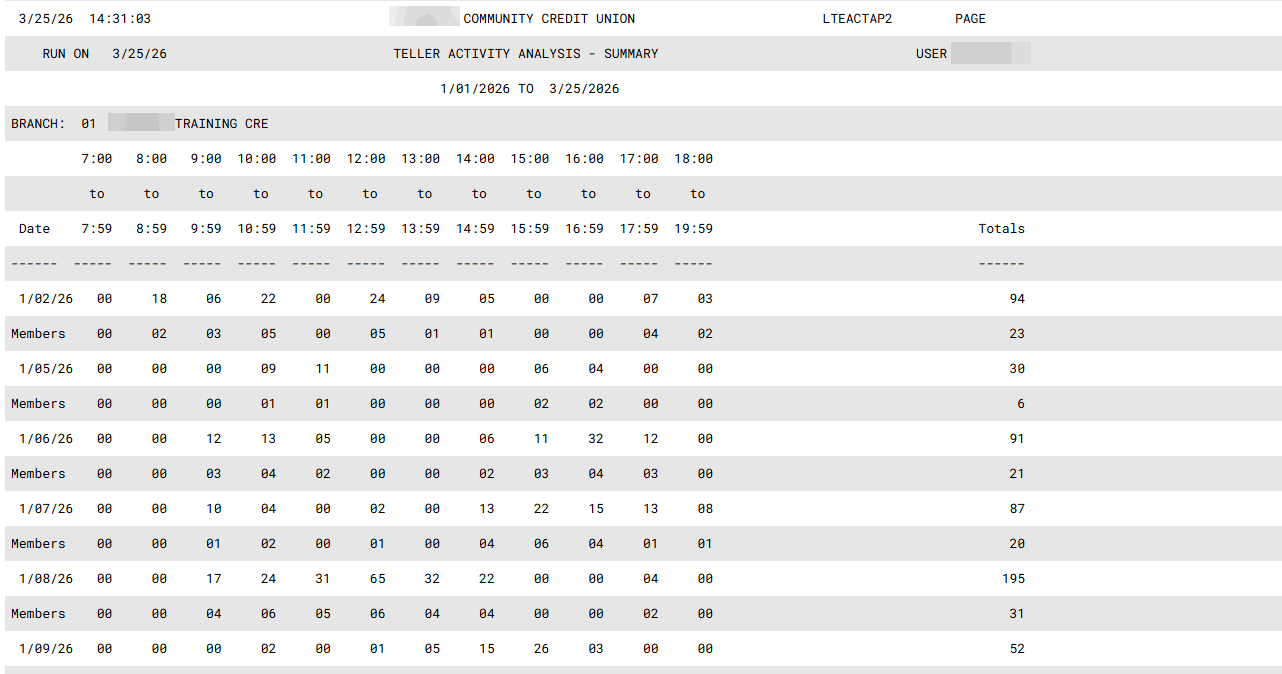
Use these fields to enter a starting and ending date for the range which should appear on the report. Each day will be listed separately (i.e., Monday, then Tuesday, etc.—not combined), and all transactions for each day within the specified range will be subtotaled on the report. |
|
Report Type |
Enter one of the following to select a report format (samples are shown below): Detail (D) - This report shows transactions for each individual teller, with a subtotal for each day in the date range. Each branch/location begins on a separate page. Summary (S) - This report shows all transactions for all tellers as one total for each day in the date range, with a subtotal for all tellers for the day. |
|
Location/Branch No |
If you wish to show activity for only one location (branch), enter the branch number here. Leave the field blank to include all branches. |
|
Teller ID |
If you wish to include activity for a specific teller, enter the teller Employee ID here. Leave the field blank to include all tellers. |
|
Transaction Code |
To show only transactions that have a specific transaction code (TRANCD), enter the code here. Leave the field blank to include all codes. |
|
Transaction Type |
To show only transactions that have a specific transaction type (TRTYPE) code, enter the code here. Leave the field blank to include all transaction types. |
|
Transaction Identifier |
To show only specific types of transactions using the Transaction Identifier (ADFTYP) code, enter the code here. Used by the Teller Audit system to categorize transactions, the following are valid identifier codes: 2 Deposits/Payments 6 Outside Checks 4 Miscellaneous Receipts 7 In-house Drafts 5 Miscellaneous Advances 8 Withdrawals Leave the field blank to include all codes. |
|
Starting Time |
Enter the time at which the report should begin. Use a 24-hour (military) format. For example, to begin reporting at 9:30 a.m., enter 0930. |
|
Ending Time |
Enter the time at which the report should end. Use a 24-hour (military) format. For example, to stop reporting at 5:30 p.m., enter 1730. |
|
Time Block Increments |
Enter one of the following to specify how the range between the Starting Time and Ending Time should be grouped: One hour (1) - Example: 7:00 to 7:59, then 8:00 to 8:59, etc. Half-hour (2) - Example: 7:00 to 7:29, then 7:30 to 7:59, etc. 15 Minutes (3) - Example: 7:00 to 7:14, then 7:15 to 7:29, etc. There are a maximum of 16 blocks that can print on the report. Therefore, depending on the increment chosen, you may need to adjust the Starting or Ending Time in order to make the range fit on the page. In addition, the final block may be adjusted to be slightly longer or shorter, as needed, to round out the requested range. |
Report Sample
Following are sample pages from both the Detail and Summary Teller Activity Analysis Reports. Both reports were run in half-hour increments, starting at 7:00 a.m. and ending at 5:00 p.m. On the Detail report, each Branch/Location begins on a separate page.
Notice that the rows marked “T” represent the number of actual transactions processed, and rows marked “M” show the number of actual members represented by those transactions.
Detail
Summary
Key file used: TEACTR
·NOTE: This file is simply a cumulative file that contains the detail records from TEAUDT1 and TEAUDT2. This file stores the records for long-term analysis, since the TEAUDTx files are refreshed daily.