Configuring an Approval Matrix (Loan)
|
Screen ID: Screen Title: Panel Number: |
UAPVMXT-02 Configure Approval Matrix 6372 |
Access this screen from the first approval matrix screen by either selecting to change an existing code, or to add a new code.
For details, refer to the booklet, Online Credit Bureau Access and FUEL: Configuring FUEL and the Approval Matrix.
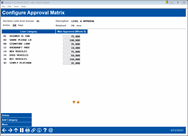
This screen is used to configure maximum approval amounts for loan products, including online credit cards. When the screen appears for a brand-new code, it will be blank, and the Description field at the top will allow you to enter a description for this code.
The Active days field will indicate how long a report should be considered “active” before a new one is pulled by the system. The default comes from the For existing credit reports, # of days active before a new one should be pulled setting in OPER Tool #5408 Online Credit Bureau Config. Change the value here to control how “fresh” you want credit report pulls to be for applications that come in through this particular channel. You can use any value between 00 days (such as for indirect channels where you always want a fresh report) to 99 days (in this case this actually means 99 days, not “forever”).
-
NOTE: For the CBX delivery channel (“CB”), the core loan application system does not use this configuration flag. Instead, the system uses a standard period of 6 months: if the most recent report is within that period, then a window displays to the user to let them know there’s a recent report on file, and the user makes a decision about whether to pull a new one or not.
After pressing Enter to save, the Add Category window will appear automatically. (If editing an existing code, use Add Category to configure more loan categories for this decision code.)
-
CU*TIP: If you have added a loan category to the list by mistake, place the cursor in the amount field for that item, and then select Delete. There will be one confirmation message.
When returned to the loan products screen, enter a dollar amount (whole dollars) into the Max Approved column for each of the loan categories. When done, press More or use Enter to proceed to the share products screen.
