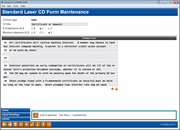
Configuring Laser Certificate Forms
| Screen ID: | UCDCFG-02 | 
|
| Screen Title: | Certificate Form Configuration | |
| Panel ID: | 6250 | |
| Tool Number: | 257 | |
| Click here to magnify |
NOTE: This is an older-style form with limited configuration options. For more flexibility in creating certificate forms, use Misc. Member Account forms (Tool #261).
Access this screen by entering the four-digit code name for the CD form in the Certificate Type field on the previous screen and pressing Enter. Or select an existing form on the list and then Select.
-
For complete information on using these screens to create and maintain your CD forms, refer to the User-Defined Laser Certificate Forms booklet.
This screen is used to configure and enter text for the CD form. There are a total of 24 lines for entering text, which is the equivalent of 12 lines of text on the printed form. Every two lines on the screen is equivalent to one full line of print on the final form. For example, notice that on line 04 in the above example the word “give” is split between the lines. On the printed form, these two lines will be put back together as one long line of text.
In addition to specifying a title, signature information and free-form text, Adjust Headings is available to specify the position of the CD title and credit union address information at the top of the form.
Roll keys can be used to display lines 07 through 12. When done with all free-form text, be sure to use Update one last time to update all changes, then use F3-Backup to return to the previous screen.
Field Descriptions
|
Field Name |
Description |
|
CD form type |
The four-character form name entered on the previous screen. |
|
CD title |
Enter the title that should print along the top edge of the certificate. |
|
# of signatures |
The date range during which this charge type is effective. The field is defined in configuration. |
|
Member's signature |
If you wish to print a line for “Owner Signature” at the bottom of the CD form, choose the number of lines to be printed here (maximum of 2). If you do not wish to include these signature lines, choose zero or leave the field blank. |