Verify Membership Creation
|
Screen ID: Screen Title: Panel Number: |
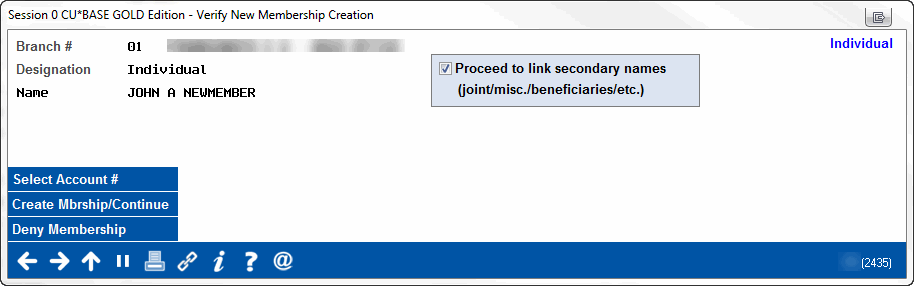
UMBRSHIP-40 Verify Individual/Organization Membership Creation 2435 |
|

|
Check out the video related to this topic: Approving a Membership Application (More videos below!) |
Screen Overview
This screen appears after all member information has been entered, and provides one last chance to confirm that this membership account should actually be opened or if it should be denied and a non-member record created.
Check the Proceed to link secondary names (joint/misc./beneficiaries/etc. check box if you wish to proceed to the Secondary Names setup screens after the membership account is opened, to add secondary names to the new base share account (suffix 000).
Creating the Membership
There are two ways to continue creating the membership account:
-
Assign an Account # Automatically - To allow the system to choose the next available account number for you, click Create Mbrship/Continue. The membership will be created and the account number chosen will be displayed. Click the forward arrow (Enter) to continue to the next step in the process. If you checked the Secondary names option, the Secondary Names Linked to This Account screen will appear next so you can set up
-
Assign an Account # Manually - If the member requests a specific number, or you wish to use a number out of sequence, click Select Account #. A window will appear to allow you to enter a specific account number to be assigned to this membership.
Once the account has been opened, if you checked the Secondary names box you'll proceed to the Secondary Names Linked to This Account screen next. After you have used finished on that screen, a printing confirmation window will appear next to allow you to print any Member Account Forms (TIS disclosures, etc.) that have been configured for new memberships.
Using the Deny Membership Feature
If after verifying the new member's information you decide to deny membership, click Deny Membership now. The initial Member Service Denial Notices screen will appear so that you can print a denial notice.
The system automatically will create a non-member record using all of the information entered on the previous screens. If the denial notice is actually printed, the Deny membership flag automatically will be checked on that non-member record to prevent the same person from attempting to open a membership again later.
·CU*TIP: If you do this by mistake, remember that a non-member record is created immediately when you click the Deny Membership button. You can repeat the steps for opening a new membership, and when you enter this same SSN/TIN again there will be a window showing you the non-member record so that you can copy the information into a new membership. As long as the denial notice was not actually printed, it will not be necessary to override anything to create the new membership.
Additional Video Resources
|
|
Check out these additional video resources! |
View more videos related to membership application processing.
View videos related to opening memberships/accounts.