Creating a Database File
|
Screen ID: Screen Title: Panel Number: |
Report Builder (Query) Database File Output QRYDBASE |
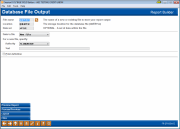
This screen appears after selecting “Database file” (3) on the Choose Output screen.
This screen is used to produce a new file using data pulled by this custom inquiry. The most common use for this is to produce a file that can be downloaded to a computer for use in a spreadsheet or word processing package, such as when creating personalized letters or mailing labels. The database file could also be downloaded and stored on a diskette to provide requested data to a third-party vendor.
-
CU*TIP: If you need to use a very complex set of criteria to analyze your member data, it is sometimes helpful to start with a smaller group of records by using basic selection criteria to create a database file. Then, you would create another custom inquiry in Report Builder, choose the new database file as your source, and specify additional criteria on that smaller group.
When done, use Enter to save.
Field Descriptions
|
Field Name |
Description |
|
File name |
Enter the name for the new database file. Up to 10 characters can be used. The file name must begin with an alphabetic character (A through Z, $, #, or @), followed by any alphanumeric characters (A through Z, 0 through 9, $, #, @, ., or _). · Examples: NAMEADDR or INVEN1203 |
|
Location |
Enter the name of the library where the database file should be stored. For all custom reports, use the QUERYxx (where xx is your credit union two-character ID). Exception: For the file used to define selective statement inserts, use FILExx instead. |
|
Data set |
This field is not used for CU*BASE reports. |
|
Data in file |
Choose one of the following: 1 = New file - Use this if creating a new file, using a name that you have not used before. 2 = Replace file - Use this if creating a file using a name that has already been used. The new data will completely replace all data from the existing file. 5 = Add to Member – Used exclusively in string queries, select this option when you are working with similar files and fields and you wish to insert your current results into a pre-existing file from earlier in the string. All rows from your current results will be inserted into the bottom of the file without affecting any pre-existing rows. NOTE: Add to Member only works if both the existing file and your new query results are identical in column structure. Every column in the existing file must have a counterpart in your new query results, and each must be exactly the same length and format (numeric, alphanumeric, date, etc). The remaining options (New Member, Replace Member, and Add to Member) are not needed for CU*BASE reports. “Member” in this context has to do with internal file structure, not with your credit union members! |
|
Authority |
This field controls what access others will have to this database file. Other choices are not recommended. Click here for a more detailed description of the available options. |
|
Text |
Enter some descriptive text that describes the purpose of this file. This text will appear when viewing a list of files in a library. Files are different from query definitions; you can view file names and descriptions within Tool #1980 Library Dashboard. You can view contents of a file by entering it into a query definition and use the Preview Report feature. |
|
Print report definition |
Place a checkmark in this field to print a record of the entire custom report definition, after the database file is created. The definition can be helpful if you wish to document the parameters used to produce the report.
|
