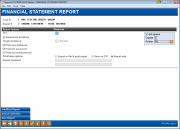
Printing Financial Reports - Specify Print Options
| Screen ID: |
LGLFILC |

|
| Screen Title: |
Financial Statement Report |
|
| Panel ID: | 674 | |
| Tool Number: | 640 | |
| Click here to magnify |
Access this screen by using Enter on the previous screen.
Helpful Resources
Refer to this booklet for more information on downloading your financial statements to Excel: Downloading Your Financial Statements to Excel
Screen Overview
This final screen contains miscellaneous output options for financial reports. Included is the option to print your report, to export the data from the report for use in Excel, or to view the report on your screen in an inquiry-type format. If you export the data the report will also print at your printer. For more information about exporting data to Excel, refer to the booklet Downloading your Financial Statements to Excel.
Any settings changed on this screen will be retained for the next time the report is run.
When done, use Enter to proceed.
-
If you select Blank Report only from the drop-down menu next to Report Format, your report will print using the print specifications you set up on this screen.
-
If you select Print and Export to File from this drop-down menu, the report will print AND the transfer utility will open allowing you to download your data into a format that is more compatible with Excel.
-
If View on CRT is selected, you will see the "select columns" screen.
-
CU*TIP: Once you have the financial report printing exactly the way you want, use the Print Accounting Format flag to remove the negative signs from all credit-balance accounts. While the report computes exactly the same, it can be easier to read and analyze. CAUTION: There are a few cases where this format might not give you the results you are expecting. See below for more details.
Field Descriptions
|
Field Name |
Description |
|
CPI |
The CPI (characters per inch) setting can be used to designate the font style to be used when printing the report, and can have a significant impact on the number of columns that will fit on the page. Depending on the type of printer you are using, you may not be able to change the CPI setting here. Contact a CU*BASE representative for guidance. The most common setting is 10 CPI. |
|
Print for ALL branches or branch |
To print balances for one location only, enter the branch/location number here. To see all locations, leave this field blank.
|
|
Print combined balances for all branches |
Check this box to summarize the balances from all individual locations into one balance for each G/L account. Leave it unchecked to print the G/L account balance for each location separately. Regardless of the setting you use, you can also use Branch Selection (F5) to display a list of credit union branches, and select which branches should be included on the report. For example, you may want to print a combined report, but only include two of your branches that are located in a different state. |
|
Print zero balances |
Check this box to print balances for all accounts, even those with zero balances. Leave it unchecked to print only those accounts which have a balance greater than zero. |
|
Print G/L account # |
Check this box to print the G/L account number along with the account name. Leave it unchecked to print the descriptive account name only. |
|
Print accounting format |
Check this box to remove all minus signs (-) from credit-balance accounts. Computations will still be done exactly the same.
Important Caution When Using This Feature In order to determine whether or not the minus sign should be removed from an item, the system looks at the G/L account itself to determine whether it is an asset, liability, income, or expense. However, for line items that represent totals of multiple accounts, the system does not have a single G/L account to look at to determine whether or not to hide the minus sign. This particularly affects items that were configured using total codes B (Bypass/Accumulate) and P (Print Bypassed Total), and sometimes T (Print Heading Total). Therefore, the system will look instead at the G/L account for the previous line item (the one just above that total in the report) and hide or display the minus sign according to that type of account. Whether the report displays minus signs correctly or not will depend on how those total codes are being used on your particular report. The computations will still be correct, of course. |
|
Print/view options |
Choose from one of three options:
Remember that certain math calculations only appear when the report is printed, not when it is viewed on the screen. SEE ALSO: Using "% Val" Percentage Calculations |
|
Report comments |
This optional field allows up to 80 characters of free-form text to be printed at the top of the financial report. It can be used for the purpose of the report (e.g., “December Board Meeting”) or can contain a list options used to print the report (e.g., “Locations Summarized and Zero Balances Excluded”). |
Buttons
|
Button |
Description |
|
Run/Next Report (F1) |
Use this to run the report and return to the first screen to select another report.
|
|
Branch Selection (F5) |
Use this to choose which of your branch locations should be included on the financial report. |
|
New Report (F6) |
Use this to return to the first screen and select a completely different report. |