Printing Laser Notices
|
Screen ID: Screen Title: Panel Number: |
PNOTIC-01 Notice Forms Printing Selections 1263 |
|
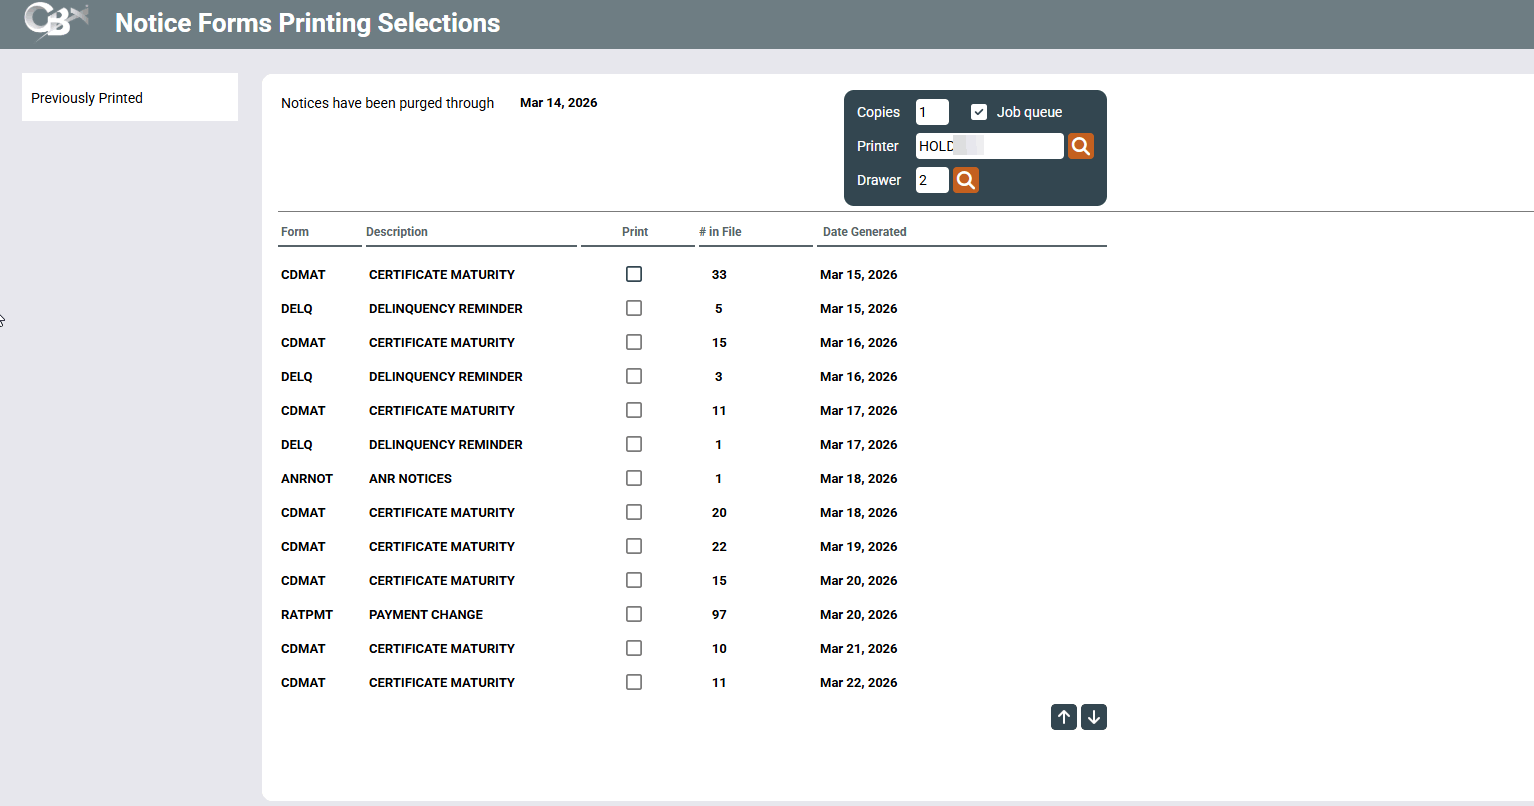
Access this screen by selecting Tool #653: Print Laser Member Notices (Shortcut: notices).

|
Check out the video related to this topic: Notices via Member Communication (More videos below!) |
Helpful Resources
Visit Show Me the Steps for easy instructions on how to print delinquency notices.
Visit Show Me the Steps for easy instructions on how to stop delinquency notices from printing.
For complete information about configuring notice “events” and “forms,” refer to the Member Notices: Configuring and Printing CU-Defined Laser Notices booklet.
For directions on specifically configuring Opt In and/or Opt Out notices, refer to Opt In/Opt Out (Reg E) – Managing Your Offering.
Screen Overview
This screen is used on a daily basis to print member notice forms. Notices are used for communicating with members about activities that concern their accounts, such as loan delinquency and related fines, checks returned for non-sufficient funds and related fines, overdraft protection transfers, rate changes, loan payment changes, and the like.
-
If it has been configured in the membership designation the DBA label will appear above the address instead of the member’s or organization’s name.
This screen is used to print notice forms for events that have occurred since the last time notices were printed. If the same event occurred multiple times during that period (such as several NSF checks), all will be included on the same form as configured. Notices are listed according to Form ID and date generated. The Date Generated represents the day when the events were compiled into the notice file.
-
The # in File figure represents the number of events that have been recorded in the notice file. When the notices are printed, the system may be able to combine events for a specific member onto a single notice, resulting in a smaller number of actual printed notices.
To print, specify a printer and paper drawer, then place a checkmark next to each batch you wish to print and use Enter to begin printing.
IMPORTANT: Be sure to print ALL batches of the same form name at the same time. This way, if the same event occurred for a member multiple times during that period (such as several NSF checks over a weekend), all will be printed on the same form.
For example, say you print notices on Thursday morning, then don't print them again until the following Monday afternoon. Member John Doe has an NSF check that comes in on Friday, and another on Monday morning. On Monday afternoon, this screen will show separate batches of notices for events that occurred on Thursday, Friday, Saturday, Sunday (if applicable), and Monday morning. If all batches of the NSF form were printed at the same time, John's NSF notice form would include both of the NSF events on the same printed form.
Printing Contract Variable Rate Change Notices
Because of the unique nature of contract variable rate products, this form will remain separate from the configurable member notices and should be printed using Print Contract Var Rate Notices.
Reprinting From a Spool File
If you start a batch of notices and experience problems with the printer (jammed paper, out of ink, etc.), the notice file can be printed again starting at any desired page number.
1.Note the page number located in the bottom left corner of any printed notice to determine the appropriate starting page number.
2.Locate the notice file in your spool file, select it and choose Change.
3.When the “Change Spooled File Attributes” screen appears, press Additional parms.
4.Press Page Down to go to the second page of print choices.
5.Enter the starting page number and, if necessary, an ending page number. Press Enter to begin printing again.
Reprinting Notices
To reprint notices after they have already been printed, use Prev. Printed to view a list of batches printed previously. Printed notices are listed according to Form ID and date printed. The Last Date Printed represents the date on which the notices were last printed, and may represent a batch of notices generated on several different days (such as when you print notices on Monday and they include events generated Saturday and Monday).
Notices can be reprinted as many times as needed until they are purged. Use Prev. Printed again to return to the list of notices waiting to be printed.
Skipped/Unprinted Notices
Occasionally a member is flagged to not receive certain notices, such in the case of a bankruptcy, and the notice is skipped when notice printing takes place. For members with Written-off loans or members who have their Courtesy Pay Print Flag set to skip ANR notices, a new tracker will be assigned with either the NA NoPrint/ANRFlag or NL NoPrint/WrtnOff memo code to give explain why a Notice went unprinted. See more information in the Write-Off/Charge-Off Tools for Loans, Member Notices, and Automated Non-Returns (ANR) booklets.
Purge Rules
To keep the notice file clean, notices will automatically be purged according to the following rules:
-
Notices that have not yet been printed will be deleted automatically after 10 calendar days from the Date Generated.
-
Notices that have already been printed will be deleted automatically after 10 calendar days from the Date Last Printed recorded on the notice batch (use Prev. Printed to see these notices).
Special Note Regarding e-Alerts
For members who have subscribed to the “Notice Mailed” e-Alert (which send them a message letting them know a notice has been mailed to them), the e-Alert that appears in the members online banking Secure Message Center will be generated at the time you print the notices. So if you print a notice, it is important that it be mailed in a timely fashion! (If the member has also requested an email message, these are all generated at the end of the day in a batch.)
Members with Wrong Address Indicated in the System
CBX does not print a notice when the member’s address is marked as a “wrong address” in CBX. (Remember, you can mark an address as a “wrong address” in many places in CBX, including the Name/Address feature in Inquiry and Phone Operator.) Instead, CBXwill record that the notice was not sent though an entry on the member’s Notice Tracker. This entry will include an NW Memo Code entry (NoPrint/Bad Address), along with the title and basic details of the notice (shown below). Note: This will have no effect on members enrolled in e-Notices. This change only affects printed paper notices.
-
Automated Wrong Email Address Handling. CBX has an automated process to handle invalid email addresses from emails send via CBX. Learn more about Automated Wrong Email Handling.
Additional Video Resources
|
|
Check out these additional video resources! |