Create Quick G/L Check/Maintain Accounts Payable Disbursement
|
Screen ID: Screen Title: Panel Number: |
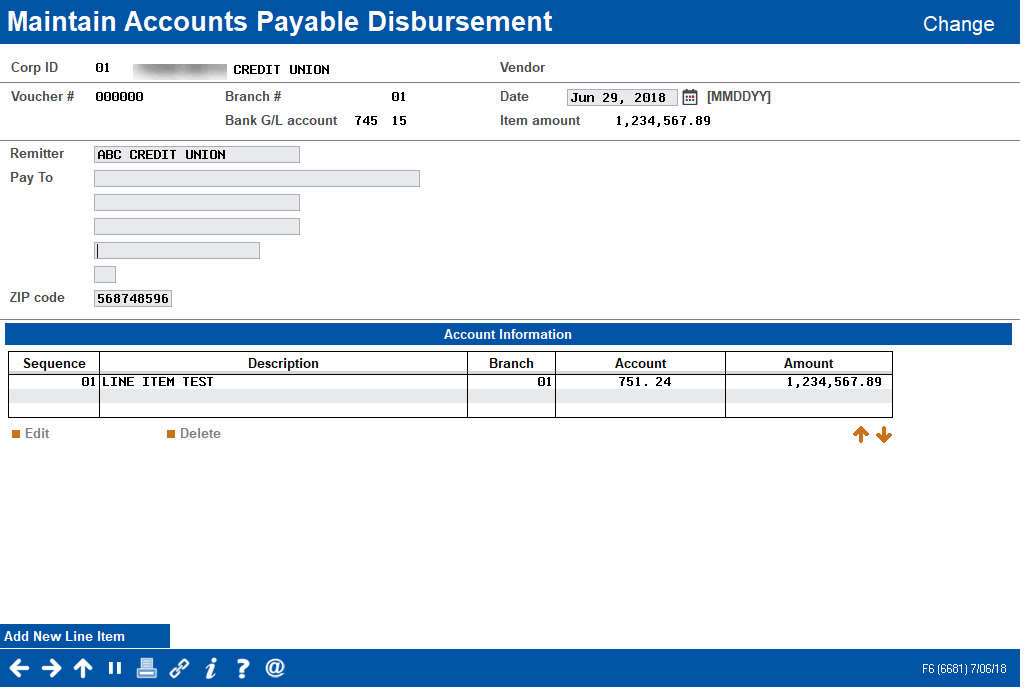
UGLCHDA-01 Maintain Accounts Payable Disbursement 6681 |
Access this screen by selecting a voucher and then Edit or View on the Process Payments for Vendors screen or after selecting a vendor after selecting "Quick Check" on the Process Payments for Vendors screen (after selecting a vendor). (If approvals for payments is activated, this screen will not be available via Edit or Quick Check.)
What you can do on this screen depends on how you access it.
-
Note: The A/P vendor address displayed here may not contain the full address that prints on the check itself. This is because the address information displayed on this screen comes from GLCHHP (voucher table) which only contains 2 address lines and 25 characters per line. The A/P vendor record (APVEND) contains 3 address lines and 30 characters per line.
Viewing the Details of a Vouched Item
View the details of the vouched item by selecting a voucher on the Process Payments for Vendors screen and then View.
Maintaining the Invoice
Maintain the invoice by selecting a vouched item on the Process Payments for Vendors screen and then Edit or after selecting a vendor after selecting "Quick Check" on the Process Payments for Vendors screen (after selecting a vendor). (If approvals for payments is activated, this screen will not be available).
|
Field |
Description |
|
Date |
(Optional) (For payments made by check) By default this is the date the accounts payable is entered into the system. If you wish a specific date to print on all checks, enter it here. This date is the date that appears at the top of the check. Leave this field blank and the system will use today's date as the check date when the checks are printed. |
Adding a Line Item to an Existing Vouched Item
Add a line items to an existing vouched item by selecting the vouched item on the Process Payments for Vendors screen and then Edit or after selecting a vendor after selecting "Quick Check" on the Process Payments for Vendors screen (after selecting a vendor). (If approvals for payments is activated, this screen will not be available).
You can add a line item to a check if approvals for payments is not activated.
-
Click Add New Line Item.
-
On the Line Item screen, enter the Description, Branch #, G/L Account, and Amount fields.
-
Repeat Step 3 as needed for additional expense items.
-
NOTE: A history record is not created when items are added via this method. You may also need to adjust or add a record in the history of this A/P Vendor.
Creating a Quick G/L Check
Create a quick G/L check by selecting "Quick Check" on the Process Payments for Vendors screen. (If approvals for payments is activated, this option will not be available.
-
NOTE: Remember if you generate a new check manually, you may also need to adjust or add a record in the history of this A/P Vendor.
-
NOTE: A history record is not created when checks are added via the Quick Check method.
-
NOTE: This feature is only available for vouchers that are paid via check. This feature cannot be used with vendors that are configured for ACH payments.
Follow these steps to create a Quick Check. (Creating a check to a vendor from the Process Payments screen will only be available when you access this screen via the Quick Check button.)
On this screen the Bank G/L account is populated with the workstation check printer. (The Bank ID is on the Print ID configuration.)
-
Fill in the top section of the screen with the date of the payment and the remitter information. (You can only edit this section when you access this screen via the Quick Check button.)
-
Click Add New Line Item.
-
On the Line Item screen, enter the Description, Branch #, G/L Account, and Amount fields.
-
Repeat Step 3 as needed for additional expense items.
-
When done entering expense items, use Enter to move to the Process Payments for Vendors screen.
Pay to Fraud Block List
After Pay to Name fraud block list scan is run against the name entered in the Pay to line when the vendor is selected after the Quick Check button is clicked n the Process Payments for Vendors screen. Take care to enter the Pay to name in a way that the scan will most effectively be run. If the Pay To Name is a match or partial match to the name in the block list, you will see a Suspect warning message.
Learn more about Fraud Block Lists: Overview: Fraud Block Lists