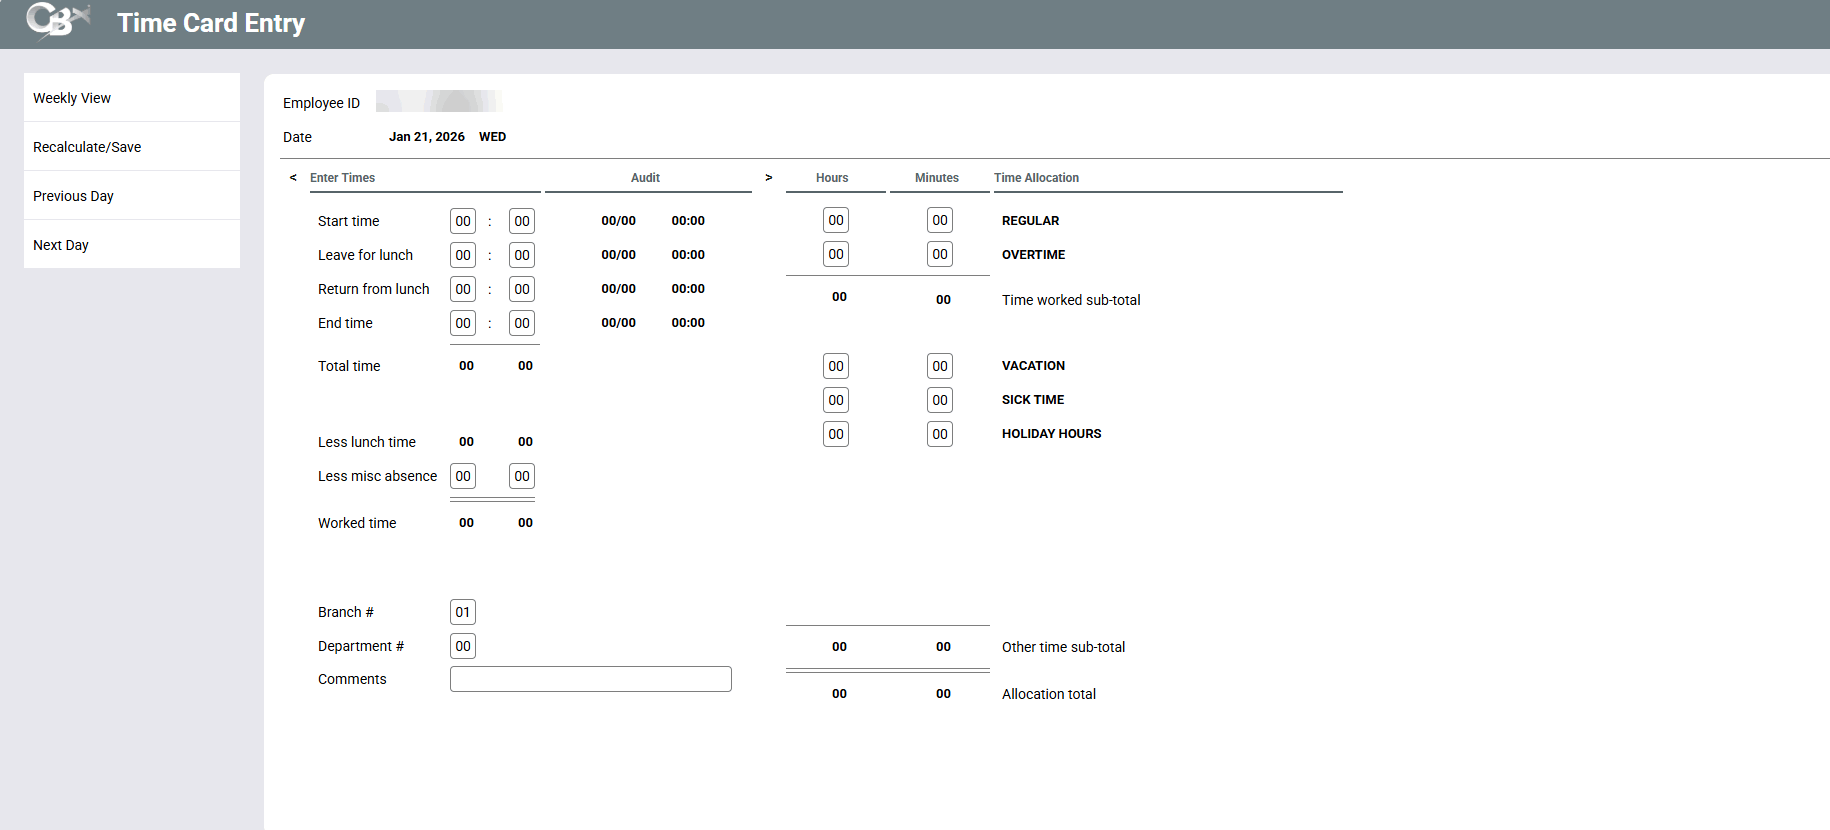
Entering Employee Time Card Data
|
Screen ID: Screen Title: Panel Number: |
UTIMEC02 Time Card Entry 2880 |
SEE ALSO:Timecard Processing Overview
This screen is accessed by selecting Tool #905: Update My Employee Timecard (Shortcut: tcard). A slightly different version of this same screen is used by the supervisor maintenance program available via this screen.
This screen is used to record a credit union employee's starting and ending work time each day. Lunch hours can also be recorded. Blocks of working and non-working time can be categorized according to credit union-defined groups, for further analysis of employee activity.
When used by employees to record time card data, by default the screen will display the current day's time card. (See below for instructions on updating other dates.) An additional “Audit” column will appear showing the actual date and time when start and end times were entered by the employee (these cannot be edited, but will update automatically if the associated time fields are changed).
Entering Times and Time Periods - Updating Your Time Card
You may access this screen as often as needed throughout the day to log starting time, lunch start/end time, and any miscellaneous absences from work (such as for a doctor's appointment). When you get ready to go home for the day, record an End time and then allocate your working time (and any non-working time such as sick or personal time, etc.) into the allocation fields on the right side of the screen.
Pressing Enter will save changes and return immediately to the Home Page. To calculate times and verify your entries before leaving, click Recalculate/Save . You can then use Weekly View to see a review of your time for the week. This can be printed and signed to use as a printed time card.
-
In order to save your final time card for the day, the calculated Worked timeon the left side of the screen must match the Total worked sub-total on the right side of the screen. Therefore all working hours must be allocated into your credit union's first two configured categories (typically Regular and Overtime). The remaining categories are for non-working hours such as sick time, personal or vacation time.
For example, say you normally work an 8-hour day (8 to 5), with an hour for lunch. Today you need to go home at 3:00 due to illness. Here's how the time card screen should be filled out:
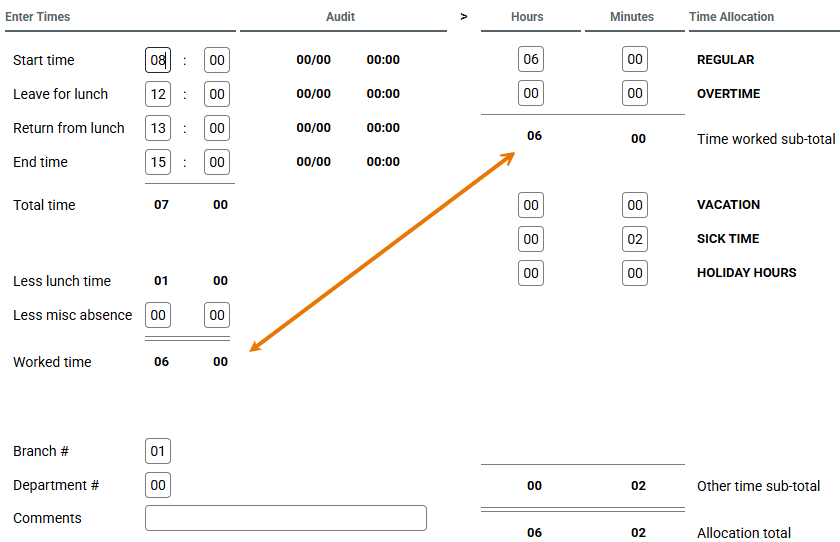
Notice that the daily total would show 6 working hours and 2 “other time” hours logged in your credit union's designated sick time category, for a daily total of your normal 8 hours.
Adjusting Time Card Data for Other Dates
Use Previous Day and Next Day (or click the < > buttons at the top of the screen) to adjust time card data for other dates.
NOTE: When using the supervisor maintenance program, you can use the initial screen to enter any date up to one year in the past or one year into the future. The Previous Day and Next Day buttons and corresponding arrow buttons will NOT be available if a range of dates is entered on the initial screen.Simply use Enter to proceed forward through the range.
Logging a Vacation Week
If logging a vacation day or other non-working time, you do NOT need to enter any of the start/end times on the left side of the screen. The most common situation would be to log an entire week's vacation:
-
Use Next Day to display your vacation starting date (such as next Monday).
-
Enter 8 hours (or the appropriate number of hours) into your vacation category.
-
Use Next Day to go to Tuesday (the system will automatically save your entry from Monday).
-
Repeat steps 2 & 3 until Friday's hours are entered, using Enter to save and return to the Home Page.
Remember that you can only go forward two full weeks, so you cannot log next month's vacation until a week or two before you leave.
NOTE: If you use the backup arrow (F3) or up arrow (F7) from this screen, you will exit this screen. Changes made since the last time any other button was used will NOT be saved.
Field Descriptions
|
Field Name |
Description |
|
Enter Times |
|
|
Start time |
Use this to record your starting time for the day. For example, if you arrived at 8:00, enter 08 00 into these fields. (Remember to use a 24-hour clock.) |
|
Leave for lunch |
Use this to record the time when your lunch break began. (Remember to use a 24-hour clock.) |
|
Return from lunch |
Use this to record the time when your lunch break ended and you returned to work. For example, if you returned from lunch at 1:15 p.m., enter 13:15. |
|
End time |
Use this to record your ending time for the day. (Remember to use a 24-hour clock, such as 17:00 for 5:00 p.m.) Once a time is entered here, you will be required to take the calculated hours shown in the Worked time field and allocate them into the first two categories on the right side of the screen. (Worked time must equal Time worked sub-total.) Additional non-working hours (such as if you are taking a few hours of personal or sick time) should be logged using the remaining categories. |
|
Total time |
Once your End time has been entered, the system will automatically calculate the total time from the Start time to the End time. |
|
Less lunch time |
If times are entered into both the Leave for lunch and Return from lunch fields, this will calculate the total lunch period. This period will be subtracted from your total hours to calculate the time worked. |
|
Less misc absence |
If you had to leave work for a period during the day (other than for lunch), use these to record the total amount of time away from work. (Enter the number of hours and number of minutes, not a time. You can also enter 90 minutes and the system will automatically calculate it as 1 hour, 30 minutes.) For example, this would be used if you had a dentist or doctor appointment where you left work but then later returned. This time will be subtracted from the total calculated Worked time. |
|
Worked time |
Once an End time has been entered, this will automatically calculate the total time worked for the day. This includes the time from the Start time to the End time, minus a lunch period (if those fields were used) and minus any hours entered into the Less misc. absence field. |
|
Branch # |
The branch number where the employee's workstation is located (this is filled in automatically but can be changed as needed). |
|
Department # |
(Optional) Use this to record your assigned department number. |
|
Comments |
(Optional) This field allows you to record a comment regarding the time card information for the day, such as “LEFT EARLY FOR DR APPT” or something similar. |
|
Audit These fields show the date (month and day) and time when an employee last modified the start time, end time, and lunch leave/return time fields. Audit data is NOT recorded when a supervisor changes these times using the supervisor maintenance program. |
|
|
Time Allocation |
|
|
Allocation of time worked |
These fields are used to break down the work day into credit union-defined categories for easier analysis. Enter the total hours and minutes under each category as appropriate, using Enter to calculate your total time. (You may also enter all minutes, such as 90 minutes, and the system will calculate it as 1 hour, 30 minutes.) The first two categories are considered working time, and the sub-total of these two categories must match the calculated Worked time on the left side of the screen. Remaining categories are optional and should be used for non-working time such as vacation, sick, etc., according to your credit union policies. |
|
Time worked sub-total |
This is a sub-total of the hours and minutes entered into the first two allocation categories. This must match the calculated Worked time on the left side of the screen. |
|
Other time sub-total |
This is a sub-total of the hours and minutes entered into categories 3 through 10 (if configured). These are typically non-working hours. Remember that the data on the left side of the screen is NOT compared or verified in any way against the data entered into these categories. |
|
Allocation total |
This is a total of all times entered in the allocation fields on the right side of the screen, both working time and non-working time allocation categories. |
Buttons
|
Buttons |
Description |
|
Weekly View (f9) |
Use this to display the Time Card Weekly View by Employee screen, which functions as a weekly time card summary for just this employee. This could be printed and signed to function as a printed time card. |
|
Recalc/Save (F10) |
Use this to calculate and verify your entries without leaving the screen. Changes will be saved. You will need to exit and re-enter the screen to see the changes. |
|
Previous Day (F11) |
Use this to save changes for this date and return to the previous day's time card. You can move backward one full calendar week before this week. |
|
Next Day (F12) |
Use this to save changes for this date and proceed to the next day's time card. You can proceed forward two full calendar weeks after this week. |