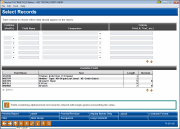
Choosing Records Using Selection Criteria
|
Screen ID: Screen Title: Panel Number:
|
Report Builder (Query) Select Records QRY001 |
This screen appears when you choose the “Choose records” option on the Report Builder Main Menu. It will also appear whenever you select one of the “canned” Query reports.
SEE ALSO: Database Inquiry: Search for Fields and Files
Helpful Resources
Learn how to perform Query-related tasks in CU*BASE.
Screen Overview
The query tool is very powerful and handling it incorrectly can lead to mistakes in accuracy and processing. Most significantly, incorrect joining (matching) data from multiple files, or incorrect filter settings can lead to significant errors. If you are a new user of query, please be extra vigilant about checking your work (preview the report) after each change you make and contact an expert at CU*Answers with your questions when needed.
This screen is used to choose which records should be included in the report. For example, you may want to see only records which fall within a certain date range or have a certain amount in a balance field. In the following example, only accounts in branch 01 with a balance between $1,000 and $5,000 will be included:
![]()
See the below for instructions on entering selection criteria. When done specifying criteria, use Enter to save changes.
-
If this report uses multiple files, the file ID must precede the field name (for example, T01.BRANCH) for any fields which may occur in both files. Click for details about using multiple files.
NOTE: Many of the CU*BASE standard “canned” Query reports use this selection screen to allow you to specify which records should appear on the displayed report. For these types of reports, this is the only screen which will appear; no other parameters can be modified. Using Enter in this case will simply run the report and display the results on the screen.
Specifying Query Conditions
|
Option |
Description |
|
Combine |
This field appears on all but the very first criteria item. Choose AND to add an additional condition. A record must match both conditions in order to be displayed.
Enter OR to add a separate condition. Any transaction that matches either or both of the conditions will be displayed.
IMPORTANT: Special rules apply when combining “AND” and “OR” conditions in the same report. For example, say you wish to locate debits of $1,233.45 in GL account number 739.00 (an “AND” condition) or credits of $1,233.45 in the same GL account (an “OR” condition). The conditions would be entered as follows (field names are fictitious for this example): DEBIT EQ 1233.45 The system first gathers all debits of $1,233.45 for GL account 739.00, then gathers all credits of $1,233.45 for GL account 739.00. A common mistake is to exclude the last condition, which would result in debits of $1,233.45 for GL account 739.00, as well as all credits of $1,233.45. |
|
Field Name |
Enter the field which should be searched. The field name must exactly match the fields listed on the bottom half of the screen. To see additional fields, click the blue arrows beneath the bottom list (or click anywhere on the list then use Page Down and Page Up keys).
|
|
Comparison |
Enter one of the following tests to indicate how the value should match the transaction record. (You may type the shortcut, such as EQ, or choose from the pull-down list.) EQ Equal to NE Not equal to LE Less than or equal to GE Greater than or equal to LT Less than GT Greater than RANGE Between one value and another value LIST Equals one of the values in the list NLIST Does not equal one of the values in the list LIKE Starts with, ends with or matches the pattern of NLIKE Does not start with, end with, or match the pattern of |
|
Criteria |
Enter the value you are searching for, using the following rules as a guide:
|
Using ISO Date Fields to Choose Records
With the File Expansion Project in 2014, CU*Answers began reformatting date fields into an easier to use ISO format. Previously, dates in the system could be difficult to work with as selecting a range of dates required multiple steps or often creating new fields to extract portions of the date (see the section below). With ISO formatted dates, distinguishable by their CCYY-MM-DD output and 'L' value in the Decimal column, selecting a range or sorting by the date is much easier.
Inputting the Selection Criteria
When using ISO dates, the date must be entered in single quotations (like a text field). Criteria can be entered with different formats, including with or without leading zeros (with the exception of MM/DD/YY), but they must be in single quotes. You can simply enter your date range or use the greater/less than comparisons to find all records between, after, or before the defined dates. In the example below, we are selecting accounts opened Dec 31, 2010 or earlier, between Jan 1 and Dec 31, 2012, or since Jan 1, 2014.

Selecting Records with No Date
For the ISO format, a "null" (blank) date is represented as 0001-01-01. In the example below, we select all loan accounts that have not yet had a payment made (i.e. no last transaction date):

Tips for Date Ranges Crossing 19xx ® 2000 on Non-ISO Formatted Dates
If Year is a separate field (CCYY):

If Year is a separate field (YY):

If Date is a combined field (MMDDYY):
First define a result field using the DIGITS expression to convert the date field to text. Then define a second result field that uses use the SUBSTR expression to allow the 2-digit year portion of that field to be used separately. (Click here for information about defining these types of results fields.) Then define selection criteria using the defined year field:

If Date is a combined field (YYMMDD):

