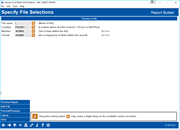
Choosing Files for a Custom Report
|
Screen ID: Screen Title: Panel Number: |
Report Builder (Query) Specify File Selections QRYFILE |
This screen appears when you choose the “Choose files” option on the Report Builder Main Menu.

|
Check out the video related to this topic: Selecting a File (More videos below!) |
Helpful Resources
Database Inquiry: Search for Fields and Files
Commonly Used CU*BASE Files (If you have trouble locating the data you need, contact a client service representative for assistance in choosing the correct file.)
Screen Overview
The query tool is very powerful and handling it incorrectly can lead to mistakes in accuracy and processing. Most significantly, incorrect joining (matching) data from multiple files, or incorrect filter settings can lead to significant errors. If you are a new user of query, please be extra vigilant about checking your work (preview the report) after each change you make and contact an expert at CU*Answers with your questions when needed.
This screen is used to choose a file or group of files where the data you need is stored. For CU*BASE users, there are specific files which contain the data needed in most custom reports. After entering the file name and location, use Enter to save changes.
Using Multiple Files
Some reports will require fields from more than one CU*BASE file, joined together based on a common field.
-
For example, say you want to show member name, city, and ZIP code, along with share draft account information. This report would require both the MASTER file (name and address data) and the MEMBER2 file (share draft data) to obtain all the required fields. Both file names must be added to the report using this screen.
The first file you enter is called the “primary” file. All other files are called “secondary” files. To add a secondary file, use Add File (F9). Additional fields will be added to the screen:
-
Notice that an ID field has been added and an ID assigned to each file. This ID will be used in other configuration screens to indicate which file a particular field belongs to, if using a field name that exists in both files. You may assign a different ID if desired (such as A, B, C, etc.), or use the ID assigned by the system (T01, T02, T03, etc.).
Enter the desired file name. If a third file is needed, use Add ent File (F9) ander another file name. When done, use Enter. A confirmation message will appear; use Enter again to confirm and continue to the next screen.
Field Descriptions
|
Field Name |
Description |
|
File name |
Enter the file name where data will be found for this report.
|
|
Location |
Enter the library name where the file will be found, as follows (in place of the xx, substitute your credit union's two-character CUID): Current files: FILExx
|
|
Data set |
You do not need to enter anything into this field for CU*BASE reports. The system will automatically fill in the appropriate name when Enter is used. |
|
Format |
In this context, a “format” is an arrangement of fields within a database record. You do not need to enter anything into this field for CU*BASE reports. The system will automatically fill in the appropriate name when Enter is used. |
Additional Video Resources

|
Check out these additional video resources! |
Visit the CU*BASE video library.
