Configuring a Financial Report (2)
|
Screen ID: Screen Title: Panel Number: |
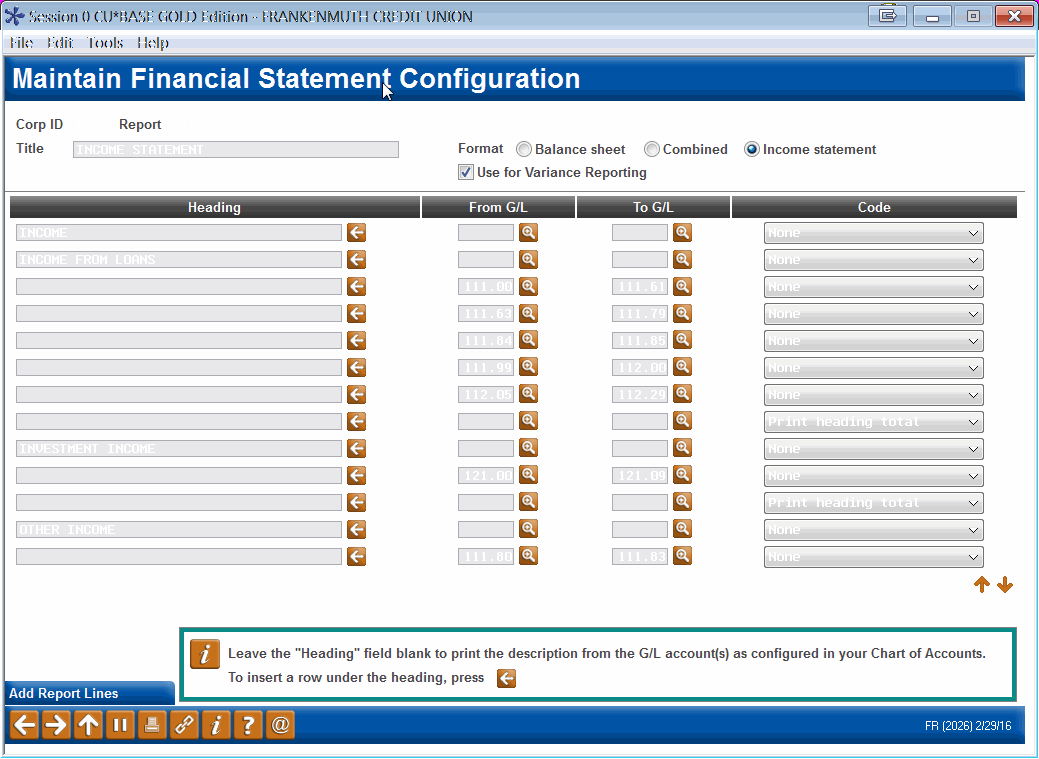
UGLHEA1C Maintain Financial Statement 2026 |
|
This screen appears when you choose to create or modify a report on the first financial report configuration screen.
Click here to view samples for ways to complete this screen.
This screen is used to specify the headings, general ledger accounts, and summary totals that should print on the financial report.
Configuring a financial statement can be as simple as listing all income and expense accounts with a grand total of each. However, the system is flexible enough that your financial reports can be very complex, with many subtotals and summary groupings. It is not uncommon to spend a good deal of time experimenting with various configurations until you get just the right report for your needs.
IMPORTANT: Every general ledger account should appear on at least one of your credit union's financial statements—either the Balance Sheet or the Income Statement.
Start by entering a report Title to describe how the report will be used. Next, choose one of the following Report Types:
Balance Sheet (B) - When printed, this report type will allow you to select only an ending date and will report all totals up to that point in time.
Income Statement (I) - When printed, this report type will require both a beginning and an ending date range, to report totals only for that period of time.
Combined Balance Sheet and Income Statement (C) - When printed, this report type will require both a beginning and an ending date range, to report totals only for that period of time.
(Beginning and ending periods are specified when the report is actually printed.)
If you wish to use this report to show variances from your budget using the Print Variance Financial Stmts feature to be sure to check the Use for Variance Reporting setting.
Next, use the four columns in the list to specify which G/L accounts should be included in the report, as well as how groups of accounts should be summarized.
Field Descriptions
|
Field Name |
Description |
|
Heading |
For every account or group of accounts that will appear on the report, use this column to enter the descriptive heading that should print: either alone as a section heading (leave the G/L Acct columns blank), or as labels for account balances and totals. Leave this field blank to print the description from the G/L account(s) as configured in your Chart of Accounts. |
|
From G/L |
Use this column to enter the starting general ledger account number to be printed or totaled. If used with a Total Code, the system can calculate summary totals; otherwise, the actual account balance will be printed. If an account is entered here but the G/L Acct To column is left blank, only one G/L account will print on this line. To include a range of accounts, fill in the ending account number for the range using the G/L Acct To column.
|
|
To G/L |
The ending general ledger account number in the range to be printed or totaled. If used with a Total Code, the system can calculate summary totals; otherwise, the actual account balance will be printed. |
|
(Total) Code |
If you wish to use this line to print a total of two or more G/L accounts, choose a (Total) Code using the pull-down list in this column. See below for a description of all available codes. |
When a new report is created, you can use up to 10 lines for report configuration. Use Add Report Lines (F10) to add 10 more lines (you may need to roll up or down to see all lines). Repeat for additional lines as many times as needed.
When all headings, account numbers and total codes have been completed, use Enter to save the changes and return to the previous screen.
-
CU*TIP: If you need to insert a line in the middle of the configuration, select a row in the list and use the Insert Row option. The new row will be inserted above the row that was selected, and that row will move down to make room.
-
CU*TIP: To delete a row, simply delete text from all fields on that row. When the report is exited, the system will eliminate any completely blank lines automatically.
Codes (Total Codes)
Total codes determine how the system handles totaling on various lines of the report.
|
Code |
Description |
|
(blank) |
Print account balances only for each individual G/L account. See Report Sample #1 below for an illustration. |
|
Bypass/accumulate |
Bypass any printing but accumulate the total for the range of accounts listed on this line—like using the “Memory+” button on a calculator. See Report Sample #2 below for an illustration.
IMPORTANT: If you plan on using the Print accounting format option when printing this report (to remove the minus sign on credit-balance accounts), using this total code may not give you the results you expect. Click here for more details. |
|
Percentage subtotal |
(Used for income statements only.) Mark this as the point in the report where the total should be saved for use in calculating percentage fields. The system will store a figure from any “Print Heading Total” or “Print Summary Total” codes printed thus far. See Report Sample #3 below for an illustration. For example, say you had calculated total income from two separate totals using “Print Heading Total” codes, and wanted the sum of both totals to be used when calculating percentage of income later. A blank line with the “Print Summary Total” code on it would instruct the system to remember the totals so far and use them later for the calculation.
|
|
Print net |
(Used for income statements only.) Calculate and print a net gain or loss figure on this line in the report, by adding together all amounts already printed up to this point. See Report Sample #3 below for an illustration. If a heading is entered on the same line as this code, your heading will be printed as a label for the summary total. If no heading is entered, the system will use “Current Gain(-) or Loss” as the heading.
|
|
Print bypassed total |
Print the accumulated total of the accounts listed with “Bypass/Accumulate” codes—like using the “Memory Clear” button on a calculator. See Report Sample #2 below for an illustration.
IMPORTANT: If you plan on using the Print accounting format option when printing this report (to remove the minus sign on credit-balance accounts), using this total code may not give you the results you expect. Click here for more details. |
|
Print summary total |
To print a summary total for the range of accounts listed. See Report Sample #1 below for an illustration.
|
|
Print heading total |
To print a total for the last report heading. The system will total all accounts listed since the last heading which was entered with no accounts and no total code. See Report Sample #1 and Report Sample #4 below for illustrations. IMPORTANT: If you plan on using the Print accounting format option when printing this report (to remove the minus sign on credit-balance accounts), using this total code may not give you the results you expect. Click here for more details. |
Report Sample #1
Configuration

Printed Report

Notice how the lines where no G/L accounts were entered are printed as headings on the report. Headings are indented under any previous headings that have no account number or total code.
Also notice that because of the "Print summary total" (S) code, the “Misc. Employee Benefits” line on the report comprises a total of G/L accounts 213-01 and 213-02, while accounts 370.69 through 371.68 print separately with their own headings from the Chart of Accounts.
Finally, notice that the final total prints with the word “TOTAL” and the last main heading that was entered without an account number or Total Code.
Financial Report Sample #2
This sample shows how the “B” and “P” total codes work together to provide summarized totals of non-sequential G/L accounts.
Configuration

Printed Report

Notice the G/L accounts that were entered with the “Bypass/accumulate" (B) code are not actually printed, but rather their individual account totals are accumulated and printed on the line with the "Print bypassed total" (P) code. No individual G/L accounts can be printed on the same line with a "Print bypassed total" (P) code.
Financial Report Sample #3
This diagram shows a simple example of how the “Percentage subtotal" (G) and “Print net" (N) codes can be used.
-
IMPORTANT: When a report is configured with the “Percentage subtotal" (G) code, special instructions are required when the report is printed in order for the percentages to be calculated.
Configuration

Printed Report

Notice that the second line where the “Percentage subtotal" (G) code was entered does not print anything, but instructs the system to remember the preceding total to be used in later calculations. The system remembers any totals from a “Print heading total" (T) or "Print summary total" (S) printed thus far. Starting with the “Operating Expenses” line, the system begins calculating % of income using the figure stored from the “Percentage subtotal" (G) code on the previous line.
For the “Net Income Before Div.” line, the "Print net" (N) code instructs the system to calculate a net amount by adding together all the amounts already printed (in this case, total Income and total Operating Expenses).
Finally, because this was formatted as an Income Statement, notice that the “Net Gain(-) or Loss” information automatically prints at the bottom of the report.
Report Sample #4
The following is a very simple income statement. The picture at the top shows the configuration settings used to set up the report, with a sample of the printed report below it. While this is a very simplistic example, it can be helpful to study the design in order to get ideas for starting your own report configuration.

