Misc. Member Account Forms Layout
|
Screen ID: Screen Title: Panel Number: |
UNAFRM-02 Misc. Member Account Forms Layout 2528 |
Access this screen by selecting a form layout on the previous screen and selecting Change.
-
For complete information on using this screens to set up new account forms and TIS disclosures, refer to the Miscellaneous Member Account Forms booklet.
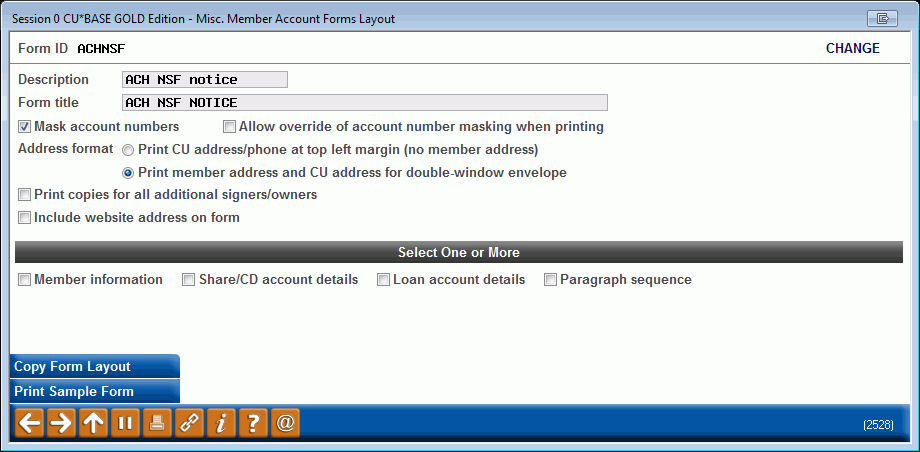
This screen is the first of four used to design the layout of a Member Account Form. Start by entering a Description of the form, to be used in various screens and help windows to describe the form’s use. Also enter the Form Title which should print at the top of the form. Refer to the Miscellaneous Member Account Forms booklet for an example.
Next, choose an address format to specify whether this form should include the member’s name and address positioned for the window of a standard double-window envelope.
-
You may not wish to use the window envelope format on forms such as TIS disclosures, fee schedules, etc., so that you will have as much space as possible on the page for the paragraphs themselves. However, for correspondence that will be printed on an occasional basis to specific members, this feature allows you to include the member address so that you can simply slip the printed form into an envelope for mailing.
You can also choose to check the “Include website address on form” checkbox and the website address configured on the Chart of Accounts screen will appear on the member account form.
When printing, you are able to select to print copies for all additional signers and/or owners on the account. To print the copies for additional signers/owners, you must include the fields for Joint Owner name and address on the form layout.
Finally, place a checkmark to choose from the four available layout screens will be needed to design the form. You may choose as many as needed, and the screens will appear in order, one after the other, until all have been filled in.
Masking Account Numbers
Simply check the options to make masking available, and to allow the override, if you desire. These options will only appear when the member account number is configured to appear on the form, so keep in mind that when creating a new form, you’ll first have to select the fields from the “Account Details to Include on Form” section of the configuration to include the Account # before seeing the option to mask the account number.
Once you’ve configured your form to allow for masking, use Tool #21 Print Misc. Member Account Forms to print the desired form for the desired member. Once you’ve selected the member and form, the Print Form pop-up will allow for you to select to mask, or not mask, the member’s account number, resulting in an account number that will appear as *****00-000, where the zeroes represent the member’s actual final digits and account suffix.
Field Descriptions
|
Field Name |
Description |
|
Choose this if you wish to include a “Member Information” section at the top of the form containing name, address and joint owner information for a specific member. |
|
|
Choose this if you are creating a form that relates to either share or certificate accounts, and you wish to include an “Account Details” section on the form containing specific account or product information, including rates, terms, dividend payment information, etc. |
|
|
Choose this if you are creating a form that relates to loan or line-of-credit accounts, and you wish to include an “Account Details” section on the form containing specific account or product information, including payment amount, amount due, maturity and payment dates, etc. |
|
|
Choose this to choose which text paragraphs should print in the body of the form, and the order in which the paragraphs should appear. |
Printing a Sample Form
If you wish to print a sample copy of the form now to see how the layout is coming, use Print Sample Form. The window will appear to allow you to select a printer, tray and number of copies. If the form includes editable paragraphs, a screen will pop in CBX allowing the MSR to adjust the text to customize it.
Remember that unless the form is linked to a product, no product-specific information (such as rates and terms) or member-specific data (names and addresses) will appear, but the headings and labels will be there so you can verify placement and spacing.
Copying a Form Layout
If you have already created a form layout similar to the one you are starting now, Copy Form Layout can be used to bring in all of the layout parameters from that form into the current one, including member and account detail fields and paragraph order. After the layout is copied, you may make any changes necessary to this layout without affecting the other form.