General Transaction Activity Report
|
Screen ID: Screen Title: Panel Number: Report Name: |
LTRREGS-03 Transaction Register 4632 LTRREG1 |
Access this screen by selecting Tool #381: General Transaction Register.
Helpful Resources
Screen Overview
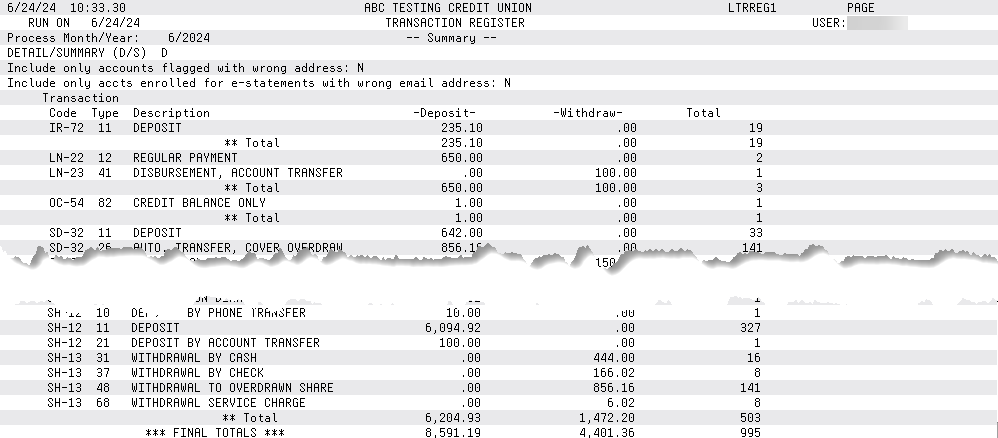
This screen is used to print a transaction register showing all transactions posted to member accounts. You can also choose to print just a summary showing total deposits and withdrawals by transaction code and type.
NOTE: Examples are below for staging this report for current and previous months.
-
CU*TIP: To print a list of only account adjustment transactions, use the Member Account Adjustments report instead.
Use this Report
-
To run a summary report to get a total of all ATM transactions for last month.
-
To run a detail report to list all transactions made to written off loans using a primary G/L = 719.00.
-
To run a detail report to list all the mail direct transactions that were posted for a specific day using origin code = 04.
-
To run a detail report for all transactions this month that offset to G/L 870-00 miscellaneous suspense.
-
To run a detail report for all transactions ran by a specific employee for last month.
-
To run a detail report for all manually posted ACH Transactions. Click here to see how to stage the screen to use this screen for balancing after the Post feature has been used from the ACH Exceptions Screen.
-
For auditors to monitor members flagged with wrong addresses, as well as members who enrolled in e-Statements but have wrong email addresses.
Practical Uses of this Report
Use this report to find totals of transactions by origin code to analysis the activity for the month. Use this report to find a group of transactions offsetting a specific primary G/L or specific offset G/L.
For auditors, use this report to monitor members flagged with wrong addresses, as well as members who enrolled in e-Statements but have wrong email addresses. This report allows the selection of activity by transaction code, origin and type (to allow for the selection of EFT transactions that require the production of a statement). Filter the report results to just the members you need to monitor. Use the “Export report to file” feature to create a file of these members for use in Report Builder and Member Connect.
How Do I Save/Retrieve My Report Settings?
For more details on setting up this feature, refer to the Automating Reports and Queries booklet.
This report can be used with the “Report Scheduler,” a time-saving automation feature that allows you to select and save the filters you use to run several commonly used reports and then set these reports to be run automatically by our operations staff on the first of the month. Or you can save the settings and run them manually by yourself at any time.
o save your report settings, first select your filters, including printer (can be a physical printer or the HOLDxx or MONTHxx OUTQs). Then select Save Settings. On the next screen name your settings (we recommend adding your name!), and designate whether you wish to run this manually or if you wish for operations to run the report. At a later time, use Retrieve Settings to populate the screen with the settings you have saved. You can also edit your settings using Retrieve Settings. All saved settings can be viewed on the Report Automation: Standard Reports screen.
Field Descriptions
|
Field Name |
Description |
|
Report type |
Choose Detail to list each individual transaction, sorted by account number. (This is usually quite a long report.) Choose Summary to show just total deposits and withdrawals by transaction code and type. |
|
File type |
Choose one of the following to specify where data should come from when generating the report: Current - to use data from current month files TRANS1, TRANS2, and TRANS3 See below for report staging recommendations. End of Month - to use data from an end-of-month file ETRmmyy1, ETRmmyy2, and ETRmmyy3 History - to use data from transaction history files HTRANS1, HTRANS2, and HTRANS3 |
|
File date |
Enter the month and year for the file to be used when pulling data for the report. |
|
Application type |
To include only transactions that affected a certain type of accounts, use the Select button to reveal a screen to select one or more application types. When you return to the screen, the count of the items selected with appear next to the button. SEE ALSO: Filter and selection directions. |
|
Transaction origin code |
To include only transactions that came from a specific origination point, use the Select button to reveal a screen to select one or more transaction origin codes. When you return to the screen, the count of the items selected with appear next to the button. SEE ALSO: Filter and selection directions. |
|
Transaction code/type |
To include only transactions with a certain transaction code and/or type, enter the codes here (Tran Code goes into the first field, Tran Type in the second field). You can use either or both, as needed. |
|
Date/Date Type |
To include only transactions with a certain date, use the Date field to enter the date of the transactions to be included on the report. Then select whether you wish to specify Activity Date (TR) or Business Date (PR). What is Activity Date? What is Business Date?
Leave both fields blank to include all transactions, regardless of date. |
|
Branch type |
To include only transactions that were posted to a particular branch/location number, choose one of the following to specify which branch data to use: Member Branch - When a transaction is posted, the system automatically records the branch number from the member's MASTER record. Choose this to pull transactions according to this branch. Transaction Branch - When a transaction is posted, the system includes the branch number from the workstation used to post the transaction. Choose this to pull transactions according to this branch. Then use the Branch # field (see below) to enter the desired branch number. Leave both fields blank to include all transactions, regardless of branch. |
|
Branch # |
(Optional) (Optional) (Use in conjunction with Branch type.) To include only transactions associated with a specific branch, use the Select button to reveal a screen to select one or more branches. When you return to the screen, the count of the items selected with appear next to the button. SEE ALSO: Filter and selection directions. |
|
Member G/L account # |
To include only transactions that were posted to a certain member G/L account number (the “primary” G/L), enter the account number here. Leave the field blank to include all transactions, regardless of member G/L account. |
|
Member account base |
To include only transactions that were posted for a certain member, enter the account base here. Leave the field blank to include all members. |
|
Offset G/L account # |
To include only transactions that were posted against a certain G/L account number (the “offset” G/L), enter the account number here. Leave the field blank to include all transactions, regardless of offset G/L account. |
|
Employee ID |
To include only transactions posted by a particular person, enter an Employee ID here. Leave the field blank to include all transactions, regardless of which employee posted them. Viewing data center employee activity:
|
|
Include only accounts flagged with wrong addresses |
Filter the results to show only members with their address flagged as a wrong address. (Where the wrong email address flag is set to Y.) |
|
Include only accts enrolled for e-stmts with wrong email addresses |
Filter the results to show only members who are enrolled in e-Statements but who also have their email address flagged as an invalid (wrong) email address. |
|
Export to file |
(Optional) Check the “Export to file” go to a screen where you can choose to create a file that lets you use Member Connect to communicate instantly with these members via email and online banking messages, set up a marketing outreach via mailing labels and selective statement inserts, and track the responses via a telemarketing Tracker. This file will contain account base only. Or choose to export more data to use with Report Builder. |
Staging of Screen for Printing a List of ACH Transactions Posted Today Through the ACH Exceptions Post Function
Use the staging below to print this report for use with reconciling your ACH Exception Report (Print on the ACH Exceptions Screen) totals after using the Post option on the ACH Exceptions screen.

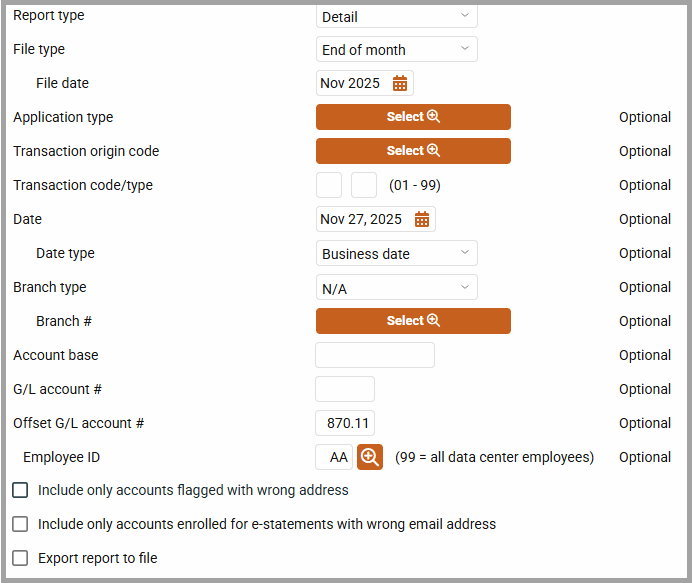
·NOTE: In this example, the report is staged to list all the member transactions that posted on October 4, 2025 by Employee AA that were offset to G/L 870.11. Employee will use this report every day to verify the transactions they posted to the member’s accounts from the ACH Exceptions Screen using the Post option (function).

-
NOTE: In this example, the report is staged to list all the member transactions that posted on November 27, 2025 by Employee AA that were offset to G/L 870.11. In this example, we are using the End-of-Month file for September. Employee will use this report to verify the transactions they posted to the member’s accounts from the ACH Exceptions Screen using the Post option (function) from the previous month, when needed. You will need to use the End-of-Month file from the same month as the selected date to get the desired results. If you use the current month, with a date from a prior month, your report will not include any transaction.
Report Sample
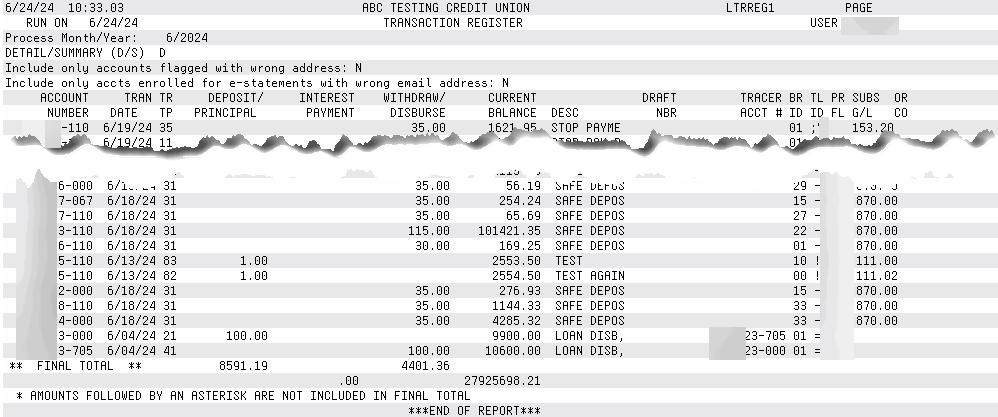
Transaction Register (Detail)
NOTE: The “Pr Fl” column shows various status flags from transaction history records, which are primarily used behind the scenes by the system when processing transactions.
S = Suppressed from member statement.
P = Can represent a fee for printing a Transaction History list; also used for some types of transaction reversals.

Summary

