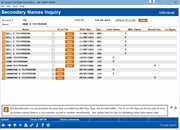
Secondary Names Inquiry
| Screen ID: | ISNWF-01 | 
|
| Screen Title: | Secondary Names Inquiry | |
| Panel ID: | 4420 | |
| Tool Number: | n/a | |
| Click here to magnify |
This screen appears when you click Secondary Names on the main Member Inquiry, Phone Software, or Teller Verify Member screens or by clicking the Secondary Names Inq button on the Xpress Teller Who Are You Serving screen.
Explain the differences between a joint owner and a miscellaneous owner.
Why am I seeing all 9s in fields on this screen? What are the affected tables?
This screen shows all secondary names or additional signers (co-borrowers) that are attached to any sub-accounts under this membership. This includes joint owners, misc. owners, and regular beneficiaries (secondary names links in the SECNAMES table) as well as additional signers (entries in the ADSL table) on loan and LOC accounts. IRA Beneficiaries are not included in this list because IRA Beneficiaries are stored according to IRA Plan Type, not by individual sub account.
The label used for "Joint Owner" and "Misc Owner" will vary depending on the Membership Designation code assigned to this membership. For example, instead of “Joint Owner” you might see “Trustee” for a membership flagged as a trust account. Or instead of "Misc. Owner" you might see "Benef Owner" or "POD."
If a member has been marked as deceased, the Secondary Name will be displayed in blue text.
By default the list will be sorted by first name. This order is helpful if you are talking with a joint owner and want to see all of the accounts to which this particular person has access. Click the column headings to change the sort order (click once for ascending order, again for descending). Use Show SSN/TIN to see a SSN/TIN in place of the birth date (use Show Birth Date to toggle back). Use Show Comments to see comments about each person's relationship to the primary owner in place of the last four columns (use Show Ownership Type to toggle back).
To see address and contact information, click the lookup button in front of any name to display the Secondary Names Contact Information screen.
Integration between CU*BASE and Your Imaging Solution
This screen has a link to your imaging solution to further integrate with CU*BASE.
To view the photo ID of a member, joint member, or beneficiary, click on the View button in the ID Action column. A window will open showing the photo ID. (The View button indicates that the ID on File box has been checked.) More information on this feature, tips and troubleshooting are available on this topic.
To scan an ID for a member, joint owner or beneficiary, click the Scan button in the ID Action column. Native Receipts will launch with the person's first name, last name and Social Security number pre-populated, ready to scan.
Important: When you click the “Scan” button, the Photo ID check box is automatically checked, regardless of whether you complete the scan. If for some reason you fail to complete the scan, simply return to the Secondary Name screen, uncheck the Photo ID on File or ID on File box next to that person’s name, and use Update to reset the indicator.
-
Remember: Only documents warranted by your vault can be scanned into the vault.
-
Clients with In-house eDOC Vaults: The links are configured to link to specific table names. Contact a Client Services Representative for assistance if our standard table names don’t match your vault’s configuration.