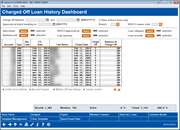
Written-off Dashboard/Charged-off Dashboard
| Screen ID: | ILNWO-01 | 
|
|
| Screen Title: |
Written Off Dashboard/Charged Off Dashboard |
||
| Panel ID: | 5718 | ||
| Tool Number: | 476 | ||
| Click here to magnify | Click here to magnify |
Access this screen by selecting Tool #476 Loan Write-off/Charge-off History Dashbd.
Helpful Resources
Write-Off/Charge-Off Tools booklet
Learn how to write off a loan.
Screen Overview
This view includes written-off loans and charged-off loans. Charged-off loans are indicated by the presence of “Y” in the Chrgd Off column. To view only the charged-off loans, use View CO Loans. Click View All Loans to return to the default view of all written off and charged off loans. The columns can be sorted on by clicking the header of the column.
There are two pictures at the top of this topic. The first is the default view of all WO and CO loans. The second is the view that is shown when you click View CO Loans.
-
You can also use the date WO between date ranges or CO between date ranges to view only loans that were written off or charge off during that time period.
-
NOTE: Some data may not be available if a loan was charged off or written off prior to the implementation of the 15.0 release (April 19, 2015 for online credit unions).
-
You can access the Written-off Loan History screen by selecting a loan and then the Written off loan history link.
-
You can also access the member’s Tracker conversations by selecting a loan and then clicking the Tracker review link.
-
Access the credit score history for this member by selecting a loan and the Credit Score history link. Your employee ID must be set to allow the review of credit scores in the Employee Security special permissions.
-
The Net Change column on the Written-off view shows the difference, both a dollar amount and a percentage, between the amounts shown in the Current Balance and Balance at Write Off fields. This could be a negative amount. Use Toggle above the balance fields to change the balances used for calculating the Net Change figures.
Filters
|
Filter |
Description |
|
WO/CO between MMDDYYYY and MMDDYYYY |
Enter From and To write-off dates to filter the written-off and/or charged-off loan information. |
|
View indirect loans only |
If this box is checked, the dashboard will display only loans with a dealer ID on the indirect dealer file. Default is unchecked. |
|
Approved at board meeting on |
Select the appropriate MMYYYY and pull loans written off or charged off on the selected date. |
|
Branch |
Select to filter by a branch. |
|
WO/CO Reason Code |
This is a lookup of the current write-off and charge-off reason codes. |
|
Interviewer WO/CO approved by Loan category Business unit Loan purpose Loan security |
Use the Select button to move to a screen where you can select one or more of the item selected. Use the Shift and Ctrl keys to select multiple items on the screen and then click Select to return to the dashboard. Choose to filter by interviewer, the Employee ID that the write off was approved by, the loan category at WO, the business unit, the loan purpose code, or the loan security code. |
Buttons
|
Button |
Description |
|
Use this to view a summary of the filters that are currently in effect on this dashboard. |
|
|
Use this to view an analysis dashboard that summarizes key statistics from your write-off/charge-off history. |
|
|
Use this to create a database file of member account numbers. |
|
|
After creating a database file using the Export feature, use Member Connect (F10) to contact those members. |
|
|
View WO Loans/View CO Loans |
The entry screen includes written-off loans and charged-off loans. To view only the charged-off loans, use View CO Loans (F11). The Charge-Off dashboard includes columns that are different than the written-off view. Click View WO Loans (F11) to move the entry screen. |
|
Use this to take this group of members and view the Common Bonds dashboards showing membership and other traits these members have in common. |
|
|
Save Filters |
Use this to save your current set of filters as a template that you can use again later. |
|
Use this to access the My Favorite Filters screen where you can Select, Delete or View saved filter settings. Use Select to work with an existing template. Making changes to an existing saved template will not update that template. You need to save as a new template if desired. Note: You cannot delete templates created by another Employee ID. |
|
|
Refresh |
If you have set any filters on the main entry screen, use this to reset the dashboard to remove all filter settings and refresh the list to a full display. |
|
Open/Close Date |
Use this to toggle Closed Date vs Open Date. |