Check Reconciliation (2)
|
Screen ID: Screen Title: Panel Number: |
UGLRECA G/L Check Reconciliation 2109 |
|
Helpful Resources
Learn how to clear a corporate check.
Learn how to void a stop pay on a check or money order.
Screen Overview
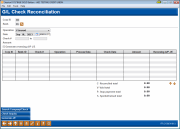
This is the second screen used to reconcile checks. The fields available on this screen will depend on the reconciliation method selected on the initial screen.
-
Start by choosing an Operation (see Operations below for a description of when to use each of the Operation codes).
-
Next, enter the check Date and Check Number (either a single check number or a from/to range). If the check Amount field appears, enter the EXACT check amount.
-
If using the Void or Stop Payment operation—on an accounts payable smart check ONLY—you may check the Generate Reversing A/P J/E flag to generate a journal entry which will reverse the debit and credit entries produced by the original check. (This can also be used if canceling an earlier Void or Stop Payment operation on an accounts payable check.)
-
NOTE: This entry does NOT automatically post. You must use the Create/Post Journal Entries feature to post the resulting entry.
-
-
Use Enter to add the check(s) to the list at the bottom of the screen.
-
CU*TIP: If some of the check data seems to disappear after entering an item, try using the Home key or the Page Up/Page Down keys to redisplay the entire list.
-
-
Repeat steps 1-4 as needed until the list at the bottom of the screen contains all of the desired items. Notice the running totals for each operation at the bottom of the screen.
-
Once all checks have been entered, use F7 or click Generate J/E (see button description below) to record the changes and generate any requested journal entries. If reversing journal entries were requested, the General Journal Reports will be printed automatically. See below for a sample of these reports.
IMPORTANT: Voiding an accounts payable check does NOT remove it from the associated vendor's history. Using the Work With AP Vendors feature, use A/P History Maint (F5) and either delete the item or change the Voucher Code on the item to remove it from the YTD total for that vendor. Click here for more information.
Canceling a Previous Check Status
Once a check has been marked as cleared, voided, stop payment, or spoiled, its status cannot be changed without first canceling the original status. Four status codes are available for this purpose: CC (Clear Cancel), VC (Void Cancel), PC (Stop Payment Cancel) and SC (Spoiled Cancel).
-
NOTE: If during a single reconciliation session you wish to change the status, you may do so by simply reentering the check with the new Operation code. The cancel codes are only necessary if you have already posted a reconciliation batch and then need to change the status of a check. However, the only way to change a check status back to outstanding is to either cancel the entire reconciliation session (you will lose all changes), or End the session normally then return and use the appropriate Cancel operation code.
Example
Say you accidentally voided check number 1201, and have already use End (F7) to generate the reversing journal entry and change the check status to “V” for Void. Following are the steps to reverse that action.
-
Return to the check reconciliation screen and mark check number 1201 using “VC” as the Operation, placing a checkmark in the Generate Reversing A/P J/E field.
-
Use End (F7) to create the journal entry and change the check status back to “O” for Open.
-
Post the journal entry using the Create/Post Journal Entries (Tool #61 Create/Post Journal Entries (Shortcut glpost)).
-
When the check actually clears, return to the check reconciliation screens and mark check number 1201 again, this time using “C” as the Operation.
-
Press End (F7) to change the check status to “C” for Cleared.
Operations
|
Operation Code |
Description |
|
C Cleared |
Use this operation to record that a check has cleared at the bank. No journal entry is made. |
|
V Void |
Use this operation if the physical check was voided and destroyed. If this is an accounts payable check ONLY, you may check the Generate Reversing A/P J/E flag. A journal entry that reverses the original debit and credit of the check will be created with an ID of “CV” (check void). |
|
P Stop Payment |
Use this operation to record that a stop payment order was placed on the check. If this is an Accounts Payable check ONLY, you may check the Generate Reversing A/P J/E flag. A journal entry that reverses the original debit and credit of the check will be created with an ID of “CP” (check payment stopped).
|
|
S Spoiled |
Use this operation if an unused check with a pre-printed check number on it was ruined and cannot be used. No journal entry will be made. On this screen, you may only spoil a check which has not yet been printed. For example, if you spilled coffee on a batch of pre-numbered checks, they should be marked as spoiled on the system. To spoil an existing check that was already printed, use the Reprint CU Checks feature (Tool #760 Reprint Corporate Checks (Same Day) (Shortcut: reprint))
|
|
CC Clear Cancel |
If a check was marked as cleared and the reconciliation session was ended with End (F7), use this operation to change the check back to an Outstanding status. |
|
VC Void Cancel |
If a check was marked as cleared and the reconciliation session was already ended with End (F7), use this operation to change the check back to an Outstanding status. If this was an accounts payable check ONLY, you may check the Generate Reversing A/P J/E flag. A journal entry that reverses the previous reversing entry will be created with an ID of “VC” (void check canceled). |
|
PC Stop Payment Cancel |
If a check was marked as stop pay and the reconciliation session was already ended with End (F7), use this operation to change the check back to an Outstanding status. If this was an accounts payable check, you may check the Generate Reversing A/P J/E flag. A journal entry that reverses the previous reversing entry will be created with an ID of “PC” (stop payment canceled). |
|
SC Spoiled Cancel |
If a check was marked as spoiled and the reconciliation session was already ended with F7-End, use this operation to change the check back to an Outstanding status. |
Other Field Descriptions
|
Field Name |
Description |
|
Corporate ID |
The corporation ID (usually 01). |
|
Bank |
The bank ID on which the checks were drawn. Click the lookup button |
|
Operation |
See above. |
|
Date |
This field defaults to the current date, but can be modified as necessary. This should be the date on which the check status was changed (when the checks were reconciled). |
|
Check Number |
Use this field to enter a single check number to be reconciled, or, if the To field also appears, enter the starting check in a range of numbers. |
|
To |
(Appears only if the Process reconciliation using batch check numbers (from/to) field was set to Yes on the first Check Reconciliation screen.) Enter the ending check in a range of check numbers. The system will apply the code from the Operation field to all of the checks within this range. |
|
Amount |
(Appears if the Process reconciliation entering each check separately field was set to Yes on the first Check Reconciliation screen.) Use this field to enter the check amount as shown on your bank statement, to verify the amount against system records. If the amount matches exactly, the check will be added to the list. If the amount does not match, an error message will appear. |
|
Generate Reversing A/P J/E |
Check this flag if using any of the following Operation codes: Void, Void Cancel, Stop Payment or Stop Payment Cancel. This instructs the system to generate a journal entry which reverses the debit and credit entries produced by the original check. This should be used ONLY on an accounts payable smart check which was printed using the Print CU Checks feature (Tool 639). Using this for a member check will throw the Change Fund G/L out of balance. IMPORTANT: This process generates the J/E; it does not actually post it. You must use the Create/Post Journal Entries feature to post any journal entries generated during this session. This option is not used when marking a check as cleared (reconciled) or spoiled, because the G/L is not affected by that status change. |
|
Corp
ID |
These columns show all of the details for checks already entered, including whether or not a journal entry will be generated. HINT: If all of the checks you have entered do not seem to appear in this list, try using the Home key or the Page Up/Page Down keys to redisplay the entire list. |
|
C- Reconciled Total |
This field shows a total of all checks marked as cleared during this session. |
|
V- Void Total |
This field shows a total of all checks marked as void during this session. |
|
P- Stop Payment Total |
This field shows a total of all checks marked as stop pay during this session. |
|
S- Spoiled/Ruined Total |
This field shows a total of all checks marked as spoiled during this session. However, since you should use this screen only to spoil a check which has not yet been printed (such as if you spilled coffee on a batch of pre-numbered checks), this should be zero. To spoil a check that was actually printed, use the Reprint CU Checks feature. |
Buttons
|
Button |
Description |
|
Search Company/Check (F1) |
If your credit union has multiple corporations, use this in conjunction with the Corporate ID field to display checks for a specific company. Enter the company number and press F1 to scroll to checks for that company. |
|
Check Inquiry (F2) |
Use this to display the Check Disbursement Inquiry screens to look up a check number or amount. |
|
Generate J/E (F7) |
When all checks have been entered with the appropriate operation codes, use this to record all changes and generate any journal entries as requested. (Only those items with a “Y” in the Reversing A/P J/E column will generate a journal entry.)
NOTE: The system will automatically generate a copy of the General Journal Reports (both detail and summary) showing the changes made to the G/L, if any, during this session. |
Report Samples
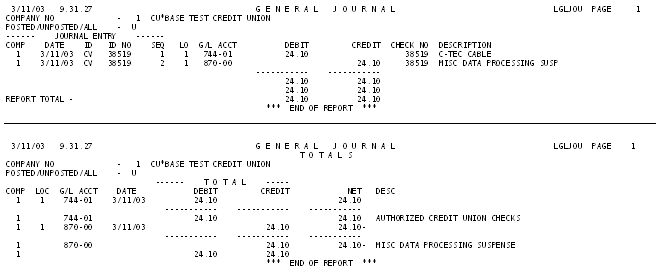
These General Journal reports will print automatically if any journal entries were generated during the check reconciliation procedure.


 to see a list of your credit union's configured
bank IDs.