Loan Application - Employment
| Screen ID: | UHLCINFO-02 | 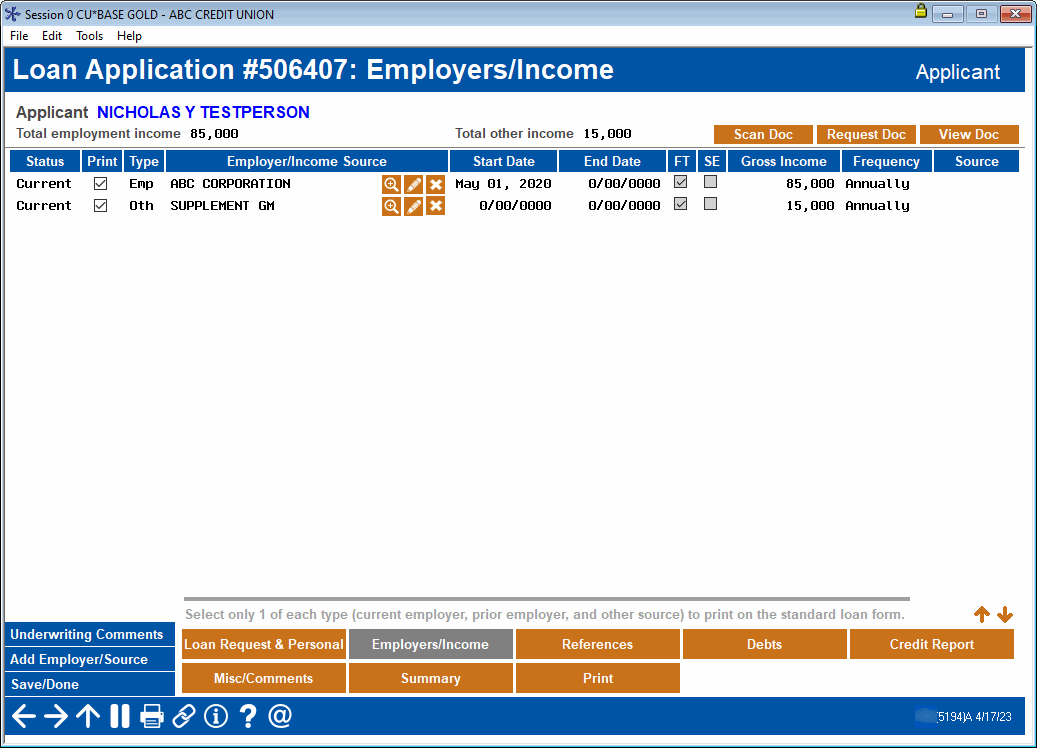
|
| Screen Title: |
Employment/Income |
|
| Panel ID: | 5194a | |
| Tool Number: | Multiple | |
| Click here to magnify |
Access this screen by selecting Employer/Income on the loan application screens.
Integration between the core and Your Imaging Solution 
This screen has a link to your imaging solution to further integrate with CBX. The “Scan Doc” button is used for scanning a document into your imaging solution. View e-Document is for retrieving images from your imaging solution. Request e-Document is for sending an email request to a member with instructions to securely upload a document or other image to your imaging solution.
-
Remember: Only documents warranted by the CU*Spy online vault can be scanned into that vault.
-
Clients with in-house imaging solutions should contact Imaging Solutions for assistance configuring links for use with your vault.
SEE ALSO:
How Loan Applications Work with the Household Database
A similar screen will appear when maintaining household information, after using the Change option on the Household Members screen.
Use this screen to view and add unlimited employment and income information in a loan application all on one screen! This allows you to record and view a historical listing of all employment and income sources for a member. If you are using the loan application version of this screen, press Enter or use Toggle Co-Applicant to view and enter co-applicant details. The right hand corner will indicate if you are looking at the applicant or co-applicant screen.
Use Add Employer/Source to add additional employment and income sources or edit existing ones. You can categorize each entry according to the type of income (employment or other), the status of the income (current or previous), and whether this source should print on forms and reports.
-
NOTE: You may only select one of each type (current employer, prior employer and other) to print on the standard loan application.
-
NOTE: Information on this screen may come form the Employer Record screen that is accessed during new member creation.
To view, update or delete an existing record, use the icons in the middle of the screen under the Employer column.
On this screen, you can check one current, one previous, and one other income record to appear on printed loan forms, where specific records are recorded. (All current income and employment records will be included in summary totals.)
-
If employment or other income is reported via an online banking application or indirect lending channel, CBX accepts this as the current employment and other income and uses this for reporting to the credit bureau and for the automated approval process. When a lending officer enter the Employment screen through the application process, the lender will be presented with the option to overwrite the existing records with these newly reported ones. If this is selected, CBX will delete all existing current employment and income records (“C” records) and replace them with the newly received ones. To view the original records, simply open a second session and refer to the Household employment screen.
When ready, use Enter to save and proceed to the next screen, or use any of the tabs at the bottom of the screen to proceed directly to the desired area of the application.
Use Add Employer/Source to move to an add/update screen to add additional income or employment sources. You can also access this screen via the Inquiry and Update buttons next to the employer name.
-
IMPORTANT NOTE: Do not use the up button if you wish to save changes on this screen. In fact, using up on any of the application screens will actually clear any data from that screen without saving it from the household database. Using the back button, however, will save changes made to the screen. It is recommended, however, that you use Save/Done to exit this screen after making changes to it.
Field Descriptions
|
Field Name |
Description |
|
Status |
Indicates whether this is a current or prior employment or income. |
|
|
You may only select one of each employment income source (current, prior, or other) to print on specific loan forms that have space for detail. All current employment and other income sources will be included in the summary information. |
|
Type |
Employment or Other |
|
Employer |
The name of the employer or other income. |
|
Start Date |
The start date of the employment or income. |
|
End Date |
The end date of the employment or income. All 00's if still employed or receiving income. |
|
FT |
The individual is employed full time at this employer. |
|
Self Emp |
Indicates that the individual is self-employed. |
|
Gross Income |
The gross income as calculated from the add/update screen. Net income is calculated as eighty percent of the gross income. |
|
Frequency |
Frequency the member receives this income. |
|
Source |
This documents whether this employment record came from a system-generated source, such as an indirect dealer relationship or online banking application, allowing better analysis of the record. In these cases this column says "Online". This is blank if the employment record is manually added. |
Buttons
|
Buttons |
Description |
|
Use this to view or edit Underwriting Comments for this member. |
|
|
Use this to add additional income and employment. |
|
|
Save/Done |
Use this to exit and return to the Loan Recap or Loan App Check Results screen (if this feature is activated). Any changes made to this screen will be saved. |
|
CU*Chat |
Currently, this button will link to the store tile until the feature is deployed. After which, the button will redirect subscribers to the CU*Chat portal for this application, allowing staff to securely communicate directly with loan applicants and exchange electronic documents. |