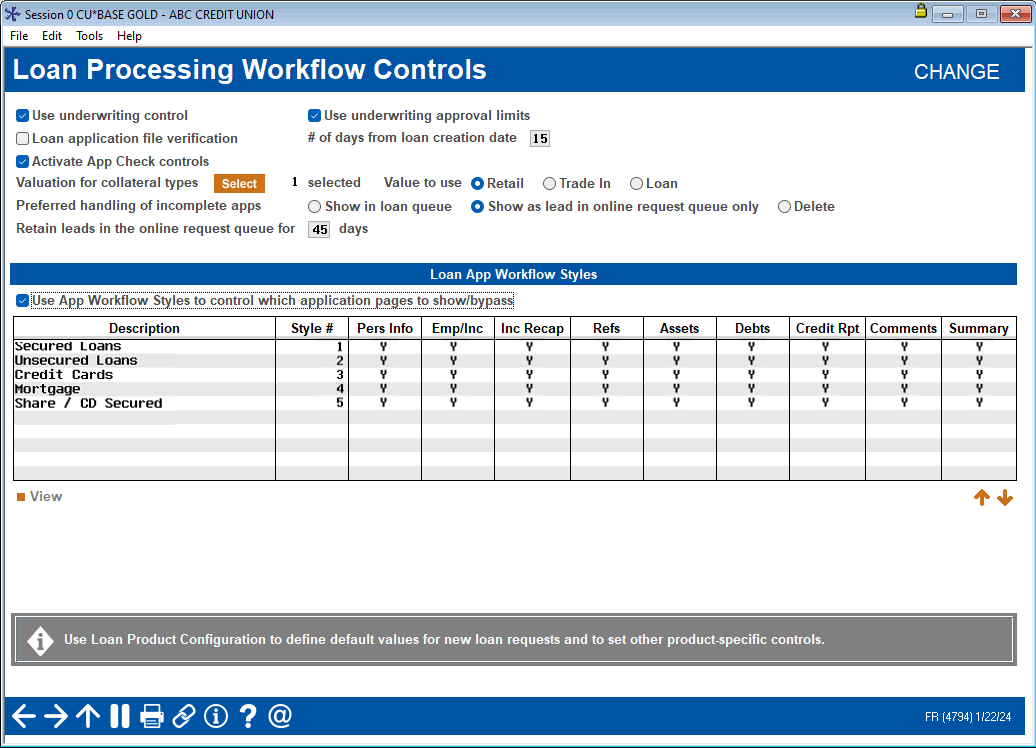
Loan Processing Workflow Controls
| Screen ID: |
ULNCTL-01 |
|
| Screen Title: |
Loan Processing Work Flow Controls |
|
| Panel ID: | 4794 | |
| Tool Number: | 475 or 954 | |
| Click here to magnify |
Access this screen by selecting Tool #475 Loan Workflow/App Check Configuration (maintenance) and Tool #954 View Loan Workflow/App Check Config (inquiry).
Field Definitions
|
Field |
Description |
|
Use underwriting control |
Check this box to enable Underwriting Control, which prevents a user from creating or denying a loan application without the proper Underwriting Code entered on the Loan Recap screen. Learn more about underwriting controls SEE ALSO: Configuring Tools for Loan Teams Changes made to this box are recorded in CUFMNT. Search for program name ULNCL. |
|
Use underwriter approval limits |
Underwriter approval limits are used to control the dollar amount (of a loan) for loan underwriting (see above). Underwriter limits are configured by category. Check this box to enable Underwriter Limits at the credit union. Learn more about Loan Underwriter Approval Limits
WARNING: If this box is checked and later unchecked, all configured underwriter limits will be deleted from the system. SEE ALSO: Configuring Tools for Loan Teams Changes made to this box are recorded in CUFMNT. Search for program name ULNCL. |
|
Loan application file verification # days from loan creation date |
Check this box if you wish to require a verification date to be recorded for all new loan accounts. This feature is used to track the paperwork associated with loan processing. Be sure to enter the number of days that should be used to calculate the verification date. The calculated date will be entered into the File verification date field on the Loan Creation screen when the loan account is created. SEE ALSO: Configuring Tools for Loan Teams Changes made to this box are recorded in CUFMNT. Search for program name ULNCL. |
|
Activate App Check controls |
Use this box to activate App Check, simply gives the application a “final check” so you can be sure your loan officer doesn't forget to get everything needed to complete the application. Learn more about App Check here. Check the box to activate this feature and press Enter to select the required items for the application on the next screen.
SEE ALSO: Configuring Tools for Loan Teams |
|
Activate automated collateral valuation |
Your credit union can implement a tight integration between CBX and the J. D. Power (formerly NADA) or Kelley Blue Book (KBB) to populate the automobile’s current value directly into the collateral record. (The election of the vendor is selected in the Operations CU Master Parameters) Learn more in the Configuring Tools for Loan Team booklet.
Check this box to activate the Automated Collateral Valuation feature. Once this box is checked, the "Valuation for collateral types" and "Valuation to use" fields will appear. Select the appropriate collateral types to apply this feature to using the multiple Select button next to the "Valuation for collateral type" field. Also select a "Valuation to use" value. Once this activation is complete, when accessing collateral on the Loan Collateral Identification screen (used in loan applications and when updating collateral on an existing loan), you will see a "Get Value" button." This allows you to populate the automobile’s current J. D. Power (formerly NADA) value directly into the collateral record. Learn more on this topic: Loan Collateral Identification screen.
|
|
Valuation for collateral types |
(Appears when "Activate automated collateral valuation" is checked.) Use the multiple Select button to reveal a screen listing collateral types with collateral definition V (vehicle). Select the collateral types you wish to use with the Automated Collateral Valuation feature explained above. |
|
Valuation to use |
(Appears when "Activate automated collateral valuation" is checked for J.D, Power only (formerly NADA.) Defaults to "Retail;" however, you may also select Trade In or Loan. (Kelley Blue Book does not show this field, since Retail is always used by default.) |
|
Preferred handling of incomplete apps |
Preferred Handling of Incomplete Online Banking Loan ApplicationsUse this to determine what tool displays incomplete applications originating in online banking (or if these applications should be immediately deleted). This allows you to give the job of following these leads up to another team. Select from the following selections:
NOTE: You must first configure a loan delivery channel for "incomplete application" for the home banking HB channel for the Delete and Show as loan leads options to work properly. Learn more about Loan Delivery Channels. NOTE: Any incomplete applications created using the new online banking credit card application (released in December 2024) will not appear in either Tool #2 or Tool #13, regardless of this field's configuration. SEE ALSO: |
|
Retain leads in the online request queue for xx days |
Enter a number up to 99 days. This is required if you select "Show as leads in online request queue only." above. This determines when the leads are purged from the queue and files. |
|
Use App Workflow Styles to control which application pages to show/bypass |
Loan App Workflow StylesUse this box to activate loan app workflow styles. This feature is configured at the bottom of this screen. SEE ALSO: Configuring Tools for Loan Teams A normal CBX loan application has 10 different screens, but not all of them are critical for every type of loan. The “Loan App Workflow Styles” controls the automatic forward momentum through the CBX Loan Application screens, bypassing pages that are not required by the particular loan product (such as skipping over the employment, income, and assets screens for a CD-secured loan).
To start using the feature, check this box and use Enter. The system-generated styles will appear as well as the Add button which allows you to configure your own styles. Learn more below. |
Loan App Workflow Styles
SEE ALSO: Configuring Tools for Loan Team
See more about feature above. To activate the feature, first check Use App Workflow Styles to control which application pages to show/bypass and use Enter.
-
NOTE: It will not affect your loan officers until these styles are attached to a loan product. This step simply allows you to create and edit the styles you will use.
Once the feature is activated, the system-generated styles will appear. Above you can see these styles. Each styles is giving a Style # and the columns indicate which screens (and corresponding buttons) are shown on the loan application. You may choose to use these default styles. You may also edit them to fit your credit union needs. Or you may create a new style using Add New.
-
The styles and Add New will not appear until you activate the feature by checking the box at the top of the screen and pressing Enter.)
To edit an existing style, select the style and use Edit. Then you can edit the selections. To add a new style use Add New.
Next you will need to associate the Loan App Workflow style to a loan product. Indicate the style on the first loan product screen.