Monitoring Member Requests from Online Banking
| Screen ID: |
PCPEND-01 |

|
| Screen Title: |
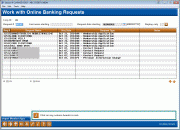
Work with Online Banking Member Requests |
|
| Tool Number: | 13 | |
| Click here to magnify |
Access this screen by selecting Tool #13 Work Online Bankg Apps/Requests (Shortcut: online).
Screen Overview
The first tab on the “Work/View Online Banking Member Requests” screen displays all of the requests that have been submitted by potential members through online banking. This screen should be checked daily for requests. To work a request, simply select a request and then Work.
The Online Loan Request button takes you to a login screen for CU Publisher, which credit unions can use to customize members' online banking experience.
Using Filters
Use the Search filters to search for a request with a specific request
#. Use the "Last name starting with" to filter the listing
to only names containing those letters. Use the "Request date
starting with" to filter for only requests from that day. To
only view a certain type of requests, use the  next
to "Display only." This will open the filter screen, where
you can select the type of request you want to work.
Working Requests
To work a request, simply select a request and then Work. You will be routed to the following screens:
-
Private Contacts
(This feature can be optional; if active, which is the default, any member can send secure Private message in online banking.). (NOTE: If you delete a Private Contact request, no Tracker record will be created; however a record will be written to CUFMAINT.) Learn more about Private Contacts. -
Personal Information Changes
(Requests will appear only if configured as “Reviewed Update” in online banking configuration.) -
Personal Internet Branch (PIB) Profile Pending Changes
(Items will appear only if you allow your members access to the PIB Profile online web tool to adjust their own Profile settings online.) -
Pending Remote Deposit Capture (RDC) enrollment requests.
-
-
(Loan leads will only appear here if configured in the Loan App Workflow Controls (Tool #475). This configuration also controls when these leads are purged.)
-
To delete a request, select the request and Delete. A confirmation screen will appear.
Importing a List of Prospective Member Names into the Pending Membership Database
Imagine being able to purchase lists of prospective members from external sources and having an easy way to import them directly into CU*BASE. Or attending a trade show and being able to jot down name and email addresses for potential new members then pull them into CU*BASE to be worked by your team.
The Import Entries button allows your credit union to easily import data into partial membership-application records. The file must contain the first name, last name, and either an email address or phone number of the prospective member in a comma-delimited file (.CSV), such as an Excel spreadsheet.
The process allows for the upload of additional information such as address, birthdate, and Social Security number. If you don’t supply a SSN, a temporary imitation one is generated during the upload process to allow a record to be made. You can even enter a “source code” during the upload to track these prospects and for further statistics.
Learn more in the "Importing a List of Prospective Member Names into the Pending Membership Database" booklet.
Non-Member Notes
You can enter notes on the non-member that will become part of the permanent record of the non-member on the next screen. If configured, the notes will also be converted to be part of the membership Tracker record should the non-member become a member. If a membership application is denied, the system-generated “Other Info/More Info” notes from the online membership screens (including the indicator that it was a MAP/MOP application) is saved to a Non-Member Note. SEE ALSO: Non-Member Notes
Additional Video Resources

|
Check out these additional video resources! |
Approving a Membership Application
Deleting a Membership Application
Denying a Membership Application
Viewing Credit Information for Membership Applications
View more member-facing online banking videos!