Loan Request Recap
| Screen ID: | PLNAPI-01 | 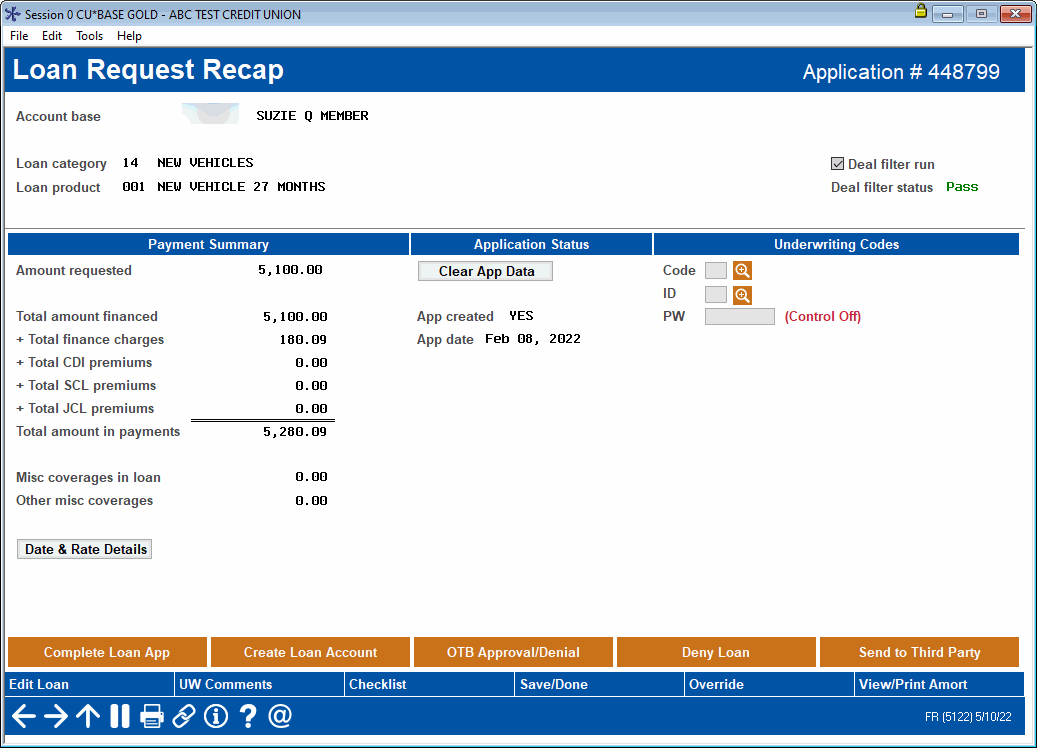
|
| Screen Title: |
Loan Request Recap |
|
| Panel ID: | 5122 | |
| Tool Number: | Multiple |
The Recap screen appears after a payment is selected on the Loan Request Payment Selection screen. It will also appear after selecting a loan request on the Loan Request Maintenance screen.
Warning: Since multiple people can be working a loan application at the same time, it is possible for updates to be overridden by another user.
Helpful Resources
Screen Overview
This screen provides a recap of the complete loan request. The system has completed the amortization calculations, providing you with accurate payment information. If necessary, you may use Edit Loan to return to the Loan Request screen, make any desired changes, and use Enter to recalculate and display a new recap.
-
If you used FUEL to pull a decision, you may wish to refresh your FUEL decision after making changes to the loan request/application. Select Review Decision/Auto Approval to access the Credit Report - Decision screen, then select Refresh Decision.
This is the final screen used in the basic loan request sequence. From here you can proceed to many different features for working with this loan, including completing the application screens, overriding loan information, approving and creating the loan, denying the loan application, and more. Think of the Recap as “command central” for working with a pending loan application.
Notice the “Application created” flag. If this reads YES, a loan application has already been started for this request. Use Complete Loan App to work with a new or existing application for this request. If a secondary loan application is also included, this loan request is using the Associated Application feature. Learn more about Associated Applications in online help and in the Associated Applications reference guide.
-
To clear the entire application (not the loan request itself, just the application screens) and start over with a new application, click Clear Application Data. This will clear all application data.
-
If Miscellaneous Coverage is amortized into the loan, a
 icon will appear
next to the coverage amount. Click this lookup icon to view the Miscellaneous
coverage on the loan.
icon will appear
next to the coverage amount. Click this lookup icon to view the Miscellaneous
coverage on the loan. -
To send a loan for approval by OpenLending, click Send to Third Party button. This requires previous setup. Refer to the OpenLending Loans reference guide.
-
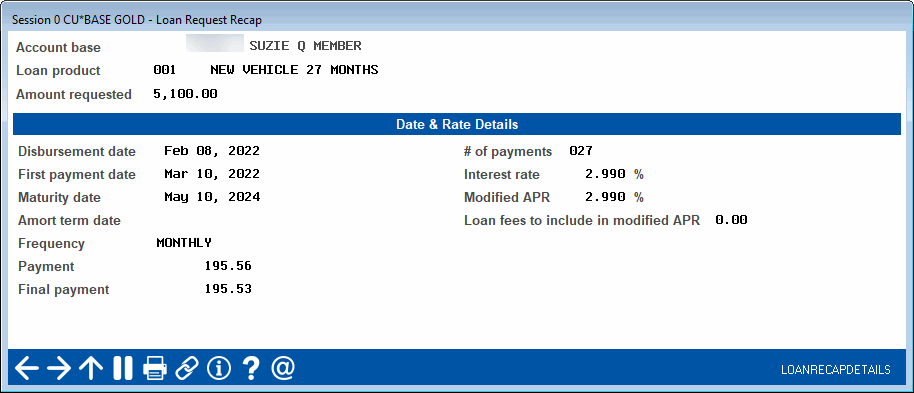
Click Date & Rate Details to view additional details about the loan.
See below for a description of other features available on this screen.
Tips
-
If an application has come in through an external delivery channel (such as Prime Alliance or Dealertrack), the Complete Loan App button will read as follows instead:

If you click the button, a warning message will appear. Remember that data entered on the application WILL overwrite any existing data in your household database, so take special care to review all application data carefully. If you want to review existing household information first, be sure to cancel when the warning message appears. Once you proceed into the application itself, data will be overwritten permanently.
-
Items with asterisks next to them on this screen have been updated on the Override screen. In these cases, the title of this screen will read “Override Performed.”
Flagging a Loan With An Underwriting Code
If your credit union uses the Underwriting Codes to track loan applications, this screen is used to flag the application with one of your configured Underwriting Codes.
Enter the 2-character code (click the lookup  to see a list of your credit union's configured codes)
as well as the underwriter’s Employee ID and password, then use Enter.
If the ID and password entered are not valid or do not have the proper
security to assign this code, an error message may appear. Otherwise,
the code description and employee name will be filled in, and if this
code is configured to send an email, the email notification will be initiated
(it may take a few moments to process). If the Underwriting Code you entered
is configured to display Comments or Notice screens, those screens will automatically appear next. (SEE
ALSO: Configuring Underwriting Codes)
to see a list of your credit union's configured codes)
as well as the underwriter’s Employee ID and password, then use Enter.
If the ID and password entered are not valid or do not have the proper
security to assign this code, an error message may appear. Otherwise,
the code description and employee name will be filled in, and if this
code is configured to send an email, the email notification will be initiated
(it may take a few moments to process). If the Underwriting Code you entered
is configured to display Comments or Notice screens, those screens will automatically appear next. (SEE
ALSO: Configuring Underwriting Codes)
-
NOTE: If the wrong code is accidentally entered, it is necessary to enter both the correct code and reenter the password. This prevents someone from changing a code without the proper authorization.
-
IMPORTANT NOTE: If this loan request originated as a loan lead (Tool #13), changing the underwriting code will remove it from this queue and move it to the LOS loan queue (Tool #2). Learn more: Loan Workflow/App Controls.
Approving a Pre-Membership Lending Request
Once a pre-membership loan request has been approved and the individual's membership eligibility verified, the loan can be created. The system will automatically display the screens necessary for opening the membership (including any membership fees normally charged), and then will proceed to create the loan account as usual.
On this Loan Recap screen, click Create Loan Account to begin the process. The membership creation screens will appear first, then the system will proceed to create the loan as it would for an existing member.
Lending Fraud Block List
A lending fraud block list scan is run against the SSN/TIN for whom the loan is being opened. If the name is on the list, the loan officer will be blocked from opening the loan for the person.
Field Descriptions
NOTE: If you are viewing the screen in the Standard size, you may need to click Date & Rate Details to view some of the data that appears on this screen. An example of this screen is shown below the main graphic above.
|
Field Name |
Description |
|
Application # |
The application number assigned to this loan application. |
|
Loan category |
The loan category indicating the type of loan. |
|
Loan product |
The loan product indicating the type of loan. |
|
Application created |
If the application screens have been started for this loan request, this will read YES. If it reads NO, the Complete Loan App feature has not yet been used to begin the application. If necessary, use the Clear App Data button to delete existing application information and start over. The loan request itself remains intact. This is helpful if a new credit report has been pulled and you wish to flood new data from that report into the debts section of the application. (Learn more about filling in debts from credit reports.)
|
|
Application date |
The date on which the original loan request was created. |
|
Amount requested |
The total amount requested by the member. |
|
Total amount financed |
The amount used to calculate the payment, including any insurance premiums. |
|
Total finance charges |
The total amount of interest charged over the life of the loan. |
|
Total CDI premiums |
Total Credit Disability Insurance premiums included in the loan. If a this coverage is selected, click the
lookup button |
|
Total
SCL premiums |
Total Single Credit Life insurance premiums included in the loan. If your credit union offers debt protection, this would show the total fee for single debt protection coverage. If a this coverage is selected, click the
lookup button |
|
Total
JCL premiums |
Total Joint Credit Life insurance premiums included in the loan. If your credit union offers debt protection, this would show the total fee for joint debt protection coverage. If a this coverage is selected, click the
lookup button |
|
Total amount in payments |
This grand total shows the entire amount to be paid over the length of the loan, including principal, interest, and insurance premiums. |
|
Dealer/Indirect ID |
The dealer name from the Dealer/Indirect ID entered on the loan request screen, if any. After the lender submits a loan request,
click Refer to the Indirect Lending: Ready to Look booklet for more information. |
|
Misc coverages in loan |
This is the total of miscellaneous coverages included in the loan amount. If a miscellaneous
coverage is selected, click the lookup button |
|
Other misc coverages |
This is a total of the miscellaneous coverage added to this loan. If a miscellaneous
coverage is selected, click the lookup button |
|
Underwriting
Codes |
These fields are used to flag this loan as either Approved or Denied using the configured Underwriting Codes. This is used as an intermediate step before actually approving and creating the loan, or denying the loan and creating a Denial Notice form. Enter the appropriate Underwriting Code,
and an authorized Employee ID and password. Click the lookup button
|
|
Deal filter run |
If this loan product is configured to run loan deal filters, this check box will appear to indicate whether the filters have been run yet or not. Remember that deal filters are run automatically whenever someone accesses the Summary page of the loan application. If they have not been run, use the Complete Loan App (or External Loan App) button, then click the Summary tab to run the deal filters and see the results. |
|
Deal filter status |
If deal filters have been run for this loan request, this will show the results (Fail, Pass, or Review). |
 to access the Counter Offer Exchange
to place a counter offer decision on the loan. After the
lender submits a loan request to your credit union, you have the
option to send a comment to the dealer by clicking this button
to access the Counteroffer Exchange. (NOTE: There is no
UW code required to initiate comments.
to access the Counter Offer Exchange
to place a counter offer decision on the loan. After the
lender submits a loan request to your credit union, you have the
option to send a comment to the dealer by clicking this button
to access the Counteroffer Exchange. (NOTE: There is no
UW code required to initiate comments.Buttons
|
Button |
Description |
|
Use this to return to the Loan Request screen to make any changes to the loan request details.
|
|
|
Use this to enter or view any Underwriting Comments recorded for this member. |
|
|
Use this to display a check list of tasks to be completed on this loan application. This is configured by your credit union and will vary depending on the loan category. |
|
|
Save/Done |
Use this to exit the loan request and return to your starting point (usually the Action Codes window, or the initial loan application processing screen). Changes made to the Underwriting Code fields on this screen will be saved. |
|
Use this to override any individual item on the loan request. This should only be used in cases where this loan will behave differently from all other loans of the same category. Changes that are made on the Override screen have an asterisk next to them on the Loan Recap screen. The title of the Loan Recap screen will also read Override Performed.
|
|
|
This will display the complete amortization schedule, which can be printed if requested by the member. |
|
|
CU*Chat |
Currently, this button will link to the store tile until the feature is deployed. After which, the button will redirect subscribers to the CU*Chat portal for this application, allowing staff to securely communicate directly with loan applicants and exchange electronic documents. |
|
Clear Application Data |
Use this when a loan application has already been started for a loan request, and you wish to erase that application and start over. The loan request itself will remain intact.
|
Loan Options
|
Option |
Description |
|
Complete Loan App |
Use this to work on the application information for this loan request, including income, assets, debts, etc. If an application has not yet been created, the Select Co-Signers screen will appear. If you are working an existing application, the first page of the application will appear instead. |
|
Use this to approve the loan request and create a loan account. If your credit union uses the application screens to process loan applications, this option should be used only after the application has been completed and approved. (To create a loan application, use Complete Loan App on this screen.)
|
|
|
This will let you approve a loan application without actually making a loan account. If the loan request was made specifically as a credit card application, not a standard loan, use this feature to mark the request as denied or approved.
|
|
|
Use this to deny the loan and generate a denial notice form.
|
|
|
Use this to review the results of your decision model.
|
|
|
Send to Third Party |
Use this to send a loan for approval by OpenLending, if configured. This requires previous setup. Refer to the OpenLending Loans booklet. Use this to send a loan to AFG calculate the residual value for vehicle balloon loans, if configured. This requires previous setup. Contact a CSR for assistance. |
 Additional Video Resources