Employee Security Maintenance Dashboard
| Screen ID: | USMAST-01 | 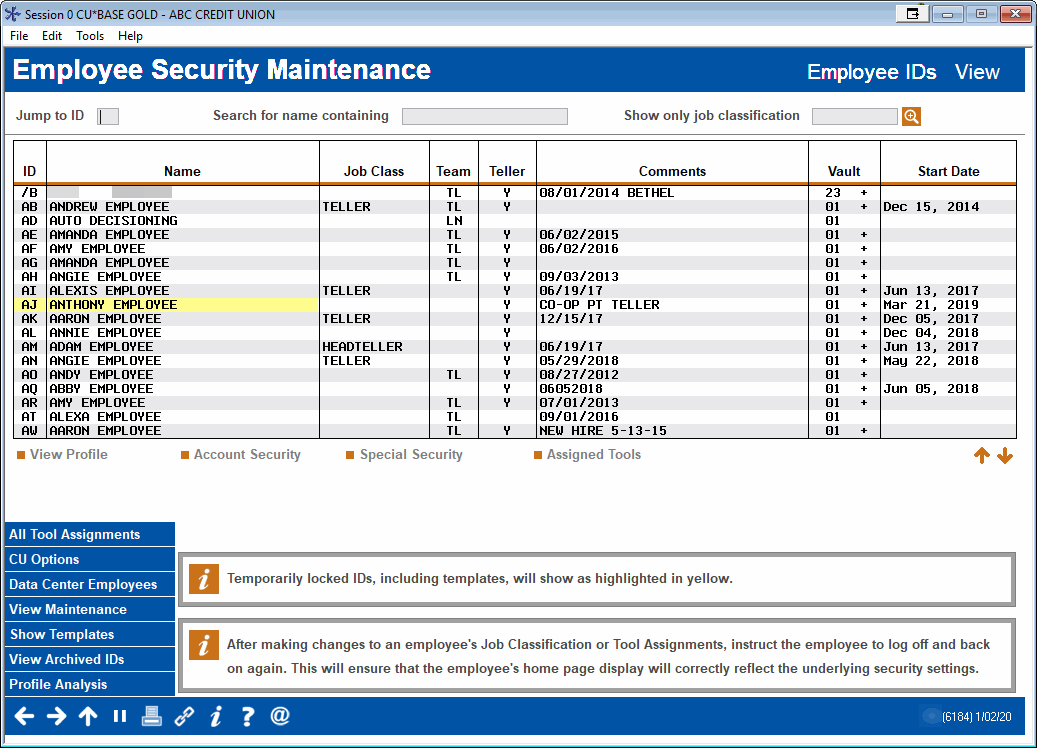
|
| Screen Title: | Employee Security Maintenance | |
| Panel ID: | 6184 | |
| Tool Number: | Multiple | |
| Click here to magnify |
Access this screen by selecting Tool #327 Employee Security (Shortcut: security) (maintenance) and Tool #951 View Employee Security Settings/Maint (inquiry).
Helpful Resources
Visit Show Me the Steps for easy instructions on assigning a tool or multiple tools to an employee
Visit Show Me the Steps for easy instructions on assigning a tool to multiple employees
Is there a way to quickly remove all the employees from a particular tool?
Is there an easy way to remove all tool assignments from an employee at the same time?
SEE ALSO: Manager's Notes - CBX Employee Security
Introduction
This is the first screen used when setting up employee security. This screen displays all of the current employee profiles and template IDs configured for your credit union. These are active employee IDs or templates only; use View Archived IDs to see IDs and final security settings for former employees that have been moved to the archive.
Reserved Employee IDs: Employee IDs 89 through 99 (including 9A-9Z) are reserved for use by internal CBX processes. Please DO NOT use these IDs for any credit union employees. Not seeing any aliased employee IDs in your list? Try using "Show Templates" - many credit unions have configured the CBX internal and support staff IDs as templates as a convenient way to isolate those "special" IDs from the standard employee IDs.
Features of This Screen
-
See all your comments and notes at a glance in the Comments column. This information is added in the Employee Profile screen.
-
Search for employee IDs by Employee ID. Enter the Employee ID in the "Jump to ID" field and use Enter. The employee will appear at the top of the list.
-
Search for an employee by name or part of name. Type a name or part of a name in the "Search for name containing" field and use Enter to filter the list to show only employees containing that text in their name.
-
Sort your list the way you by clicking on the header row. (Entering asterisks around end dates in the Comments field makes it easy to sort by this information.)
-
View the primary vault. (A plus sign next to the primary vault number indicates that additional vaults are assigned.)
-
Easily see highlighted IDs that are either locked or whose passwords are not activated for use (such as a brand new employee or an employee who hasn't logged in following a password reset).
-
Use Show Templates to toggle the display so that it shows IDs configured to act as templates for copying security settings. (This is a 3-way toggle: the button will change to read Show ALL IDs and then Show Employees, in rotation.) Template IDs are not available for actual employees and cannot be used to access any CBX tools from the home page. Template IDs will be highlighted in yellow on this screen, and are set up using a flag on the Employee Profile window.
Additional Employee Security Features
-
To change an existing profile, select the name and choose from the options listed below.
-
To add a new employee profile or template ID, use Add Employee to move to the Employee Profile window. The employee's temporary password will be x1234.
-
To change an employee or template ID's access to tools, either select the employee and "Assign Tools to This Employee" or use "All Tool Assignments" (F2). (See more below.)
-
To view a list of Data Center staff IDs, click Data Center Employees. These IDs are maintained by a CBX representative. Remember that these IDs are linked to an “alias” ID (such as 89) in your own credit union's employee security list, to control what tools and other applications these employees can access. SEE ALSO: Employee Security Audit
-
To view an online report detailing the security changes made (by a employee or to an employee), including changes to account security, tools, or special security, click View Maintenance.
-
If an employee is leaving temporarily, such as for a family leave, you can lock the ID so that it cannot be used without a password reset being performed. Select the ID and use Del/Archive/Lock, then choose the Lock ID temporarily option. Locked IDs will appear highlighted in yellow on this screen. (Template IDs are also locked, so they will appear in yellow as well.) To reinstate the ID, you must select it and use the Reset PW option (or use Tool #762 Reset Employee ID Password from the CBX home page). (The employee will not be able to change his or her own password until this reset has been done.)
-
If an employee leaves, you can retain a copy of that ID's security settings in the archive, while removing the ID from the list of currently active employees. This allows you to reuse that same ID later, if you wish, while still retaining a historical record of the employee(s) who formerly used that ID. Select the ID and use Del/Archive/Lock, then choose the Archive profile with all settings option.
-
To delete all security information permanently, select the ID and use the Del/Archive/Lock option. Click here for important tips about permanently deleting IDs.
-
NOTE: If an employee profile is archived, the Xpress Teller Limits will be deleted. Learn more here about Xpress Teller Transaction Limits. Additionally, Loan Underwriting Limits will be deleted if an employee ID is archived. Learn more about Loan Underwriting Limits.
-
Assigning Tools to Employee or Template IDs
Refer to the Helpful Resources section at the top of this topic for step by step directions.
To assign tool(s) to an employee or template ID, enter the ID in the Jump to ID field. (You may need to use the Show... button in order to display template IDs.) The ID will appear at the top of the listing. (Or use the Search for name containing feature to find the employee.) Select the employee and then Assign tools to this employee. This will take you to the employee version of the Assign Tools to Employees screen where you will assign the tools.
To assign tools to multiple IDs, use the "All Tools Assignments" to move to the credit union version of the Assign Tools to Employees screen, where you will assign the tools.
-
IMPORTANT: After making changes to the security assignments of an employee, have the employee log off and log back into CBX so that the employee's Home Page will correctly display the underlying security changes.
Self Processing credit unions interested in assigning an Operations Edition command to an employee should refer to this Operation Help topic. SEE ALSO: Employee Security Audit
Search Fields
|
Field |
Description |
|
Jump to ID |
Enter an Employee ID and use Enter. This employee will appear at the top of the listing. |
|
Search for name containing |
Enter a name in the field and use Enter. The list will be filtered to show only employee names containing this name. For example, enter "John" to return both employees John Smith and Johnny Jones. |
|
Show only job classification |
Use this to reveal a screen listing job classifications. (Job Classifications is used to group employees by job type and controls the tools they see in the Recommended Tool set on the Home Page. This is configured in the Employee Profile screen.) When you return to this screen, you will only see employees who are given this job classification. |
Options
|
Option |
Description |
|
Use this option to change the employee profile, including name, email address, start date, vault number and other general information. This is also where an ID can be set up as a template with generic security settings that can then be copied to other IDs. |
|
|
Use this option to copy the selected profile (either an employee or template ID) to another single profile or to everyone within a certain job category. You'll be able to choose whether to replace or append the settings, and can also choose whether you wish to include special security settings and/or tool assignments as well. |
|
|
Use this option to delete an ID, archive it (such as when an employee quits), or temporarily lock the ID so it cannot be used (such as during a family leave). |
|
|
Use this option to view employee profile information without changing anything. |
|
|
Use this option to change the employee's access to specific member accounts. SEE ALSO: Member/Employee Type Codes Step by Step |
|
|
Use this option to control access to special CBX tools, including teller override, unposting journal entries, viewing credit reports, etc., when they are accessed from within other CBX functions. |
|
|
Use this to give access to various CBX tools to this employee ID. |
|
|
Use this to reset an employee's password. This can be done if the employee forgets their password, but must also be done if an employee ID was locked temporarily. The employee will be required to change their password after it is reset. NOTE: This feature cannot be used on a profile that is flagged as a template.
|
Buttons
|
Button |
Description |
|
Use this to access the All Employees view of the Employee Security dashboard. Use this version of the screen to assign a tool to multiple employees, to see how many employees are assigned a tool (and who they are), and more! |
|
|
Use this to move to the Employee Profile screen where you can add a new employee. |
|
|
Use this to define your credit union's rules about password length and expiration time. Access via the Auding menu required to access this view-only screen. |
|
|
Use this to view IDs of employees of your data processing vendor who have access to your credit union files in order to provide client support services. |
|
|
Use this to view an online report detailing the security changes made (by a employee or to an employee), including changes to account security, menu security or special security. |
|
|
Show Templates/Show All IDs/Show Employees |
This is a toggle button that alternates between showing only employee IDs (the default view when the screen is first displayed), template IDs, or both. Template IDs will be highlighted in yellow on this screen, and are set up using a flag on the Employee Profile window |
|
Use this to view the archived employees dashboard showing IDs and security settings that of former employees that have been archived. |
|
|
Use this to view the Employee Profile Analysis dashboard showing graphs and statistics for all active employees. |