Teller and Member Service Workflow Controls (Teller Processing Controls)
| Screen ID: | UTELLWF-01 | 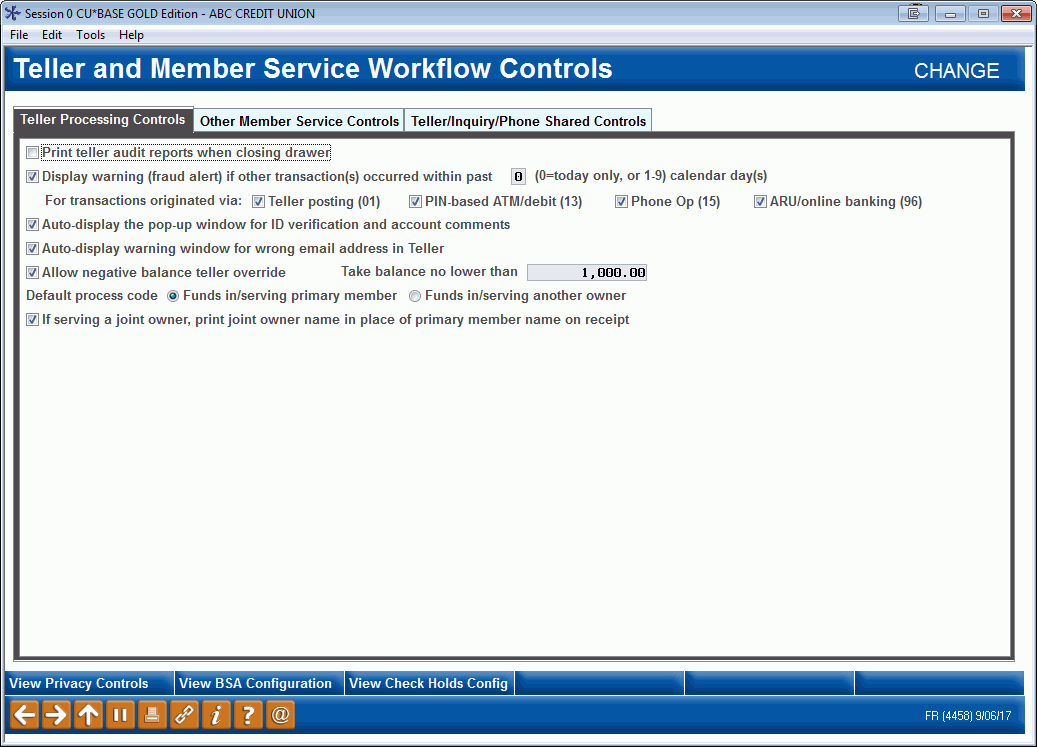
|
| Screen Title: |
Teller and Member Service Workflow Controls |
|
| Panel ID: | 4458 | |
| Tool Number: | 1005 | |
| Click here to magnify |
Access this screen by selectingTool #1005:Workflow Controls: Teller/Member Service (maintenance) or Tool #969: View Teller/Mbr Service Workflow Controls (inquiry).
Use this screen to customize the settings for your Teller and Member Service experience. Many settings exist within this tool, for example, controlling whether a teller audit report prints when the teller drawer is closed or if the teller will see alert warnings when the transactions are posted more than one time for the member in one day.
This tool consists of several screens. This screen configures teller processing controls. Use Enter save and to advance to the next screen, which configures other member service controls.
-
Refer to the additional notes below the section controls for additional matters that can affect these configuration settings.
Control
|
Control |
Description |
|
Print teller audit reports when closing drawer |
This box controls whether or not the Teller Audit Report (PTLCL2) prints whenever a teller closes his or her drawer. |
|
Display warning (fraud alert) if other transactions occurred with in the last x calendar days
For transactions originated via Teller posting (01) PIN-based ATM/debit (13) Phone Op (15) ARU/online banking (96) |
About the SARs/Fraud Alert Warning The SARs/Fraud alert warning can be configured to show if a member has transactions (for a configured time range of up to nine days and tracking specific types of transactions). It allows you to catch, for example, suspicious activity over the weekend or a holiday or when a member deposits a check at one branch then withdraws the funds at a different branch. If a member has completed any transactions through the origin codes and number of calendar days selected for transactions that hit the member’s account, but also teller drawer-only activity, the SARs/Fraud alert warning will appear immediately after entering the account number on the Account Selection Screen (the initial teller posting screen). This would provide an alert, for example, if a member attempts to deposit a check at one branch then withdraw the funds at a different branch.
How to Configure the Warning to Appear Your credit union can also select the number of calendar days to track for suspicious transactions for the SARs/Fraud alert warning to appear. Enter a zero in the last calendar days field to track only transactions only for today. Otherwise enter a number from one to nine days in this field. You also have control over which activity will be used to activate the warning window and can select from four origin code: teller (01), ARU/online banking (96), PIN-based ATM/debit (22), Phone Operator (15). This allows you to specify the scope of the warning to ensure tellers pay proper attention to the SARs/Fraud alert warning. Learn more about Origin codes Once you have set your desire settings, check the box in front of Display warning to activate the feature. |
|
Auto-display the pop-up window for ID verification and account comments |
This box controls whether or not the “Verify Member” pop-up window (which contains member ID verification details as well as Member Account Comments) will appear automatically in Teller Processing. If checked, the window will appear immediately after a member account number is entered, and the user must use the backup arrow or Enter to continue. If unchecked, staff will be required to manually access comments using a button instead. In addition to the importance of verifying a member’s identity, remember that Member Account Comments can include delinquency information, special instructions for handling a member’s account, and other important information. Disabling the pop-up window can cause employees to ignore this information when working with member accounts. This control does NOT have anything to do with the red and green “Verify My ID” or “No ID on File” buttons that link to an external photo ID image. Those are controlled by an indicator on the MASTER membership record itself. SEE ALSO: Photo ID on File Indicator |
|
Auto-display warning window for wrong email address |
This box controls whether a window will pop up warning the user when a member’s email address has been flagged as wrong while in Teller. |
|
Allow negative balance teller override |
This box controls whether or not tellers who are authorized to perform overrides are able to take a member's account below $0.
This is entirely separate from ACH Exceptions negative override. (See below for activation.) All override transactions are listed on the Transaction Override Report. |
|
Take balance no lower than |
Use this field in conjunction with the Allow negative balance teller override field to determine how far negative an override can take a member account. This field indicates a negative number. |
|
Default process code |
This allows you to select to use the Currently Servingfeature which allows front line staff to service the person standing right in front of them and to give that person access only to the correct sub-accounts. Also use this feature to print currently served information on receipts - see "if serving a joint owner, print joint owner name in place of primary name on receipt (next field).
Select from the following to control the default Process Code on the Teller Processing screen. Funds In/Serving Primary Member (F) Funds In/Serving Another Owner (S) (This Process Code is used with the Currently Serving feature.) |
Changes made via this screen are recorded and can be viewed in the online and printed File Maintenance Report.
·NOTE: Additional controls also exist that may affect teller workflow and warning messages. They include:
oLoan category configuration (allow teller disbursements, warn teller if different payment amount, allow teller to post partial payments)
oTeller check holds configuration (warn if funds not deposited to hold account, allow teller to change hold days). Use "Check Holds" (F11) to access a view-only version of this screen. Help can assist with accessing the configuration screen.
oBSA configuration (CTR alerts). Use "View BSA Config" (F1) to access a view-only version of this screen. Help can assist with accessing the configuration screen.
oTracker type configuration (display outstanding follow-ups button)
oWorkstation configuration (TCD/TCR, require member name ID, require employee ID every transaction)
oPrivacy controls (code word and out-of-wallet questions, data masking)
Buttons
|
Button |
Description |
|
Privacy Controls (F9) |
Allows you to access a view-only version of your credit union Privacy Configuration settings. |
|
View BSA Config (F10) |
Allows you to access a view-only version of your Bank Secrecy Configuration. |
|
Check Holds Config (F11) |
Allows you to access a view-only version of your Teller Check Holds Configuration. |