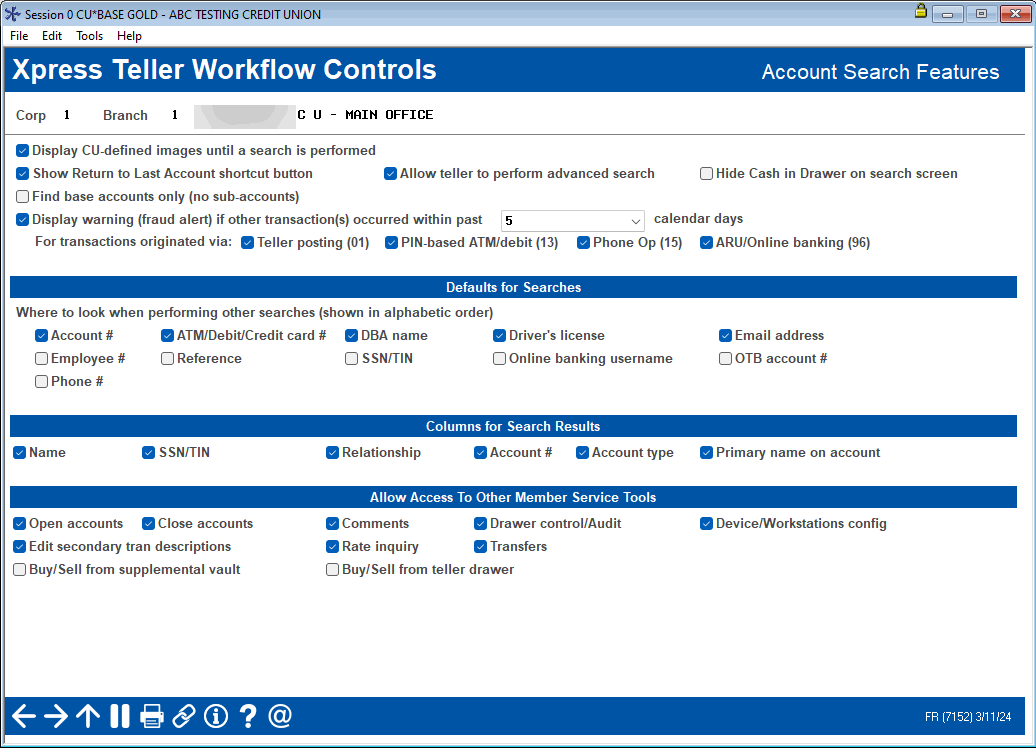
Xpress Teller Workflow Controls (Account Search Features)
| Screen ID: |
UXTLRFLW-02 |
|
| Screen Title: |
Xpress Teller Workflow Controls (Account Features) |
|
| Panel ID: |
7152 |
|
| Tool Number: | 1775 | |
| Click here to magnify |
Access this screen by entering a branch on the Add screen and using Enter, or by selecting a branch on the entry Xpress Teller Configuration listing.
Helpful Resources
Screen Overview
This is the second screen used to configure your Xpress Teller experience. It is set up by branch to allow you to have separate teller experiences at different branches.
On this screen you determine where to search and what to search on the Xpress Teller Search screen. You also configure the Member Service slider on the Xpress Teller Search screen.
-
NOTE: A Branch 01 is set up by default. This controls the settings for vertical receipts and receipt settings, for Xpress Teller and Standard Teller. All search settings default to unchecked. This of course can be changed when the actual branches for Xpress Teller are configured. Additional Xpress Teller branch configurations will need to be configured for additional branches at your credit union.
Use Enter to move to the Xpress Teller Workflow Controls ID Verification configuration screen that controls the experience on the Xpress Teller Verify ID screen.
Field Descriptions
|
Field Name |
Description |
|
Display CU-defined images until a search is performed |
Check this to show your credit union marketing images appear in the four placeholders provided. Leave unchecked if you do not wish to use this feature. Defaults to unchecked. Can I change the graphics that display in Xpress Teller? (The graphics in the middle of the screen are added/updated with CU Publisher. Learn more in the store. https://store.cuanswers.com/product/cubase-manager/) |
|
Show Return to Last Account shortcut button shortcut button |
Controls whether Last Account displays on the initial Xpress Teller Search screen, to allow the teller to quickly proceed to the ID Verification screen for the last member served (including currently served name). This button will not appear when Xpress Teller is first launched from the initial Xpress Teller Search screen Defaults to checked. |
|
Hide Cash in Drawer on search screen |
If this is checked, the "Cash in Drawer" and amount will not appear on the top of the initial Xpress Teller Search screen. This is the dollar amount of the teller cash drawer. This is especially helpful if members are shown the CBX screen. Defaults to unchecked. |
|
Allow teller to perform advanced search |
If this is checked, Advanced Search appears on the initial Xpress Teller Search screen. If access to the Advanced Search is granted, the teller can use this Search to search on all the Search fields included in Xpress Teller. All search fields will appear on this screen. If you want to control which field a teller can use to search for a membership, leave this field unchecked and the Advanced Search will be turned off. Then the tellers can only select the fields you have selected in the Look Here When Performing a Default Search (shown in alphabetical order) section below. Defaults to checked. |
|
Find base accounts only (no sub-accounts) |
If this is checked the Search screen will show only base accounts for accounts where members all have a base share 000 accounts. The sub account column is blank (so you wouldn’t see loans, IRAs, etc.). (This is designed for credit unions where if the member is on the base share account, they belong to all sub-accounts.) Defaults to unchecked. |
|
Display warning (fraud alert) if other transaction(s) occurred within past X calendar days For transactions originated via Teller posting (01) PIN-based ATM/debit (13) Phone OP (15) ARU/online banking (96) |
About the SARs/Fraud Alert Warning The SARs/Fraud alert warning can be configured to show if a member has transactions (for a configured time range of up to nine days and tracking specific types of transactions). It allows you to catch, for example, suspicious activity over the weekend or a holiday or when a member deposits a check at one branch then withdraws the funds at a different branch. If a member has completed any transactions through the origin codes and number of calendar days selected for transactions that hit the member’s account, but also teller drawer-only activity, the SARs/Fraud alert warning will appear immediately after entering the account number on the Xprress Teller Search screen (the initial teller posting screen). This would provide an alert, for example, if a member attempts to deposit a check at one branch then withdraw the funds at a different branch.
How to Configure the Warning to Appear Your credit union can also select the number of calendar days to track for suspicious transactions for the SARs/Fraud alert warning to appear. Enter a zero in the last calendar days field to track only transactions only for today. Otherwise enter a number from one to nine days in this field. You also have control over which activity will be used to activate the warning window and can select from four origin code: teller (01), ARU/online banking (96), PIN-based ATM/debit (22), Phone Operator (15). This allows you to specify the scope of the warning to ensure tellers pay proper attention to the SARs/Fraud alert warning. Learn more about Origin codes Once you have set your desire settings, check the box in front of Display warning... to activate the feature. |
|
Default setting for name searches |
This controls whether the default search will be set to Individual, Organization, or both. Users can override these settings in their personal profile preferences. |
|
Look Here When Performing a Default Search (shown in alphabetical order) |
This controls what fields the teller searches by default on the Xpress Teller Search screen. Restricting the items selected can allow for fewer results in a search. Opening this up to more items allows for a deeper initial search.
All fields default to checked (except: OTB account # should be default to unchecked). One must be checked. What is Searched? For a listing these items and the tables reviewed for each item, refer to the Xpress Teller Advanced Search topic. This also includes information on how these fields are used in related Answer Book items. NOTE: While Inquiry Search has some of the same fields, it does not follow the rules of the Xpress Teller workflow controls configured on this screen. Instead that Search automatically searches all fields provided. |
|
Columns for Search Results (use as section heading on GOLD panel) |
Controls what columns show on the Xpress Teller Search screen after a search is performed. All are set to checked by default. If a column is unchecked, that area will show as blank on the Xpress Teller Search screen. Select from the following:
|
|
Allow Access To Other Member Service Tools |
This controls what shows up in the "Additional Member Services" pop up menu on the Xpress Teller Search screen. This allows the teller to perform functions outside of the Xpress Teller platforn, including the ability to open and close accounts, make account comments, view rates and make transfers. It is highly recommended that you grant at minimum access to the drawer control audit to allow your teller to balance their drawer at the end of the day. Otherwise, they will need to use Tool #1 in Standard Teller to access their drawer. (Both teller platforms use the same drawer.)
|