Updating Non-Member Information
| Screen ID: | NPNWAC-02 | 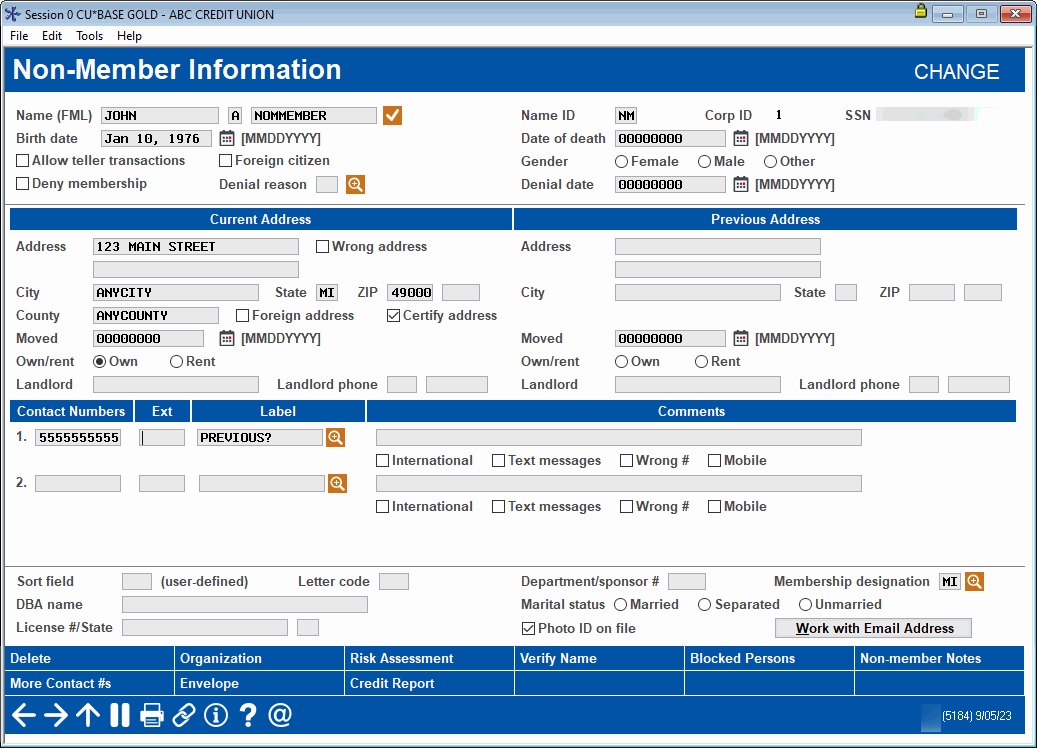
|
| Screen Title: |
Non-Member Information |
|
| Panel ID: | 6623 | |
| Tool Number: | Multiple | |
| Click here to magnify |
Access this screen by entering a SSN on the entry screen and using Enter, or click Non Member from the Non-Member Organizational Information screen. This is the Individual version of this screen.

|
Check out the video related to this topic: Updating Non-Member Information (More videos below!) |
Helpful Resources
Learn how to complete tasks related to joint owners/beneficiaries.
Learn how to cash a cashier's check or other credit union check for a non-member,
Learn how to update non-member information.
CBX Standards for Foreign Addresses
CBX Standards for Social Security Numbers
Screen Overview
This screen is used to update information about a non-member. The same screen is used regardless of the relationship this non-member has to your credit union: a joint owner or misc. owner on another membership, an applicant on a loan, a beneficiary, etc.
-
BE CAREFUL: When using this screen to update information on someone who is a joint/misc. owner or beneficiary on another membership, remember that a joint owner is simply a “link” between a membership any another member or non-member record. In other words, there isn't a separate record just for the person's joint/misc./beneficiary relationships. Changes made here WILL affect the master non-member (MSNONMBR) record for this non-member and will be seen anywhere this person is linked to another membership.
If the non-member is an organization, not an individual, use Organization to switch to an organization name format. Use Individual to enter an individual name (first, middle initial, last).
-
If you see asterisks on this screen, this is due to the privacy configuration.
Viewing Non-Member Notes and Non-Member OFAC Scans
You can enter notes on the non-member that will become part of the permanent record of the non-member. If configured, the notes will also be converted to be part of the membership Tracker record should the non-member become a member. You can also view OFAC scans run on the non-member from the non-member screen.
Use Non-Member Notes to add a note and view the OFAC scans. Learn more about Non-Member Notes
Scanning Alerts and Credit Reports
(See more on these features in the button documentation below.)
If your credit union has activated the automated OFAC Scan in your Workflow Controls, this scan will run automatically when records are created or modified.
If configured, you can run a credit report from this screen by using Credit Report The first credit report screen will appear allowing you to run the scan.
If configured, a Risk Assessment button will appear. Use this button to access the Qualifile Risk Assessment screens.
-
NOTE: This feature requires that your credit union be configured to use the QualiFile Risk Assessment interface. See the flyer QualiFile (ChexSystems) Risk Assessment Scans for more information.
Use Blocked Persons to view your new membership fraud block list for a possible match to this new member. If the Blocked Persons scan feature has been activated in your Workflow Controls, this scan will run automatically when records are created or modified.
Deleting a Non-Member Record
To completely delete a record from the non-member database, use Delete. One warning message will appear:
This record may be linked to memberships (such as joint owners or IRA beneficiaries). Continuing may cause problems with those links.
BE EXTREMELY CAREFUL when deleting a non-member record. Remember that this record may have been created as an IRA beneficiary, joint owner, loan co-signer, or for another reason. Therefore, be sure to research this individual thoroughly before deleting it. (HINT: Use Member Inquiry to look up all relationships this individual has with your credit union, by SSN/TIN.)
Field Descriptions
See also: Photo ID on File Indicator
Most fields on this screen are similar to those used for updating master membership information. (Refer to the Master screens for more information: Screen 1, Screen 2, Screen 3.) Following are fields that are unique to non-member records:
|
Field Name |
Description |
|
Deny Membership |
Check this box to prevent a membership from being opened for this person. If this exact SSN is entered when opening a new membership, the system will display an error message and prevent a membership from being opened. This box will be checked automatically if the Deny Membership feature was used in the Open Memberships process for this person (a non-member record is created in those cases and this flag checked, along with the Denial Type code and date). In addition, if your credit union activated the OFAC Scan on Account Open feature and a match was found on the OFAC list while attempting to open an account for this person, this flag is automatically checked. SEE ALSO: Using the Deny Membership Feature |
|
Denial Reason |
If
Deny membership
is checked, choose one of your credit union's configured Denial
Types to record the reason for the denial. Click the lookup
button |
|
Denial Date |
If Deny membership is checked, use this to record the date of the denial. |
|
Teller |
If your credit union offers non-member teller services, this box can be used to control whether or not this non-member has been “qualified” to receive those services. Check (allow) or uncheck ( not allow).
|
|
Sort field |
Use this field to enter any credit union-defined code (numbers or characters), which can then be helpful when performing Queries or otherwise working with your non-member database. |
|
Letter code |
Use this field to enter a code to tag member accounts for use with custom inquiries or reports, or when downloading data for mailing labels or other uses. |
 to see a list of your credit
union's configured codes.
to see a list of your credit
union's configured codes.Buttons
|
Buttons |
Description |
|
Delete |
Use this to delete this non-member record from the database. |
|
Organization |
Use this to change the non-member record from an Individual account to an Organization one. |
|
Use this to complete a Qualifile Risk Assessment. See notes above. |
|
|
Verify Name |
Use this to complete an OFAC scan. |
|
Blocked Persons |
Use this to manually run a scan of the non-member's name and SSN against your configured Blocked Persons/Fraud Alert list. (A view-only version of this screen will be accessed.) |
|
Use this to add a permanent note about the non-member and to view OFAC scans run on the non-member. SEE ALSO: Non-Member Notes |
|
|
Use this option to Add, Edit, Delete, or View additional contact numbers attached to the non-member record. |
|
|
Use this to run a credit report on the non member. |
|
|
Use this to view a Qualifile Risk Assessment if one was run for the non member. (See notes above.) |
Additional Fields on This Screen
Most fields on this screen are similar to those used for updating master membership information. Refer to the Master screens for more information. (Screen 1, Screen 2, Screen 3).
Additional Video Resources
|
|
Check out these additional video resources! |