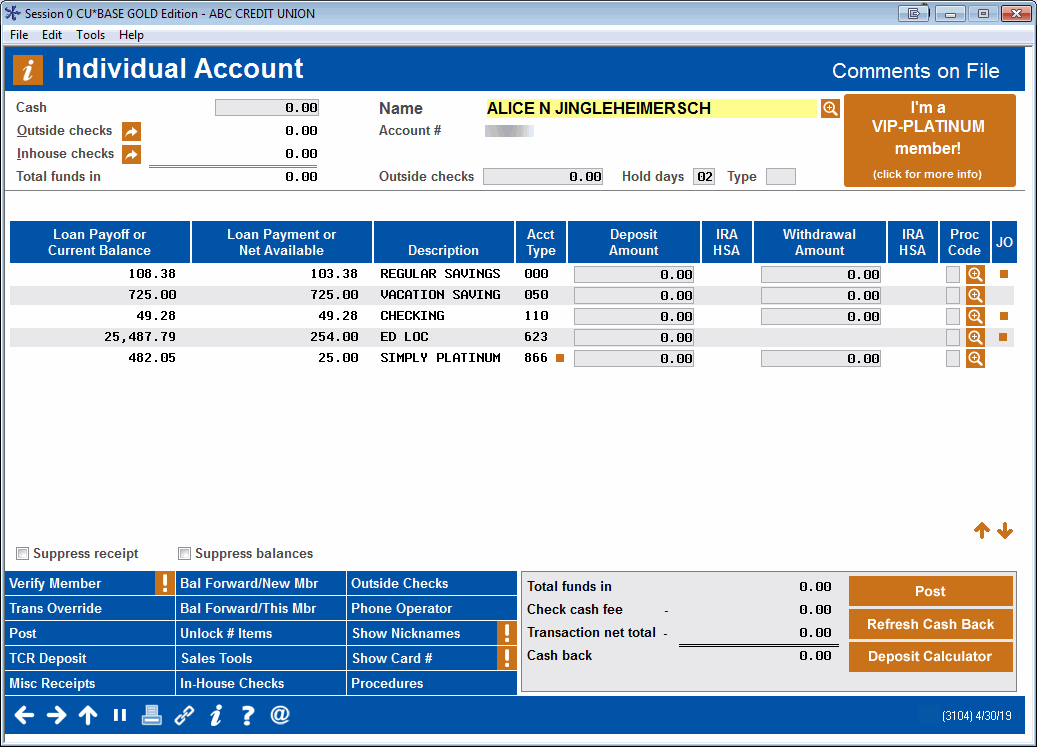
Main Teller Posting Screen
| Screen ID: |
TSBMTB-04 |
|
| Screen Title: |
(Depends of the Type of Membership) |
|
| Panel ID: | 3104 | |
| Tool Number: | 1 | |
| Click here to magnify |
Main Teller Posting Activities
This is the Main Teller Posting screen which is used to post deposits and withdrawals to a members account. It includes both funds in and member transactions on one screen. This screen enables you to post multiple withdrawals and deposits simultaneously. Whenever you use Enter, the system retrieves the Member Funds Received amount, adds the withdrawals and subtracts the deposits, and displays the difference as Cash Back.
This screen appears after the Verify Member screen in the teller posting process.

|
Check out the video related to this topic: Main Teller Posting Screen (More videos below!) |
Helpful Resources
Recognizing a Fraudulent Check
Learn how to perform teller transactions, including determining cash back.
If you see asterisks on this screen, it may be due to the Currently Serving feature – learn more
Assisting Non-Members
NOTE: If you are performing services for non-members, this screen will appear slightly different. For complete information about activating and configuring non-member teller services, as well as how to qualify non-members for teller activity, refer to the Non-Member Teller Services booklet.
Assisting a Member Other Than the Primary Member (Currently Serving)
If you use the Currently Serving feature to assist a member other than the primary on the account, an indicator (shown below) will appear above the sub account listing indicating that you are serving a member other than the primary member. If this person is not a joint owner or co-borrower on the sub account certain fields will also show as asterisks in the withdrawal field. If you assist a non-owner using Currently Serving, then all of the fields will be masked. Learn more about the Currently Serving feature.

Using the Teller Posting Screen
-
Start by entering the total amount of cash into the Cash field.
-
If any outside checks are being cashed or deposited, click the
 button to display the Outside
Checks screen. Refer to this topic for information about inputting
outside checks.
button to display the Outside
Checks screen. Refer to this topic for information about inputting
outside checks.-
Any holds placed on accounts will be taken into account to determine the available balance of the account.
-
You can also enter the dollar amount of one or more checks in the Outside Checks field. Because this can be the combined amount of two check, the configured default number of days will be used to calculate the hold. To place separate or different hold number of days use the Outside Checks screen. This can be accessed by clicking the unlock button to the left.
-
-
If any in-house checks (checks that are drawn on your own credit union against another member's account) are being cashed or deposited, click the
button
to display the In House checks screen.In-house checks are entered separately, and must include the check number, check amount, and checking account number on which the check is drawn. If an in-house check is NSF (non-sufficient funds), or if a stop payment order has been placed on it, the system will alert you. If necessary, CBX will use normal Overdraft Protection and/or ANR (Courtesy Pay) processing if appropriate. (If multiple checks are coming from the same member's account, they will be cleared in the order in which they were entered, so if you wish to process large checks before small ones, enter them in that order on the screen.)
-
If you wish to purchase a miscellaneous receipt with the cash/checks being cashed, use Misc Receipts now. Any funds not used for the Misc. Receipt will be given as cash back. (If you want to deposit funds and purchase a Misc. Receipt, use the “R” Proc. Code instead.)
-
PLEASE NOTE: Transactions with Miscellaneous Receipts cannot also include a Corporate Draft or Money Order. In this case process them in separate transactions. Additionally, the Miscellaneous Receipt must be the last screen before posting. If you back out of the Miscellaneous Receipt screen the data on the screen will be lost and you will need to re-enter it.
-
If the cash back is to be carried over to another member's base account, use Enter to verify the data, then Bal Forward/New Member. This posts the current transactions and carries the cash back sum to the next transaction for a different member. (If you need to post a second, separate transaction for this same member, use Bal Forward/This Member instead. If there is cash back, it will be brought forward as funds in for the next transaction.)
If you wish to skip the normal receipt for this transaction, check the Suppress receipt option before using Post. If you want to print a receipt as usual but keep the member's account balances from printing on the receipt, check the Suppress balances on receipt option before posting.
Using the  or using Enter on this screen
simply updates the running totals (outside checks, in-house drafts, and
total funds in). It does not post your transaction or advance you to the
next screen.
or using Enter on this screen
simply updates the running totals (outside checks, in-house drafts, and
total funds in). It does not post your transaction or advance you to the
next screen.
When finished use Enter to verify the data, then use Post).
Calculating “Cash Back”
Is your member depositing money (i.e. checks) and only want a specific
dollar amount as cash back? Use the  button to calculate the amount you need to deposit – instead of using
a calculator! Simply click the button to reveal a screen. Enter the desired
cash bar and click the calculator button. Then right
click on the deposit field where the member wants to deposit the
funds, and select “Paste to Deposit.” The correct will be entered in this
field.
button to calculate the amount you need to deposit – instead of using
a calculator! Simply click the button to reveal a screen. Enter the desired
cash bar and click the calculator button. Then right
click on the deposit field where the member wants to deposit the
funds, and select “Paste to Deposit.” The correct will be entered in this
field.
Loan Delinquency Info and the “Payment Catch Up Calculator”
Notice the blue buttons that appear to the right of loan account suffixes.
On a regular loan or LOC account, this button will display the Delinquency info window. On a credit card loan, you can also access the new Payment Catch Up Calculator screen to help a member figure out what payment needs to be made to catch up a delinquent credit card account.
Note on entering Miscellaneous Receipts
Members with Long Last Names
If you see the member's
last name highlighted in yellow, a
long last name is on file to view. Select the spyglass  to view a popup
window with the member's full last name.
to view a popup
window with the member's full last name.
Account Nicknames
Members can request special names be assigned to their individual sub-accounts. Called “Account Nicknames,” these descriptions are assigned using the Update Account Nicknames feature, and can be viewed using the Toggle Nicknames button above the Description column. Click for more information on this feature.
HINT: Did you know you can make nicknames display as the default when you first view this inquiry screen? Contact a client service representative to activate nicknames as the default. (self-processors can make this change using OPER Tool #5427 Master CU Parameter Config) This toggle key can then be used to see the standard description.
CLR Path Decision Advisor 
CLR Path (Consumer Lending on Reputation) is a free tool that lets you evaluate the strength of your relationship with a member based on data in CBX (such as length of membership and number of delinquencies), giving you tools without the need to pull (or pay for) a credit score. Get a new CLR Path score or see an existing one by clicking the following buttons: Get Advice and See Advice. If the feature is not activated, you can access the CU*Answers store to sign up. Learn more: CLR Path Decision Advisor booklet and Overview: CLR Path Decision Advisor
Making Payments to an Off Trial Balance (OTB) Account
(Available only when the member has an OTB account configured for payments via Miscellaneous Receipts.) Use OTB/Cards to access a screen listing the details of the member’s OTB accounts that are configured for payments via Miscellaneous Receipts, such as the payment amount. Then use Miscellaneous Receipts feature to make a payment to an OTB account. SEE ALSO: Tracking “Off Trial Balance” (OTB) Products.
Posting a Transaction at the Teller Line that Causes an Automated Non-Return Fee to be Charged
You can configure your Overdraft/ANR settings so that you can post a withdrawal, either with cash, check or money order, into the account's negative balance (ANR) limit. Learn more in the Automated Non-Return (ANR) processing topic and in the Automated Non-Returns booklet. A confirmation window will appear for each fee that will be charged. (Fees are charged per sub account that dips into the ANR limit and also per check/money order that dips into the ANR limit.)
Field Descriptions
These fields appear at the top and the bottom of the screen.
Click the Tiered Service badge to view the a breakdown of the Tiered Points earned by the member on the Tiered Points screen.
|
Field Name |
Description |
|
Cash |
Used to enter the total amount of cash tendered, including all bills and change. |
|
Outside checks |
Click
the |
|
Inhouse checks |
Click
the
|
|
This information appears only when fees apply for deposited items (according to your credit union policy and according to the dividend application) and when checks have been entered in the Outside Checks screen. It is a count of the checks deposited on the Outside checks screen. The quantity entered here is used in calculating any monthly fees charged by your credit union for depositing checks. This field can be made input capable by using unlock button (If you return to the Outside Checks field, these changes will be removed and will need to be readded upon re-entry to the Main Teller Posting screen.) SEE ALSO: Configuring Deposit Item Fees |
|
|
Total Funds in |
A grand total of all cash, outside checks, and inhouse checks. Use the forward arrow ( Enter) to refresh this total at any time. |
|
Outside Checks/Days |
Use this field to enter one or the combination of more than one checks without leaving this Teller Posting screen.
|
|
Type |
Enter the sub account that will be used to hold the check amount entered in the previous field. |
|
Suppress receipt |
Use this option if you do not wish to print the normal receipt for this transaction. The change will affect this transaction only. Use this when posting a transaction received in the mail, or for any other situation where a receipt is not desired. If you do this by mistake and the member does want a receipt after all, access the transaction history for this account and use the “Print receipt” feature to reprint that receipt.
|
|
Suppress balances on receipt |
Check this option if you want a receipt to print as usual, but do not want the member's account balances to be printed. The change will affect this transaction only. This is helpful when someone else is performing a deposit on the member's behalf, and you do not want this individual to be able to see account balance information for the other member. NOTE: If you are using the currently serving feature to assist a non-owner, you will need to check this box if you do not want balance information to appear on the receipt.
|
|
Total funds in |
The total amount of cash and checks. |
|
Check cashing/ negotiation fee |
If your credit union has activated check cashing fees. This field will show the calculated check “negotiation” fee to be charged to the member for this transaction. If turned off, the fee will wave when deposits are entered or the M/R option is taken. This amount is automatically charged and the fee amount is subtracted from the Total Funds In amount. |
|
Net total of transactions |
This is a running total including all of the deposits and withdrawals indicated on this screen, less the check cashing/negotiation fee (if any). As you click the forward key (Enter), this total is updated. |
|
Cash back to member |
This total takes the Total Funds In and subtracts the Check Cashing/Negotiation Fee (if any) and the Net Total of Transactions to show the amount of cash owed back to the member. This amount can also be carried forward to a different membership account using Balance Forward Member. |
 button next to Outside Checks to record
all incoming checks drawn on other banks or credit unions (except
for checks drawn on your own credit union that you are clearing
through the Inhouse checks feature). You will move to the
button next to Outside Checks to record
all incoming checks drawn on other banks or credit unions (except
for checks drawn on your own credit union that you are clearing
through the Inhouse checks feature). You will move to the Columns
|
Column Name |
Description |
|
Loan Payoff or Current Balance |
For loans, this shows the current payoff amount. For share and certificate accounts, this field shows the current balance of the account. If this information is shown in asterisks, it is because the person you are currently assisting is not associated with this account. SEE ALSO: Currently Serving |
|
Loan Payment or Net Available |
For loans, this shows the periodic payment for the loan.
For other types of accounts, this field shows the amount currently available for release.
|
|
Description |
Shows the description of the account. If a nickname is assigned to this account, it will show in this column if ShowNicknames is clicked. (Nicknames must first be activated by the credit union.) |
|
Type |
The account number suffix. |
|
Deposit (Deposit Amount and IRA) |
These two fields, Deposit Amount and IRA, are used to designate the deposit or loan payment amount for each of the listed accounts. (Some account types, such as certificates, may not allow deposits using these fields.) For IRA or HSA accounts, you are required to enter the appropriate IRA Deposit Code. Use the lookup to find the appropriate code.
5032-WARNING Pmt scheduled via Auto Funds Transfer. Use ENTER to continue. 5033-WARNING Paymt different from expected amount. Use ENTER to continue. These messages are designed to alert the teller of a possible double payment or incorrect data entry. If the payment is correct, the warnings can be bypassed and the transaction posted as needed. |
|
Deposit Amount |
Enter the deposit amount without the decimal point but include the two decimal digits. For example, a deposit in the amount of $25.50 would be entered as 2550. |
|
IRA/HSA |
For deposits to IRA or HSA accounts, use the lookup to find the appropriate IRA or HSA processing codes. |
|
Withdrawals (Withdrawal Amount and IRA) |
These two fields (Deposit Amountand IRA) are used to enter the amount of funds being withdrawn (either cash withdrawal or transfer) from a particular account type. If no funds are available for withdrawal, the fields listed below will not appear.
|
|
Withdrawal Amount |
Enter the amount without the decimal point but include the two decimal digits. For example, a withdrawal in the amount of $25.50 would be entered as 2550. If this field is absent, one reason might mean that the joint owner or co-borrower you are assisting is not associated with this account. SEE ALSO: Currently Serving |
|
IRA/HSA |
For withdrawals from IRA or HSA accounts, use the lookup to select the appropriate IRA or HSA lookup codes. |
|
Proc Code |
This
Processing Code allows you to perform various procedures, such
as transfers, miscellaneous receipts, loan payments to principal
only, or to issue checks against the member's account. Click the
look up button Click for a list of all valid Processing Codes. |
|
JO |
This column will show an indicator next to any account on which there is a joint owner, beneficiary, or additional signer record. Click the button to display the Joint Owner/Beneficiary Inquiry or Additional Signer Inquiry screen for that particular sub-account. |
Buttons
|
Button |
Description |
|
Use this to return to the Verify screen to verify member identity, to view important member comments and also to access the buttons on the right hand side of the screen for activities such as Cross Sales. |
|
|
This can be used by a head teller or other authorized user when the desired transaction cannot be performed due to a hold on the account, either based on available funds or management policy. |
|
|
Post |
Use this to post all deposit and withdrawal information to the member's account.
|
|
This will display the Miscellaneous Receipts screen. IMPORTANT: DO NOT use this if you also need to make Corporate Drafts or Money Orders. In this case you will need to process two transactions. This function key can be used to post payments to OTB accounts configured for Miscellaneous Receipt payments. SEE ALSO: Tracking “Off Trial Balance” (OTB) Products. You can also use Process Code “R” to access the miscellaneous receipts screen after entering all other transaction information.Click for details on using this code. |
|
|
Bal Forward/New Member |
Use this instead of Post to take any money shown in the Cash back field and forward it to perform a transaction on a different member’s account. |
|
Balance Forward/This Member |
Use this instead of Post when you want to post the current transaction and then return immediately to this screen perform another, separate transaction on this same member’s account. If there is any money in the Cash back field, it will be carried forward to the next transaction (although you can use this key even if there is no cash back, such as if you want to post two different transfers where no cash or incoming checks are involved). Here are two examples of when you might use this option
|
|
Unlock # items |
This is used to change the # items field, which counts the Outside checks entered. (Refer to the field definition above for more details.) This function key appears only when fees apply for deposited items (according to your credit union policy and according to the dividend application) |
|
Use this to display the Sales Tools pop-up window for access to various sales and marketing tools on the core. |
|
|
Use this to advance to the screen where you enter in house checks. |
|
|
Use this to advance to the screen where you enter outside checks. |
|
|
Phone Operator |
Use this to access the Phone Operator screen directly from the Main Teller Posting screen (after first viewing the member’s Comments screen). Once you exit Phone Operator, you will return to this Main Teller Posting screen. |
|
(Visible only when the member has an OTB account configured for payments via Miscellaneous Receipts.) Use this to access a screen listing the details of the member’s OTB accounts that are configured for payments via Miscellaneous Receipts, such as the payment amount. |
|
|
Show Nicknames |
Use this to toggle the Description column to display the nickname of the account if one is assigned. (Nicknames must first be activated by the credit union. (See above for more details on activation.) |
|
Show Card #
|
Use this to toggle the Description column to display the last few digits of the credit card number (for online credit card loan accounts on the core only). HINT: Did you know you can make the card # display as the default when you first view this inquiry screen? Contact a Client Service Rep. to activate this as the default using OPER Tool #5427 Master CU Parameter Config.) This toggle feature can then be used to see the standard description. SEE ALSO: Online Credit Card Processing User Guide |
Additional Video Resources
|
|
Check out these additional video resources! |
Learn how to post a loan payment on this screen.